
How to Enable Messages on a Freelance Marketplace
A short explanation on how to set up the HivePress Messages extension.
Learn how to create a directory website with WordPress using ChatGPT, InstaWP’s MCP server, and HivePress.
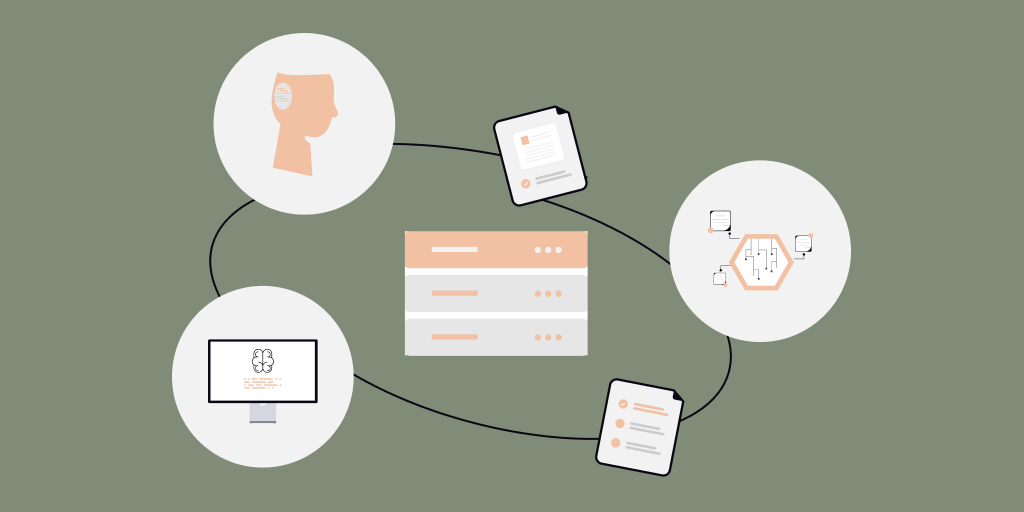
How agencies and developers build a directory website has changed a lot since the rise of modern AI models. You no longer need to do the heavy lifting across setup, installs, and repetitive configuration work.
Today, you can build a directory WordPress site with AI assistance in under a minute, and the game-changer is the WordPress MCP server. Instead of doing everything manually inside WP-admin, you can connect ChatGPT to your site and run real setup actions with prompts.
In this guide, we’ll help you learn how to create a directory website using ChatGPT.
Launching a WordPress directory site is deceptively repetitive: you do the same core setup (theme installation, plugin stack, categories, custom fields, test listings, UX checks) over and over, then tweak for niche and branding.
But when you build WordPress site with AI using ChatGPT, you’re turning ChatGPT from a “text generator” into a site operator by connecting it to your WordPress install through an MCP server. MCP (Model Context Protocol) is the bridge that lets an AI client send structured requests, which are then translated into WordPress REST API actions and executed on your site.
Here’s what that means in practice for a directory build.
You give ChatGPT real access to your WordPress site (via MCP): Instead of copying settings by hand in WP-admin, you connect an MCP server URL to ChatGPT as a connector. In InstaWP’s flow, that MCP URL includes an authentication token, so the connection is secured by a secret URL you should treat like a password.
You ask for actions, not advice: Once connected, your prompts can request actual operations such as installing plugins, activating themes, creating categories, adding custom fields, and generating test content. This is the key shift: you’re not asking “how do I do X,” you’re asking “do X on this site, then show me what changed.”
Before you start installing anything, get the foundation right. A directory site is not just “WordPress and a plugin.” You’re setting up a system that needs structured data (categories and fields), searchable filters, front-end submissions, and a workflow you can repeat across niches or client projects.
Nail these prerequisites now, and you’ll avoid painful rework later.
Directory setups involve a lot of configuration, so a fresh install avoids conflicts with old themes, leftover plugins, or random settings. Make sure you have full admin access to this so that you can install plugins/themes, adjust permalinks, and configure settings without restrictions.
We’re using InstaWP to have a fully-functional fresh instance because it gives developers a fast, disposable WordPress environment that is ideal for directory work.
You can create a site quickly, test plugin stacks safely, and iterate without setup friction. It’s also easier to standardize the same “base directory setup” across multiple builds, which matters for agencies that repeat this process.
For the “build it with ChatGPT” workflow, you need WordPress MCP turned on for the site you just created. InstaWP comes with built-in WordPress MCP server integration.
When you enable MCP in InstaWP, it automatically installs the MCP plugin and generates a secure authentication token and your MCP connection URL.
For the directory layer, we’re using HivePress because it is built specifically for directory and marketplace style sites and focuses on structured listings, custom fields (attributes), categories, and search/filter workflows.
It also has a theme and extension ecosystem that lets you start minimal and expand only when the project needs it (reviews, messaging, favorites, location/maps, claims). This keeps the directory flexible without forcing you into an all-in-one monolith on day one.
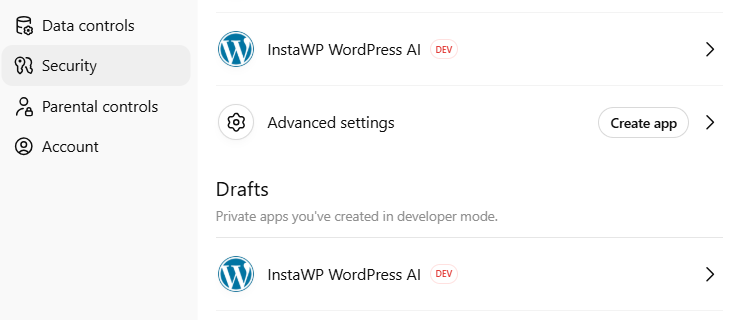
To add an MCP connector inside ChatGPT, you need Developer Mode. OpenAI describes it as the setting that enables full MCP client support.
You turn it on from ChatGPT Settings > Apps (or Apps & Connectors) > Advanced settings > Developer mode.
Optional: If you want the setup to be deterministic (and repeatable across client builds), use InstaWP Run Commands to execute WP-CLI remotely. This is useful when you want “install, activate, configure” to run the same way every time.
Once you have the basics in place, follow these steps to start creating a directory website with ChatGPT.
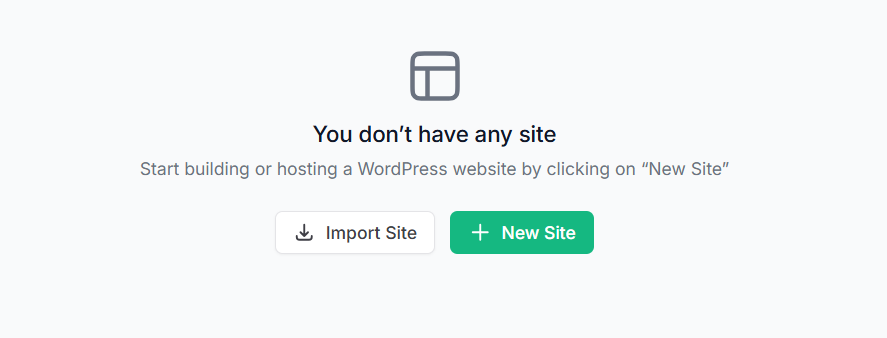
The first thing you need to build a directory website is a blank WordPress instance where you can do the development.
As mentioned above, we’re using InstaWP here as it lets you create a clean WordPress site in minutes without local setup, so you can start building right away.
In InstaWP, click Create Site and choose the From Scratch option. This gives you a fresh WordPress install with no extra plugins or themes, which is exactly what you want for a directory build.
Select the WordPress and PHP versions you want to build on. If you’re doing client work, match what you typically deploy in production so you don’t hit version surprises later.
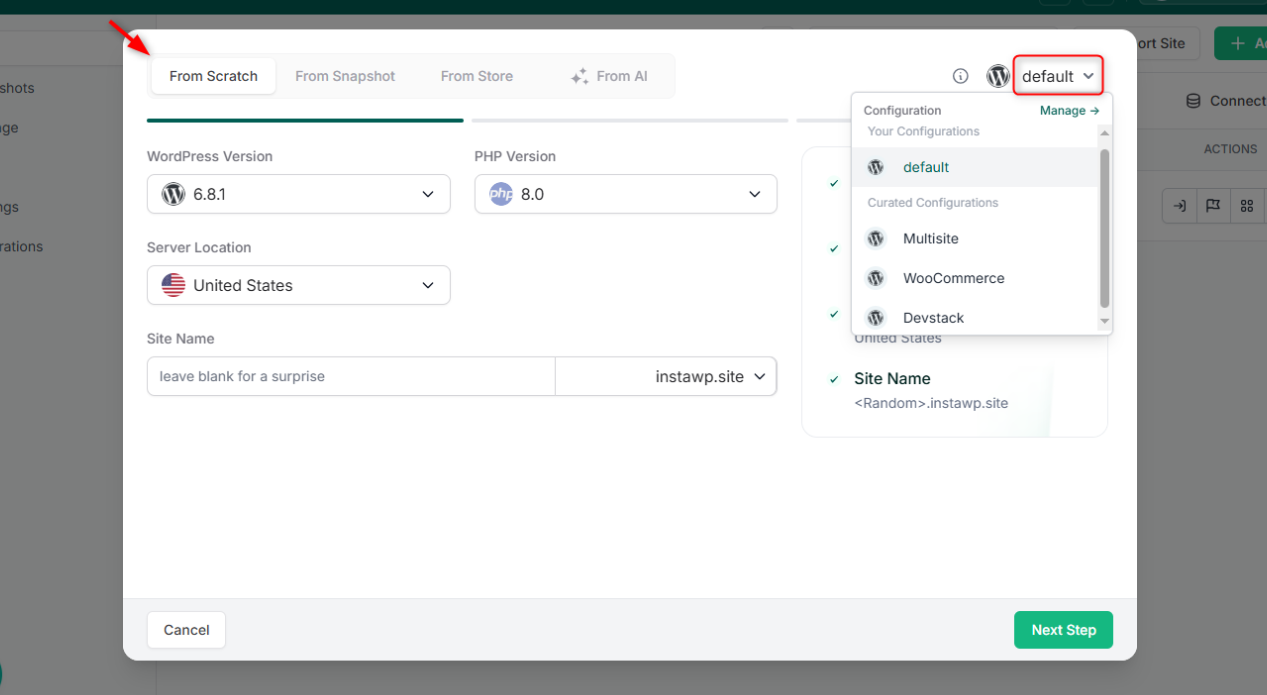
Use a name you can recognize later, for example:
This helps once you start taking snapshots or building multiple directory variations.
Select a pay-as-you-go hosting plan that fits your use case, then click Create Site.

The nice part is you can start on a low-cost staging plan, build and test your directory for as little as $0.07/day, and then upgrade the same site to a production plan when you’re ready to launch.
That way, you’re not rebuilding anything or pushing staging to live later, you’re simply scaling the environment you already developed on.
Once the site is ready, click on Magic Login to make sure you can open:
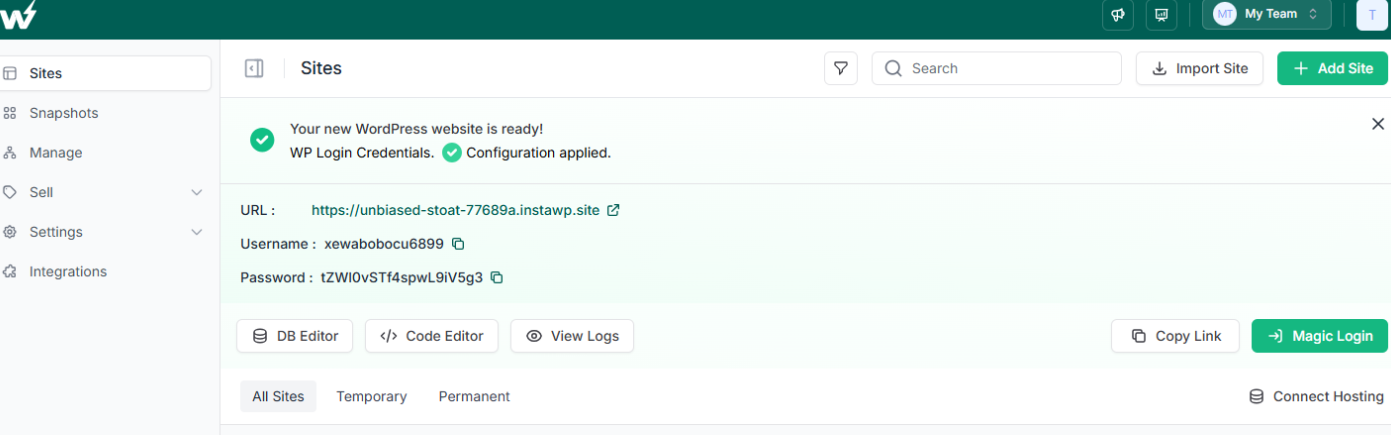
At this point, you have a clean WordPress workspace ready for the rest of the build.
Next, we’ll connect ChatGPT to this site using the WordPress MCP server so you can install HivePress and configure the directory using prompts instead of clicking through the WP-admin.
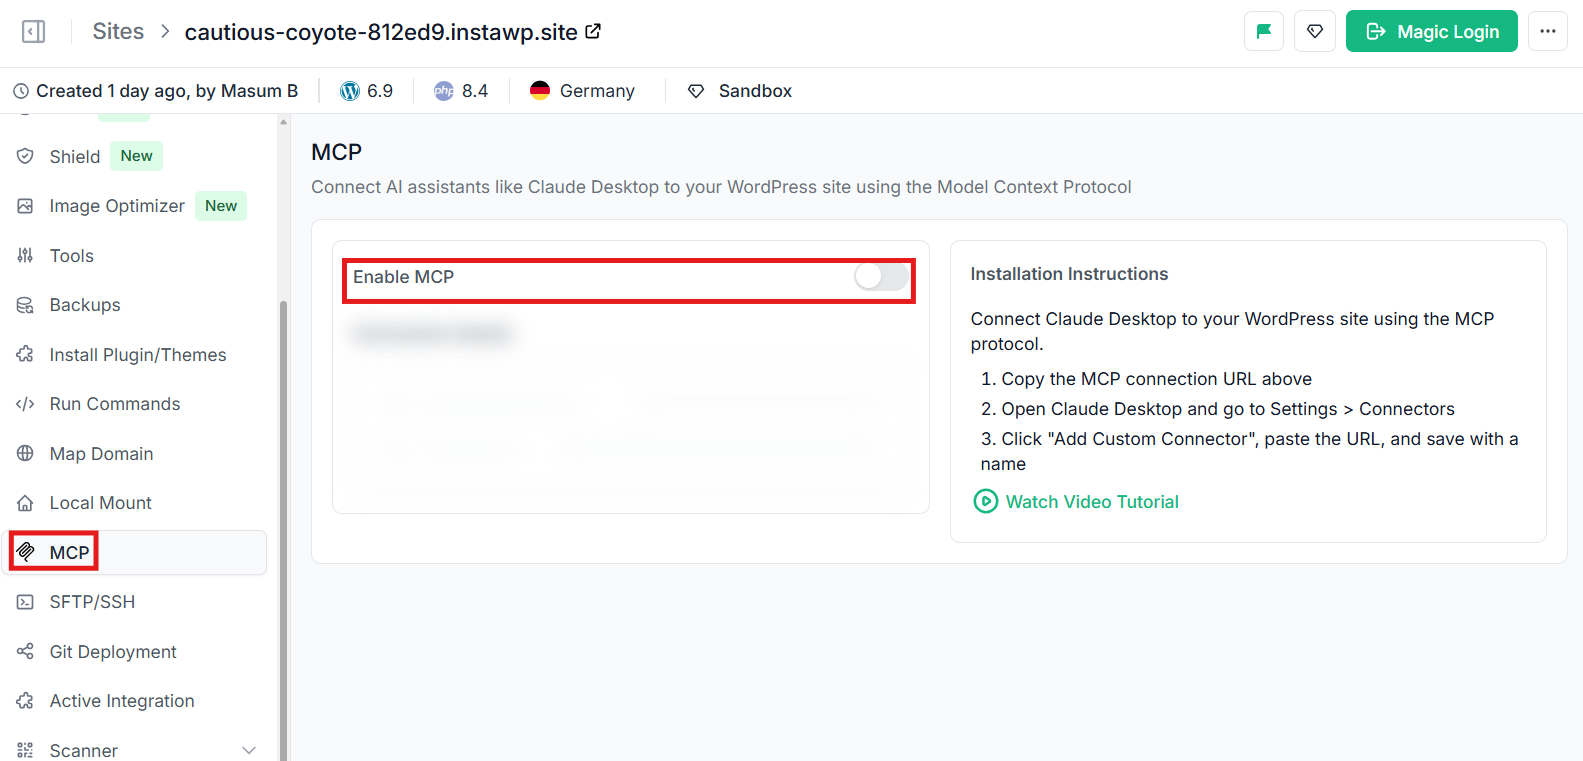
This is the part that removes “local server setup” pain. From your site’s detail page in InstaWP, open MCP and toggle Enable MCP on.
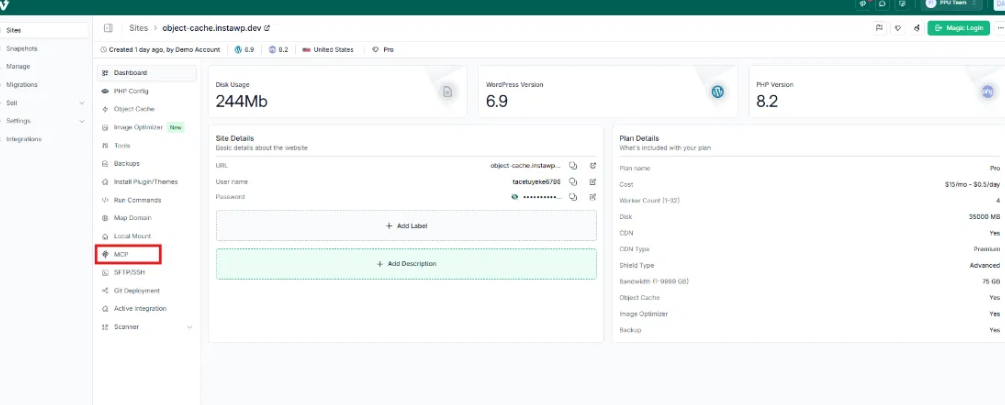
Once enabled, InstaWP automatically:
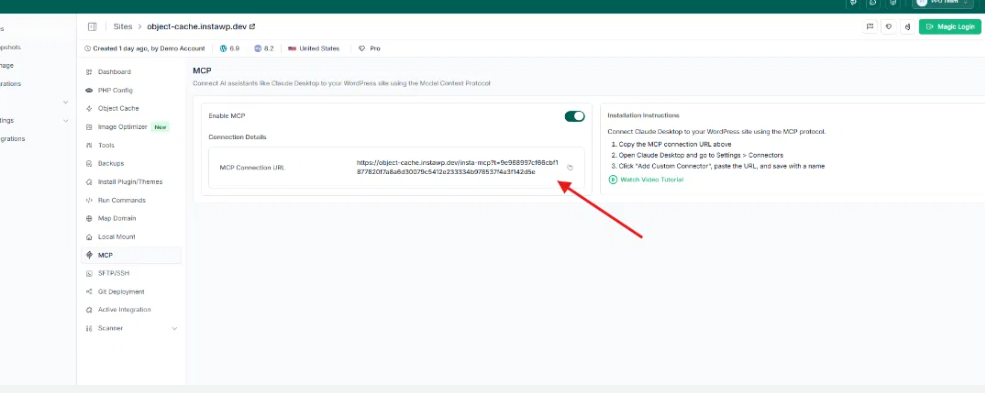
Security note (do not skip): The MCP URL contains the token, so treat it like an admin password and never paste it in public places.
Open your ChatGPT account and go to Settings > Apps & Connectors. Enable Developer Mode under Advanced Settings.
Click New App and paste your InstaWP MCP URL.
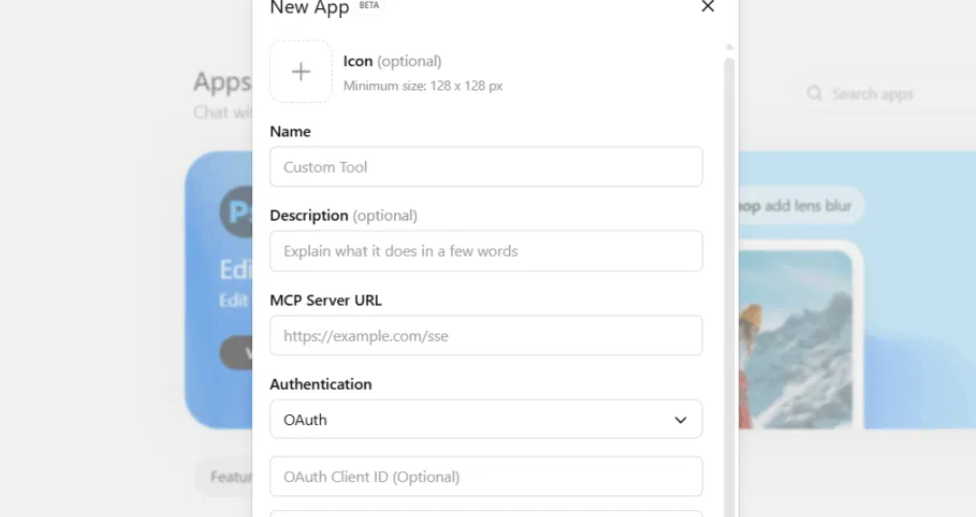
Give it a recognizable name (e.g., “My WordPress Site”). Set authentication to No authentication, the token-based authentication is already embedded in the URL, so no separate auth layer is needed.
Click Create. ChatGPT is now connected to your InstaWP site.
Test the connection with a simple prompt: “List all posts on my WordPress site.”
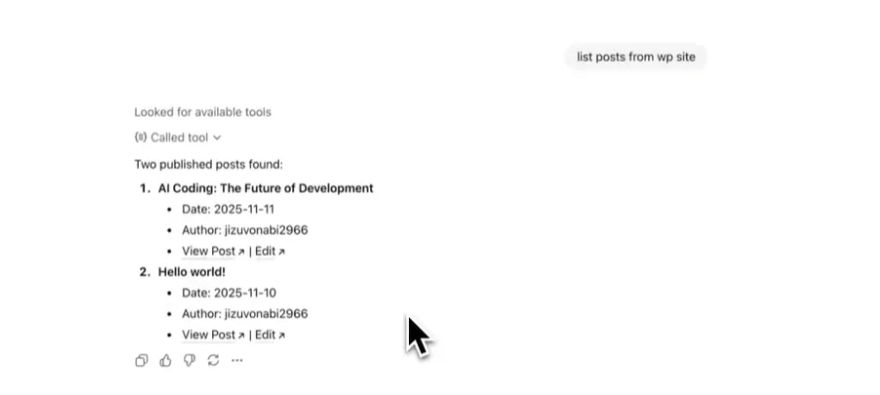
ChatGPT will ask you to confirm the action before executing it. Once you allow it, you’ll see real data pulled from your site, your actual posts, not generated guesses. You can click on the action to inspect exactly which MCP tool was called and what was returned.
From here, everything you do in the steps below happens through prompts instead of WP-admin. This is the core advantage when you build a WordPress site with AI: configuration through conversation rather than clicks.
To build a directory website with ChatGPT, you’ll need a solid directory plugin. We recommend using HivePress.
Your site is now connected to ChatGPT through the WordPress MCP servers, allowing you to execute tasks directly from ChatGPT. Make sure to select the MCP connection in the chat window before running any actions.
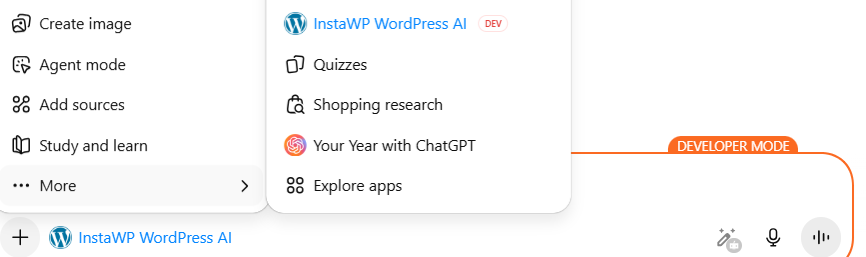
To get started, click the + icon in the chat window, go to More, and select the MCP connection.
You can then give commands directly in ChatGPT, for example: Install the HivePress plugin on my site. When prompted, allow the action so the task can run successfully.
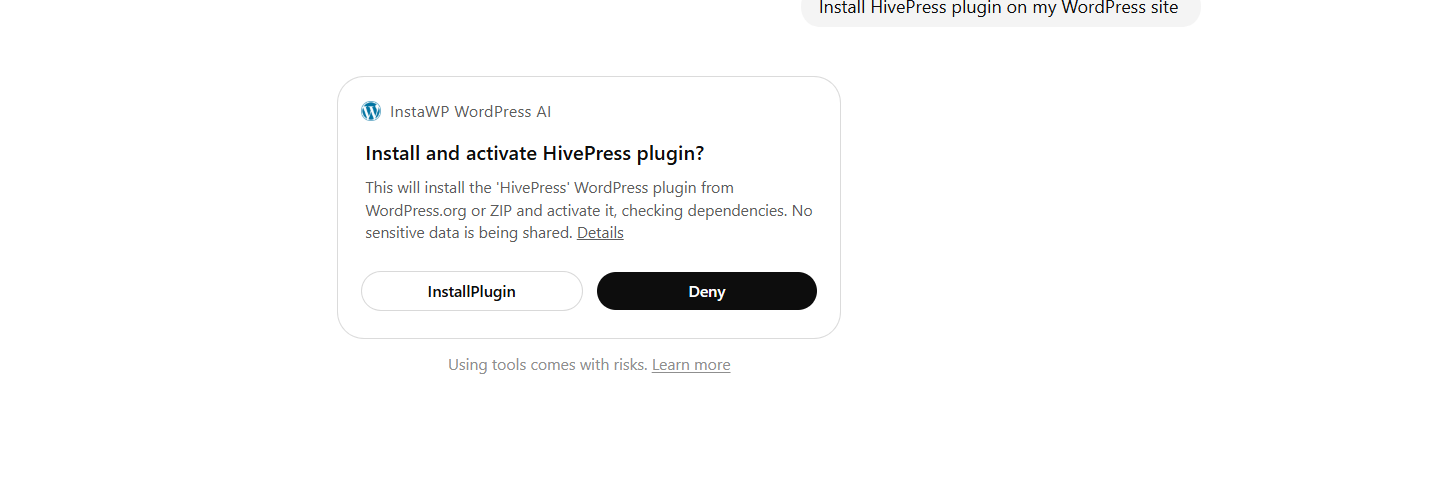
Click on Install Plugin, and the job is done.
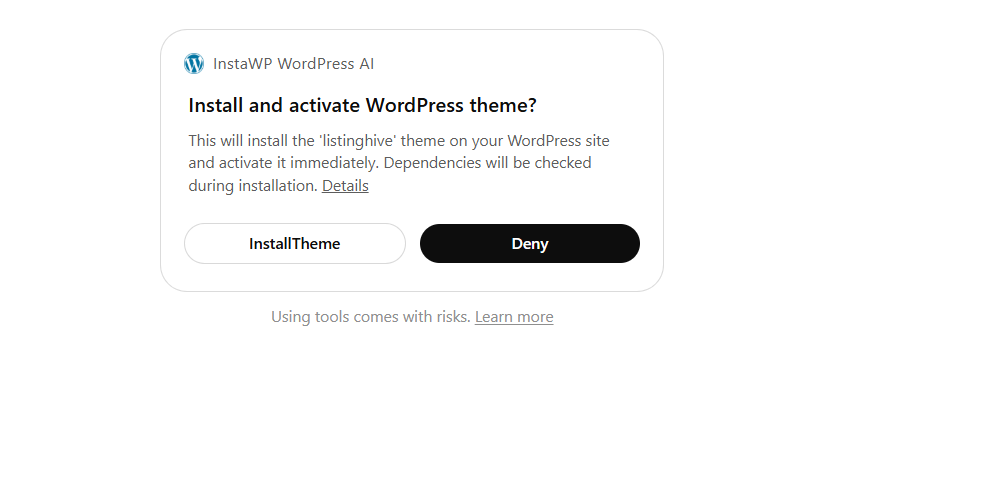
You can also install a suitable WordPress directory theme by simply entering the command in ChatGPT and approving the requested action.
We’re installing ListingHive for this guide. The theme is designed to work with HivePress’s free core plugins, which together provide directory essentials out of the box: listing templates, user dashboards, messaging, reviews, and search filters.
This is where directory sites succeed or fail. A beautiful theme means nothing if categories are disorganized, filters don’t surface the right results, or the submission flow is confusing.
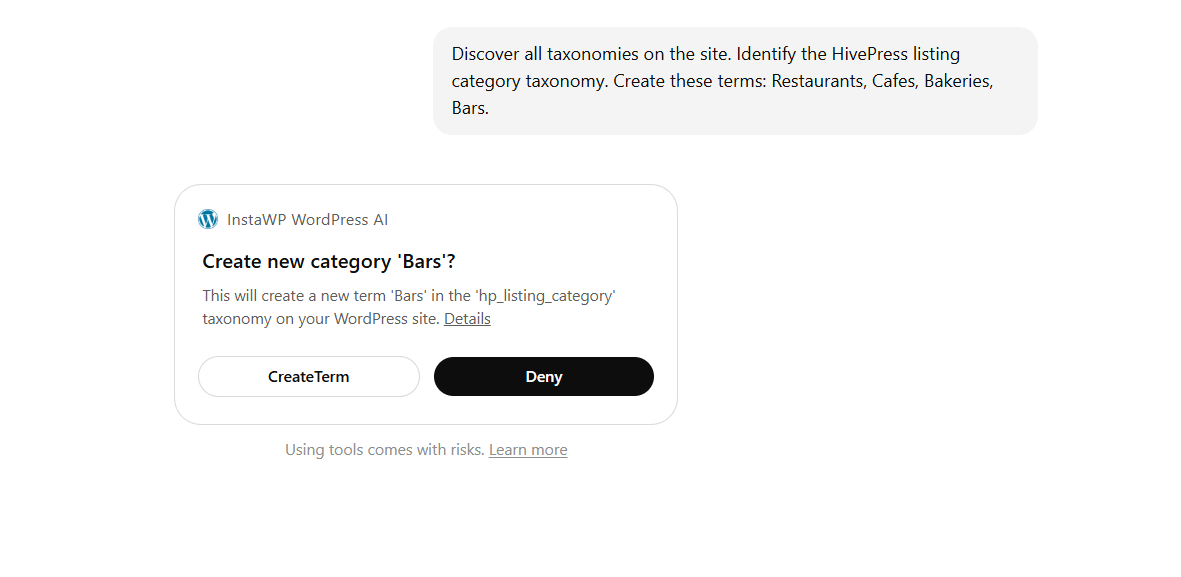
Categories define how users browse your directory and how search stays usable as listings scale. With ChatGPT + MCP, you can create taxonomy terms via prompt, ideal for templated and repeatable setups.
If you go the automation route, have ChatGPT discover the taxonomy name first. This matters because HivePress registers custom taxonomies with hp_ prefixes, so listing_category actually becomes hp_listing_category under the hood.
Give the prompt below to ChatGPT.
Prompt: “Discover all taxonomies on the site. Identify the HivePress listing category taxonomy. Create these terms: Restaurants, Cafes, Bakeries, Bars.”
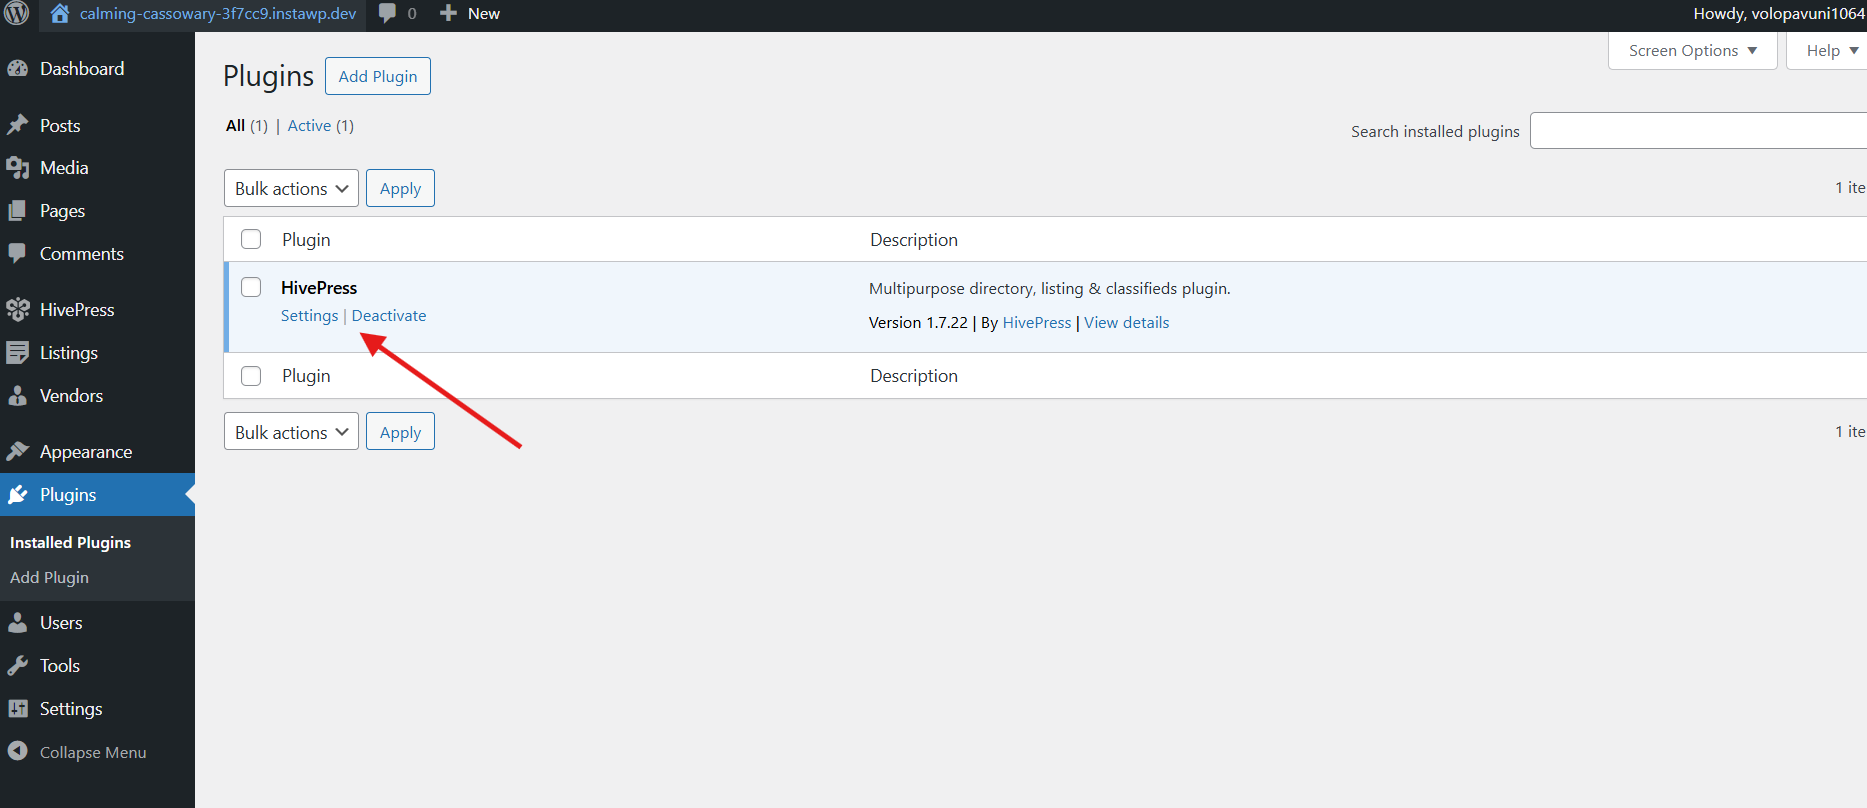
ChatGPT will create the categories.
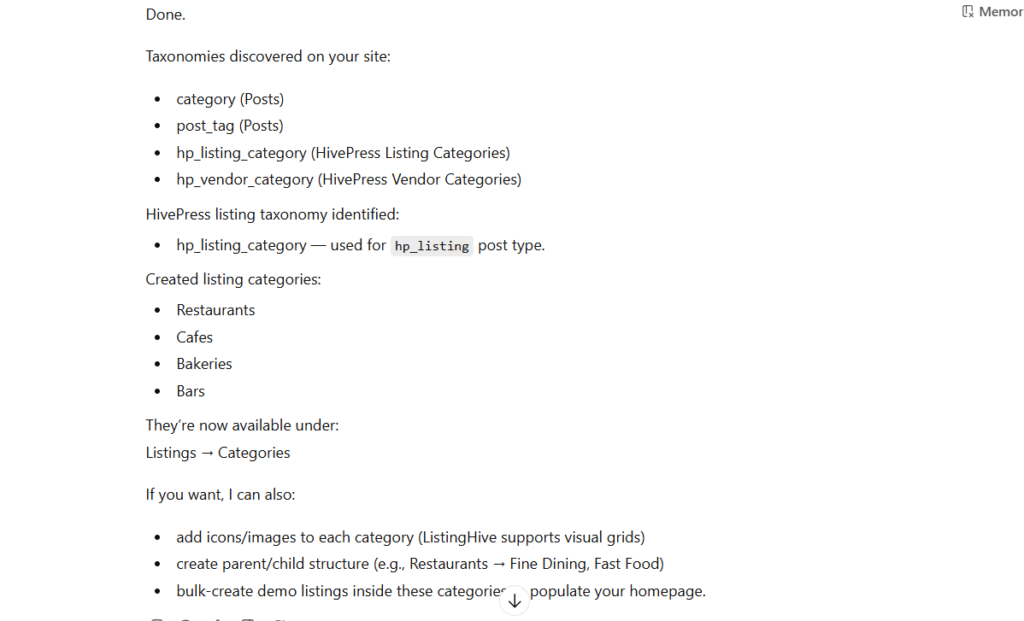
To confirm, go to the WP Admin > HivePress > Listing. You can see all those listing categories being live on your WordPress directory website.
Attributes are HivePress’s term for custom fields. You manage them under Listings > Attributes > Add New.
Each attribute can be configured across three dimensions: Editing (how it appears in the submission form), Search (filtering and sorting), and Display (where it renders on the listing page).
Here’s a recommended starting set for a local business directory:
Developer tip: Keep your filterable attributes tight. Every filter you add increases UI complexity for users and query cost on the backend. Start lean, then add filters based on actual user behavior.
ListingHive is built around two core interactions: search with filters and front-end listing submission. It supports keyword search combined with criteria-based filtering, and visitors can bookmark, rate, and review listings.
Before moving on, run through this checklist:
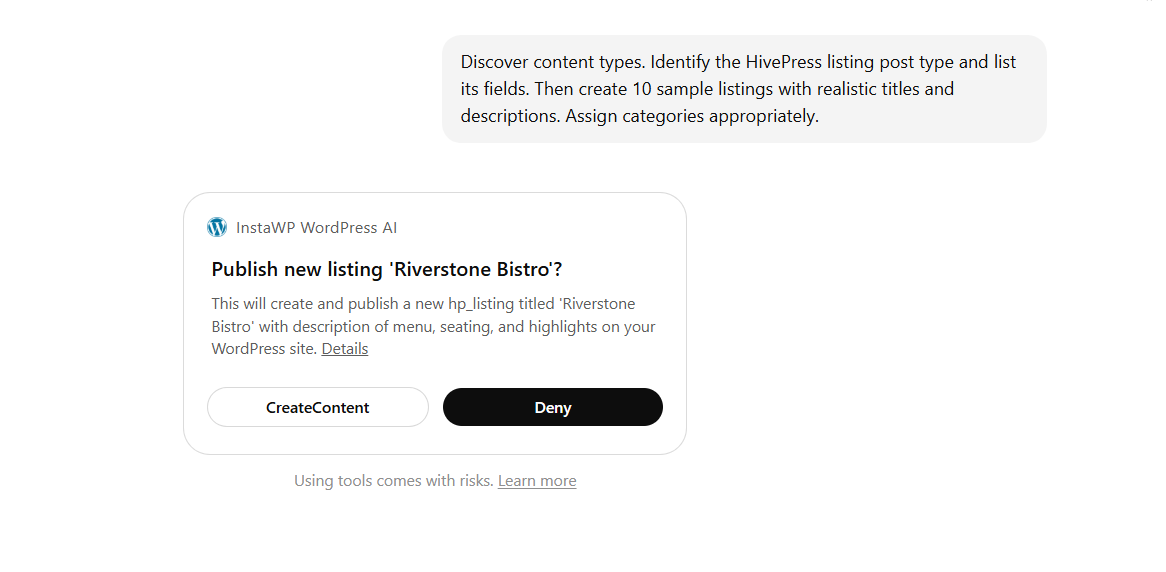
This is where the MCP connection becomes seriously practical for developers. Instead of manually creating test listings one by one, you can generate realistic seed content and run automated QA, all through prompts.
HivePress defines custom post types with hp_ prefixes (e.g., listing becomes hp_listing). Start by having ChatGPT discover the correct post type and its fields.
Prompt: “Discover content types. Identify the HivePress listing post type and list its fields. Then create 10 sample listings with realistic titles and descriptions. Assign categories appropriately.”
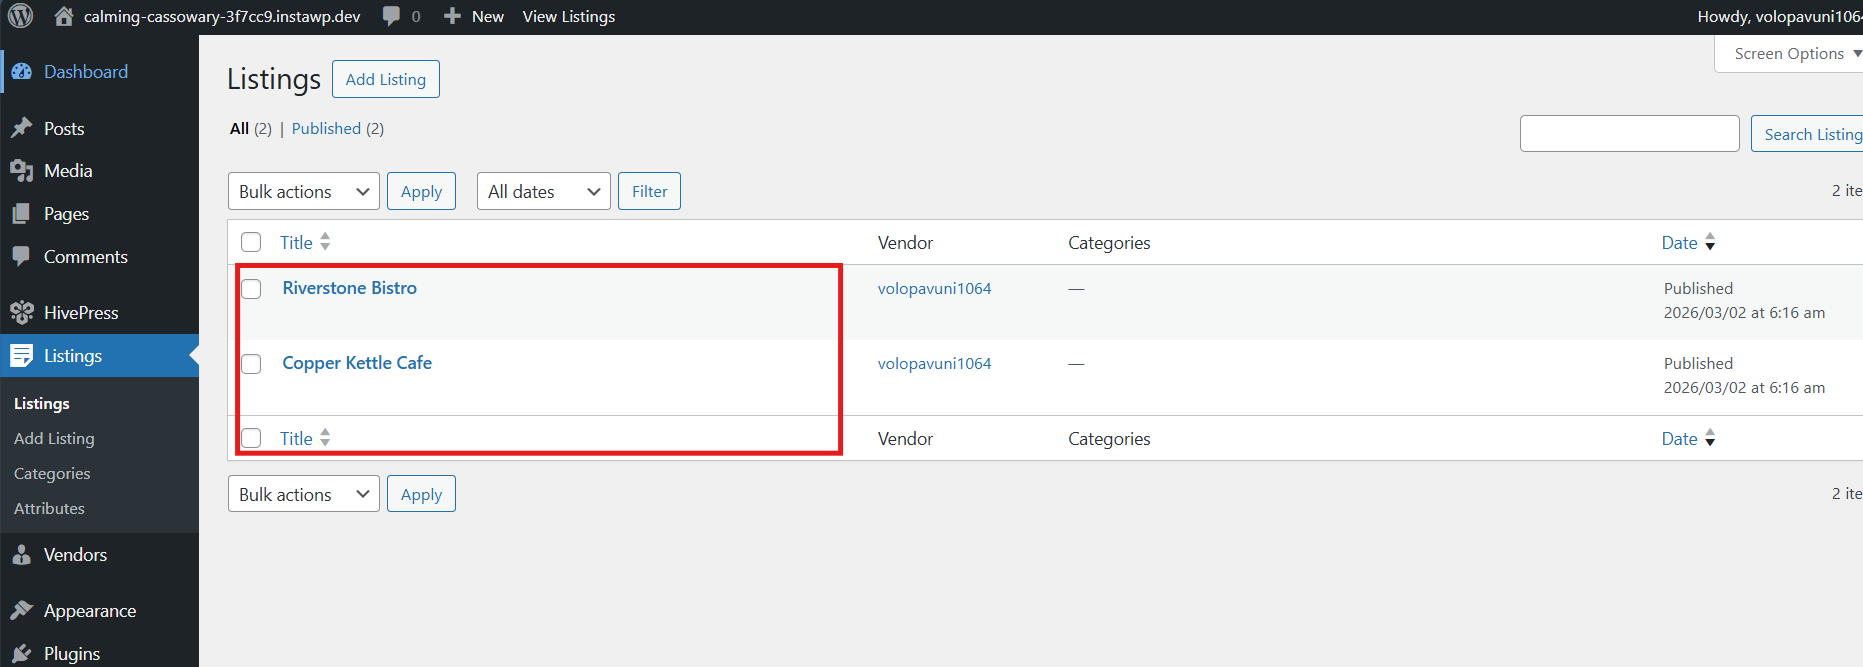
ChatGPT will create the listings and go to WP Admin to confirm the tasks.
A practical note on limitations: Attribute values are often stored as custom meta keys that your MCP connector may not expose cleanly.
If that’s the case, take a two-pass approach: use ChatGPT to create the listing titles and descriptions, then fill in attribute values manually through the HivePress UI for a few samples to verify the display and filtering work correctly.
Prompt: “QA this directory site: check permalink settings, confirm the directory homepage loads, verify listing search and filters work, and identify any missing critical pages or navigation items.”
This won’t replace a thorough manual review, but it catches obvious gaps fast, broken permalinks, missing pages, and misconfigured filters before you waste time debugging in the browser.
Once your directory MVP is working, don’t treat it as a one-off build.
Create an InstaWP Snapshot after your base setup is complete, HivePress installed, ListingHive active, core categories and attributes configured. Snapshots capture the full site state and let you restore or clone it instantly.
From that snapshot, you can:
This is how agencies turn a single directory build into a repeatable productized service.
The MCP workflow is a genuine speed multiplier for anyone looking to build a WordPress site with AI for directory projects. Create a clean WordPress site on InstaWP, enable MCP, connect it to ChatGPT, and use prompts to install HivePress, configure your directory structure, seed content, and validate the UX.
Start with one directory niche. Get the MVP working. Snapshot the base. Then reuse it across every new project instead of rebuilding from zero.
Try InstaWP for free and spin up your first directory WordPress website today.
Yes, when connected via MCP, ChatGPT can read site data, install plugins, create content, and manage settings on your WordPress instance. It’s executing real actions, not just generating text. InstaWP’s MCP integration generates the secure connection URL you need to set this up.
The connection uses a token-based URL. The token is embedded in the URL itself, which means anyone who has that URL can access your site through an AI assistant. Keep it private, treat it with the same care as an admin password.
Not all MCP configurations support direct plugin installs yet. If yours doesn’t, install HivePress through InstaWP’s dashboard using the plugin slughivepress, or run wp plugin install hivepress --activate via InstaWP’s Run Commands panel. Both methods take seconds.
HivePress calls custom fields “attributes.” You create and manage them in your WordPress dashboard under Listings > Attributes > Add New. Each attribute can be configured for editing (submission form), search (filtering and sorting), and display (listing page placement).
ListingHive is the go-to starting point. It’s designed specifically for HivePress and includes directory essentials like search filters, user dashboards, messaging, favorites, and reviews — all without requiring additional paid extensions. For more specialized needs, you can also explore HivePress’s premium themes like RentalHive, TaskHive, or ExpertHive.
Download the demo content files from HivePress, install the One Click Demo Import plugin, and run the import. If the homepage or blog page doesn’t display correctly afterward, go to Settings > Reading and manually assign the correct static homepage and blog page.
Absolutely — that’s one of the biggest advantages of this workflow. Once your base directory is configured, create an InstaWP Snapshot. You can then clone that snapshot for new niches, client demos, or staging environments without repeating any of the setup work.
A short explanation on how to set up the HivePress Messages extension.
Build & monetize your own restaurant listing website with WordPress for free.

Just a few simple steps to create your own event directory website.