
How to Create a Lawyer Appointment Website with WordPress
A short guide on how to build an appointment booking platform for lawyers.
An easy guide on how to start a WordPress salon directory website.

Finding the perfect beauty salon or spa can be challenging, especially if you live in a big city. But thankfully, salon directories can help simplify the search. In this guide, we’ll break down the steps to create and launch such a website using WordPress without any coding knowledge.
Let’s get started!
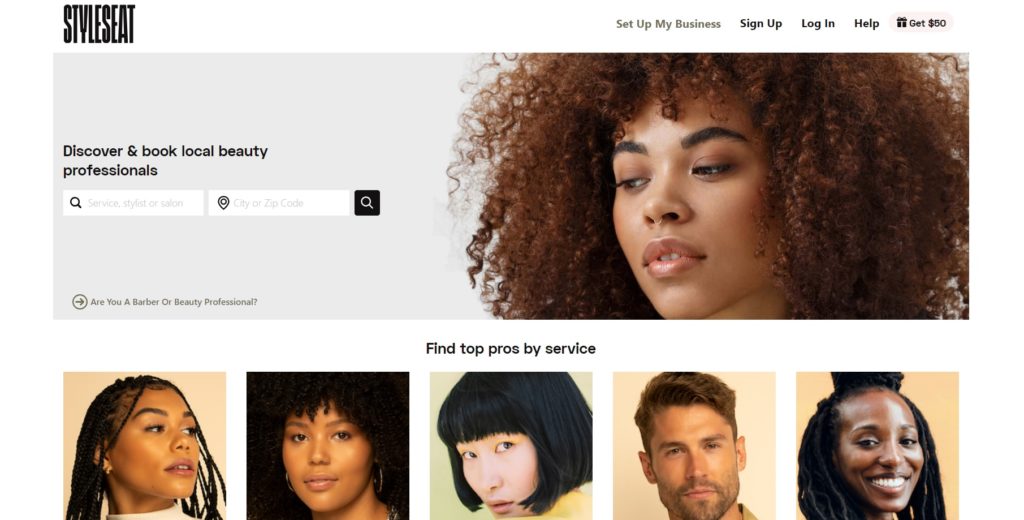
Simply put, a salon directory is a digital platform that lists various salons in a particular area, be it beauty salons, spas, barbershops, or wellness centers. It includes essential information about businesses, giving users the opportunity to read reviews, view photos, and check other details before deciding to make a visit. An excellent example of a salon directory website is StyleSeat.
Before jumping into the tutorial part, we’d like to highlight the essential elements you need to begin creating your site:
In this guide, we’ll be using ListingHive, a free and clean WordPress directory theme, on top of HivePress, a powerful multipurpose directory plugin.
Okay, let’s start by installing the ListingHive theme and the HivePress plugin.
Visit the Appearance > Themes > Add New Theme page, and type “ListingHive” in the search box. Then, install and activate it.
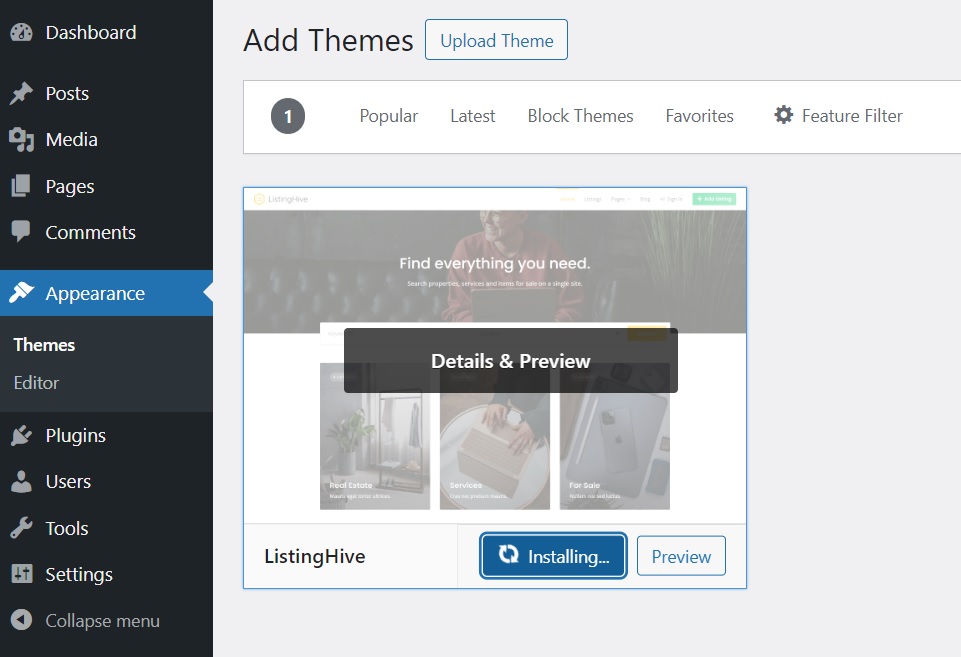
Once ListingHive is successfully installed and activated, you’ll get a message suggesting that you install HivePress, a plugin that will enhance the theme’s potential and let you take full advantage of the site’s features. Just follow the link to install and activate it.
Good, we’ve laid all the basics. Now, we can add some additional features to enhance the functionality of this WordPress salon directory. To do that, we’ll visit the HivePress > Extensions page to install some useful add-ons. There are more than 15 HivePress extensions that are fully compatible with each other, but for a salon directory, we’ll focus on these as an example:
To install an extension, simply click the Install button. After this, you need to activate it.
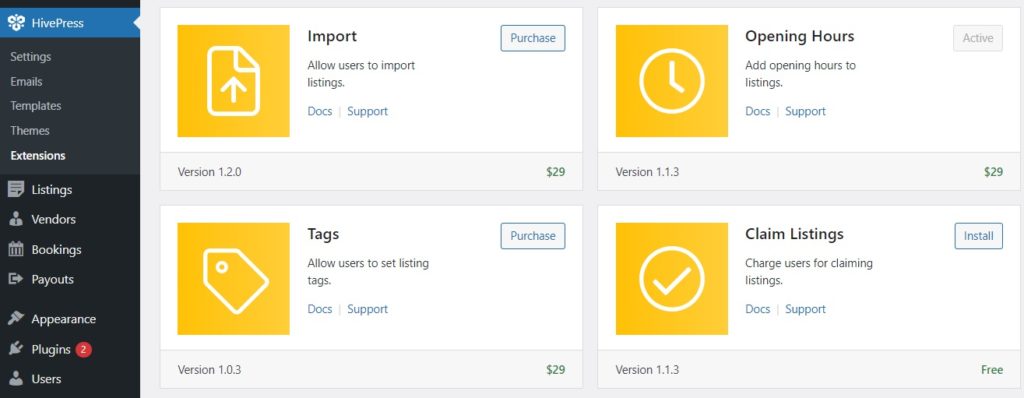
Please note that you can also install the HivePress Bookings extension if you want to allow users to book appointments and turn your website into an appointment booking platform.
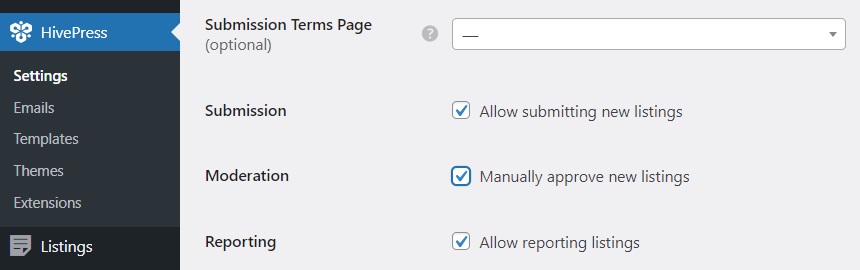
After you install any extensions, it’s advisable to go through the settings in the HivePress > Settings tab because the number of settings increases as new extensions are added. Also, there are some basic settings that we’d like to show you. Let’s start with the Listings tab and its listing submission option. If you want to be the only person who adds salon listings to your website, keep this option checked. But if you aim to create a multivendor directory where anyone can add salon listings, you should uncheck this option. Furthermore, if you’d like to approve any new submission manually, you should also check the moderation option.
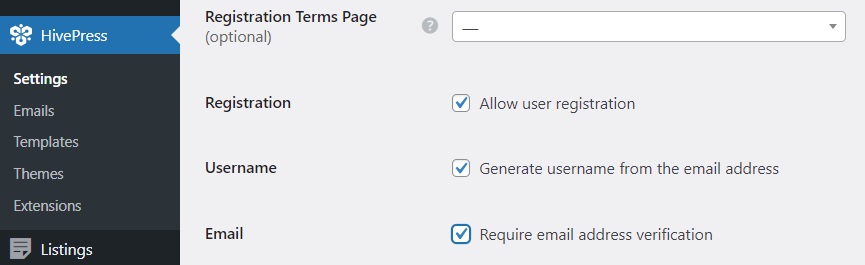
Once you reviewed all settings in the Listings tab, proceed to the Users tab. Here, you can enable email address verification to ensure all newly registered users aren’t bots.
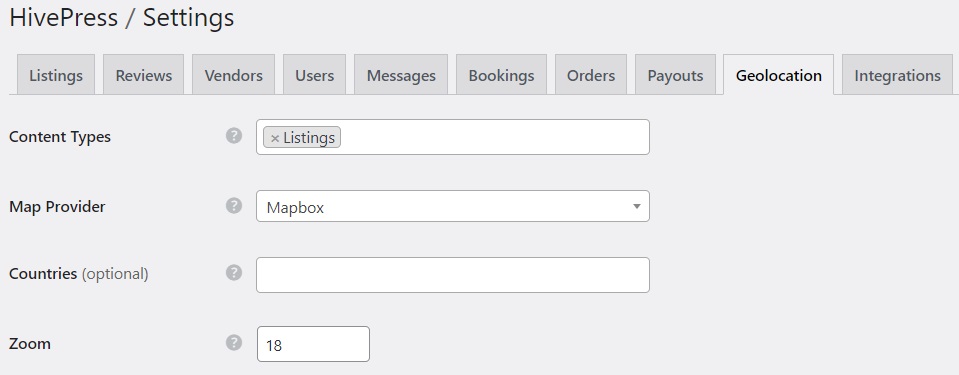
These are the basic settings. Now, if you installed the Geolocation extension before this step, you must also set it up. In the Geolocation tab, you can choose between Google Maps and Mapbox as your map provider, but we recommend using Mapbox since it’s easier to set up. Check this document for further instructions.
We showed you only a few sections, but we recommend going through all the available settings to make sure that everything is set up correctly and according to your requirements.
To get a quick overview of all the sections, feel free to check this video.
Good, all tools are present, and settings are configured. Now, we need to take the first steps towards making the directory user-friendly. Thus, let’s divide the directory into categories to make it easier to browse salon listings. To do this, go to Listings > Categories, where you can name your first category, enter a description, and upload a category image. You can also create a hierarchy by selecting a parent category, if necessary. To finish, click Add Category.
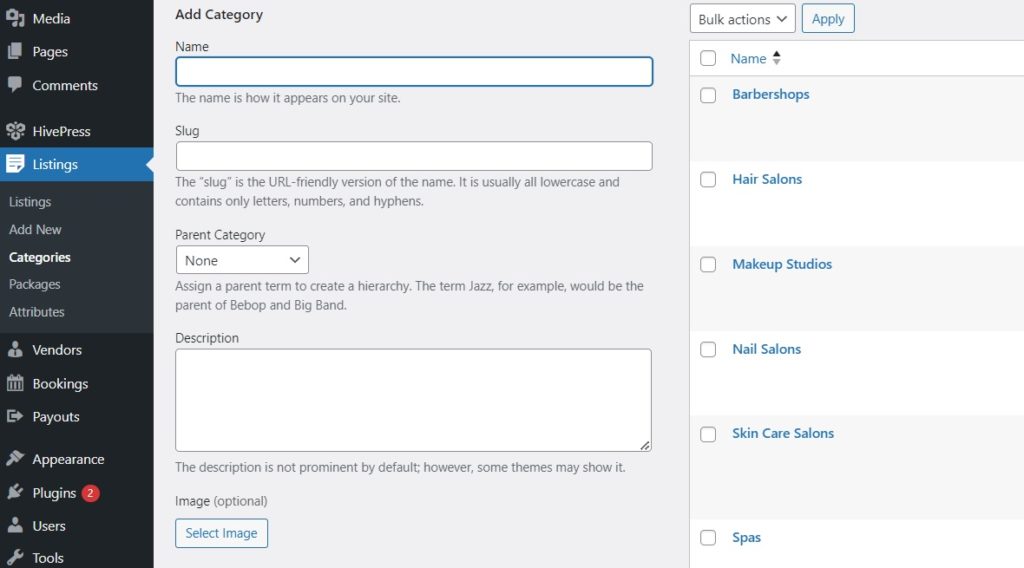
In the same way, you can add as many listing categories and subcategories as required for your WordPress salon directory website.
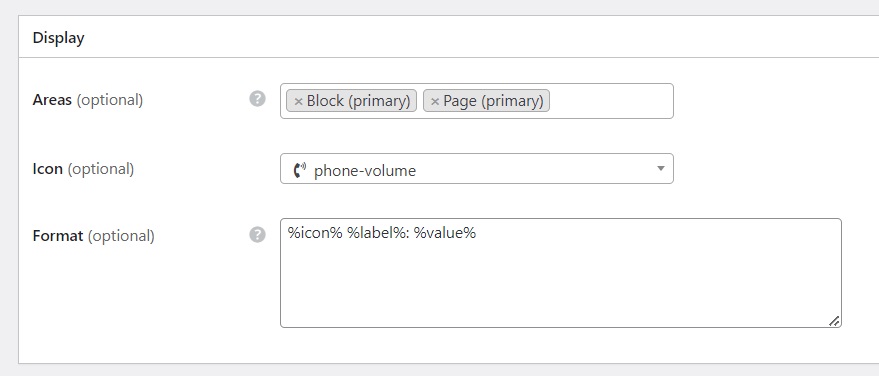
The next step is to add listing fields so users can gain important information about salons. HivePress is a customizable plugin, so you can easily create as many different custom fields and search filters as you need. For example, let’s create a “Contact Number” field that will display the phone numbers of salon managers. Go to Listings > Attributes and click Add New. After writing the field’s name, proceed to the Editing section, where you can define whether your field can be edited via the front-end by marking it as editable. Also, we’ll select the “Phone” field type and make this field required.
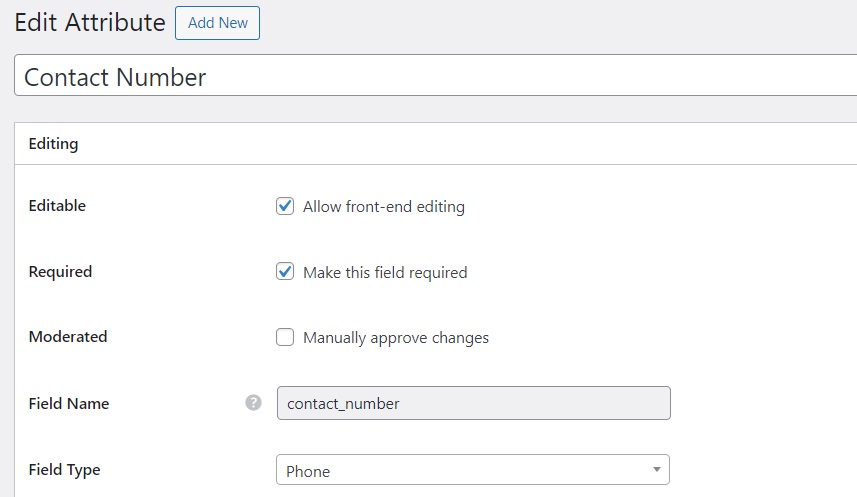
In the Search section, you can turn your field into a search filter by marking it as filterable and searchable, but it’s not needed for the phone number. However, it would make sense for a field like “Price”. Finally, in the Display section, you can define how your custom field will be displayed on the listing pages. For example, let’s assign it to Block (primary) and Page (primary), select a suitable icon, and use this display format: %icon% %label%: $%value%
When everything’s ready, click on the Publish button. As we mentioned before, there are no limits, so you can add as many listing fields as you want.
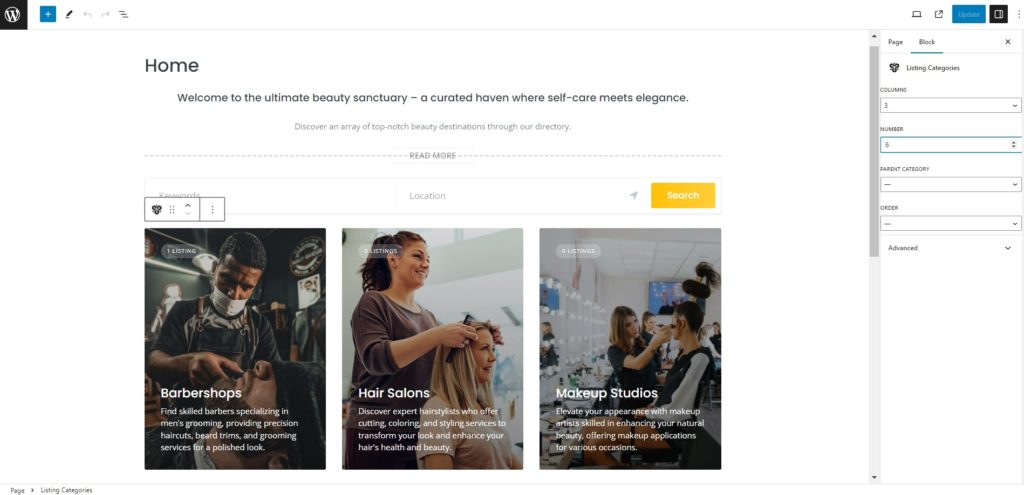
An attractive homepage is an essential part of your website’s success story. Thanks to HivePress’s seamless integration with the WordPress block editor, creating and editing pages is very simple. To begin creating our homepage, let’s go to Pages > Add New Page and name it “Home”. Then, come up with some welcome text. After this, you can begin adding different HivePress blocks by pressing on the Plus icon and typing “HivePress” in the search bar. For example, let’s add “Listing Search Form” and “Listing Categories” below. By the way, you can customize blocks in the settings column to the right.
Press Publish to make this page go live.
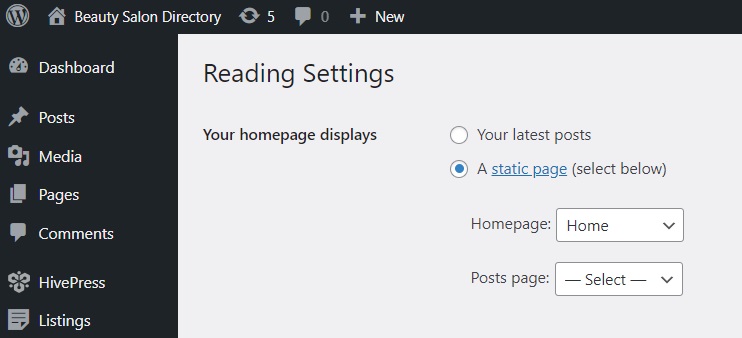
When finished, head to Dashboard > Settings > Reading, where you need to select this page as the website’s homepage.
Also, note that the pages of your site can be further customized. Check out this video on how to set up the look and feel of your website.
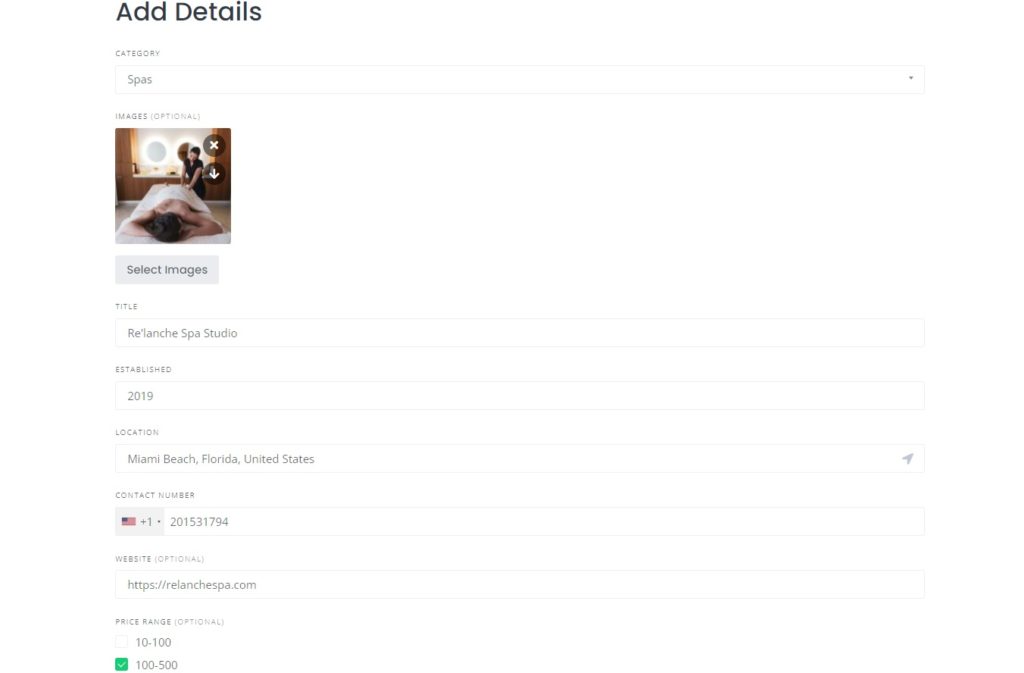
Now, let’s check what we’ve achieved so far and try to add the very first salon listing. An admin can do it either from the back-end in Listings > Add New or via the front-end if you decide to make your directory multivendor. Visit your site from the WordPress Dashboard and click Add Listing. Here, provide salon details and fill in all the fields that were previously created.
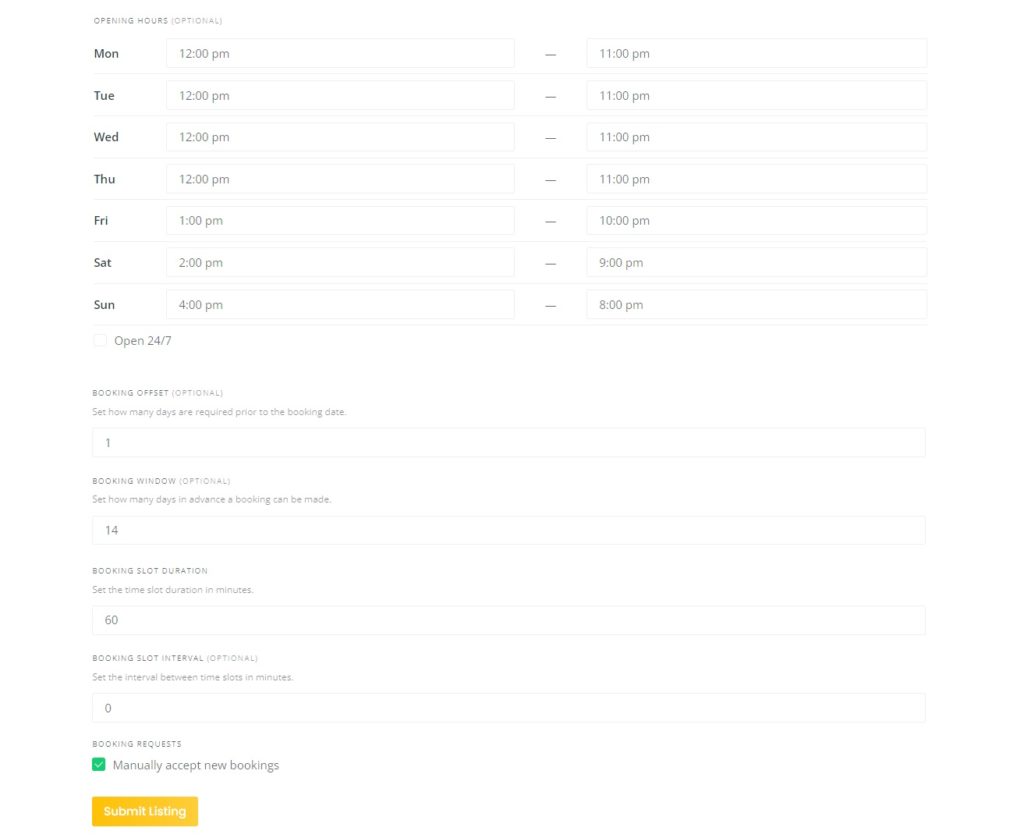
Also, if you have the previously mentioned Opening Hours and Bookings extensions installed, you’ll see the corresponding fields as well.
When everything’s ready, hit Submit Listing. If the manual moderation is enabled, approve this listing in Dashboard > Listings. Finally, the listing will be visible on the site.
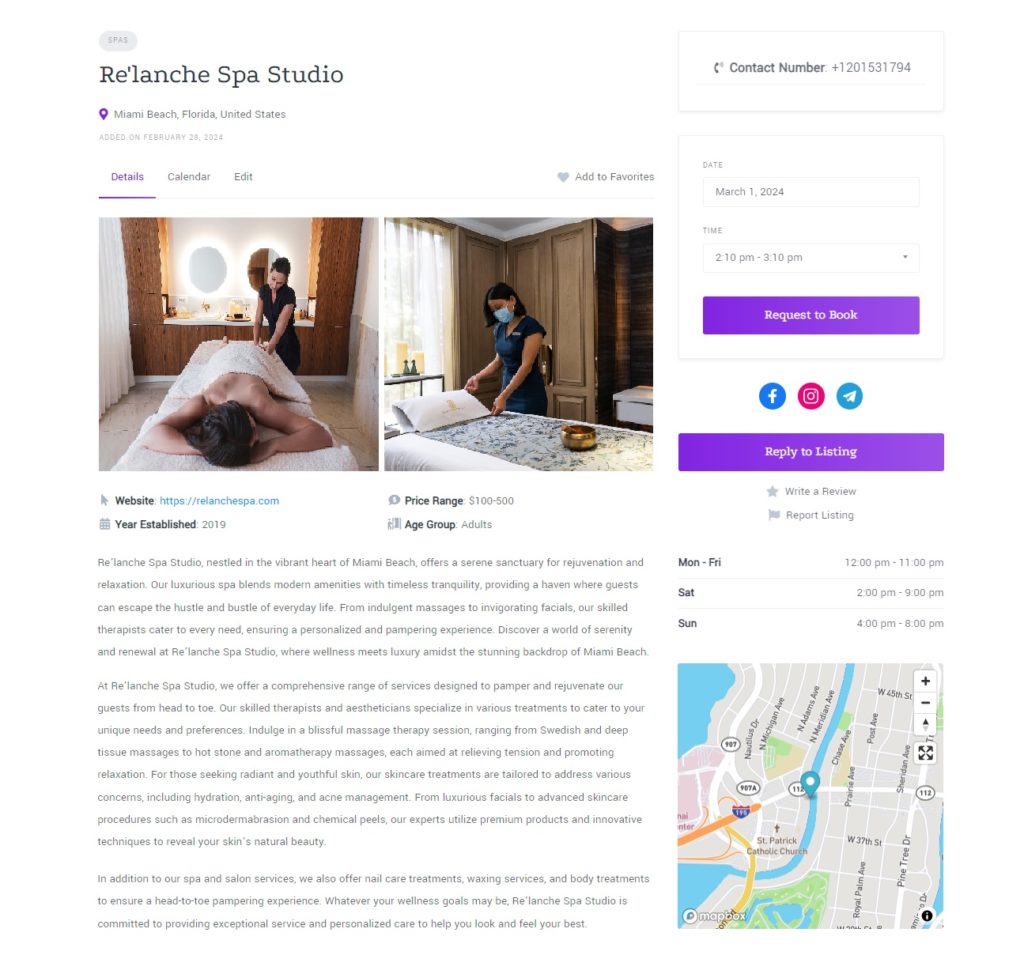
Congrats! If you correctly followed the steps, you should see your listing. But we have one more important thing to mention.
As a website owner, it’s apparent that you would like to generate revenue after all. So, we’d like to show you a couple of monetization options available in HivePress that you can easily incorporate into your salon directory.
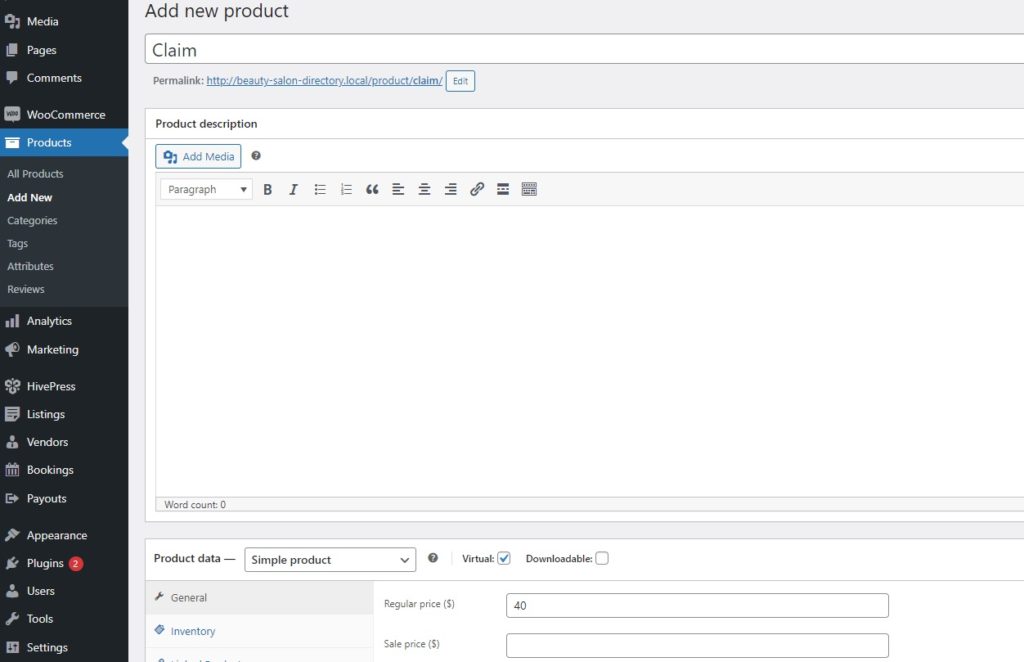
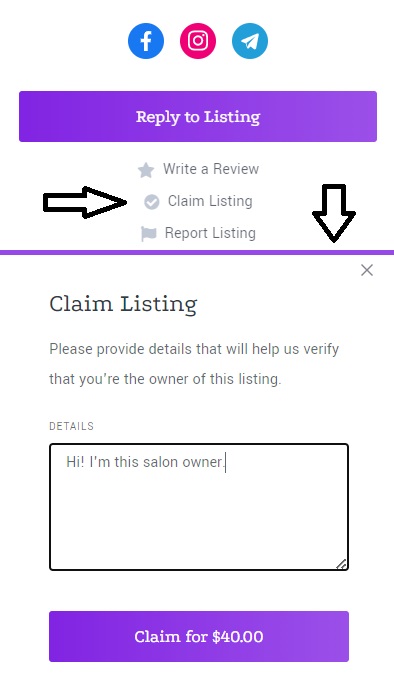
If you’re the only person adding listings to the directory, the best monetization model would be listing claiming. In this scenario, you can charge salon owners for claiming their salon’s listings, giving them access to edit them and respond to user reviews and messages. This way, you will earn money while relevant information is consistently displayed on your platform. In order to set up this monetization model, you’ll need to install the HivePress Claim Listings extension and WooCommerce plugin.
Once you install both plugins, go to WooCommerce > Products > Add New, name it “Claim”, mark it as virtual, set a desired price, and click Publish.
Then, navigate to HivePress > Settings > Claims, where you need to select this WooCommerce product from the dropdown list. Don’t forget to save the changes.
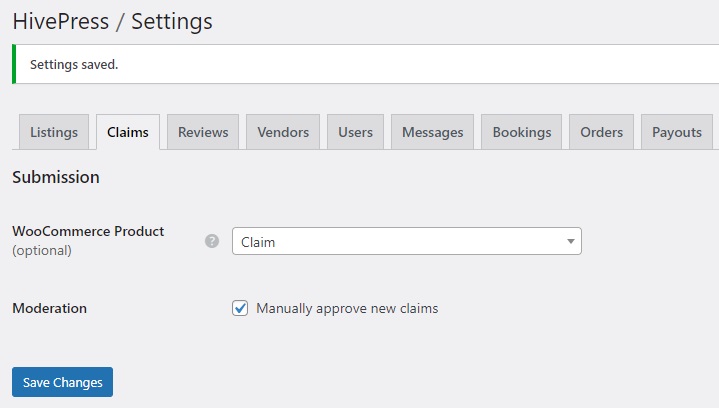
After this, users will be able to press the Claim Listing button on the listing page and purchase the owner’s rights. Simple as that.
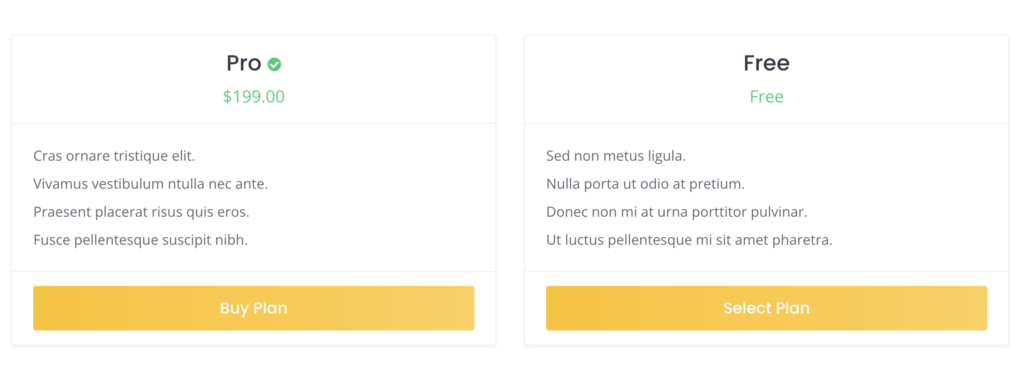
The next monetization option is eligible if you’re building a multivendor salon directory. If you allow front-end listing submission, you can charge users for adding listings and making them featured. To achieve this, you need the Memberships extension, which will allow you to create different listing plans. The process is similar to the previous model: create a WooCommerce product (or several) that will correspond to the premium plan. Then, in the Memberships > Plans, create free and premium plans. The premium one must be linked to the WooCommerce product.
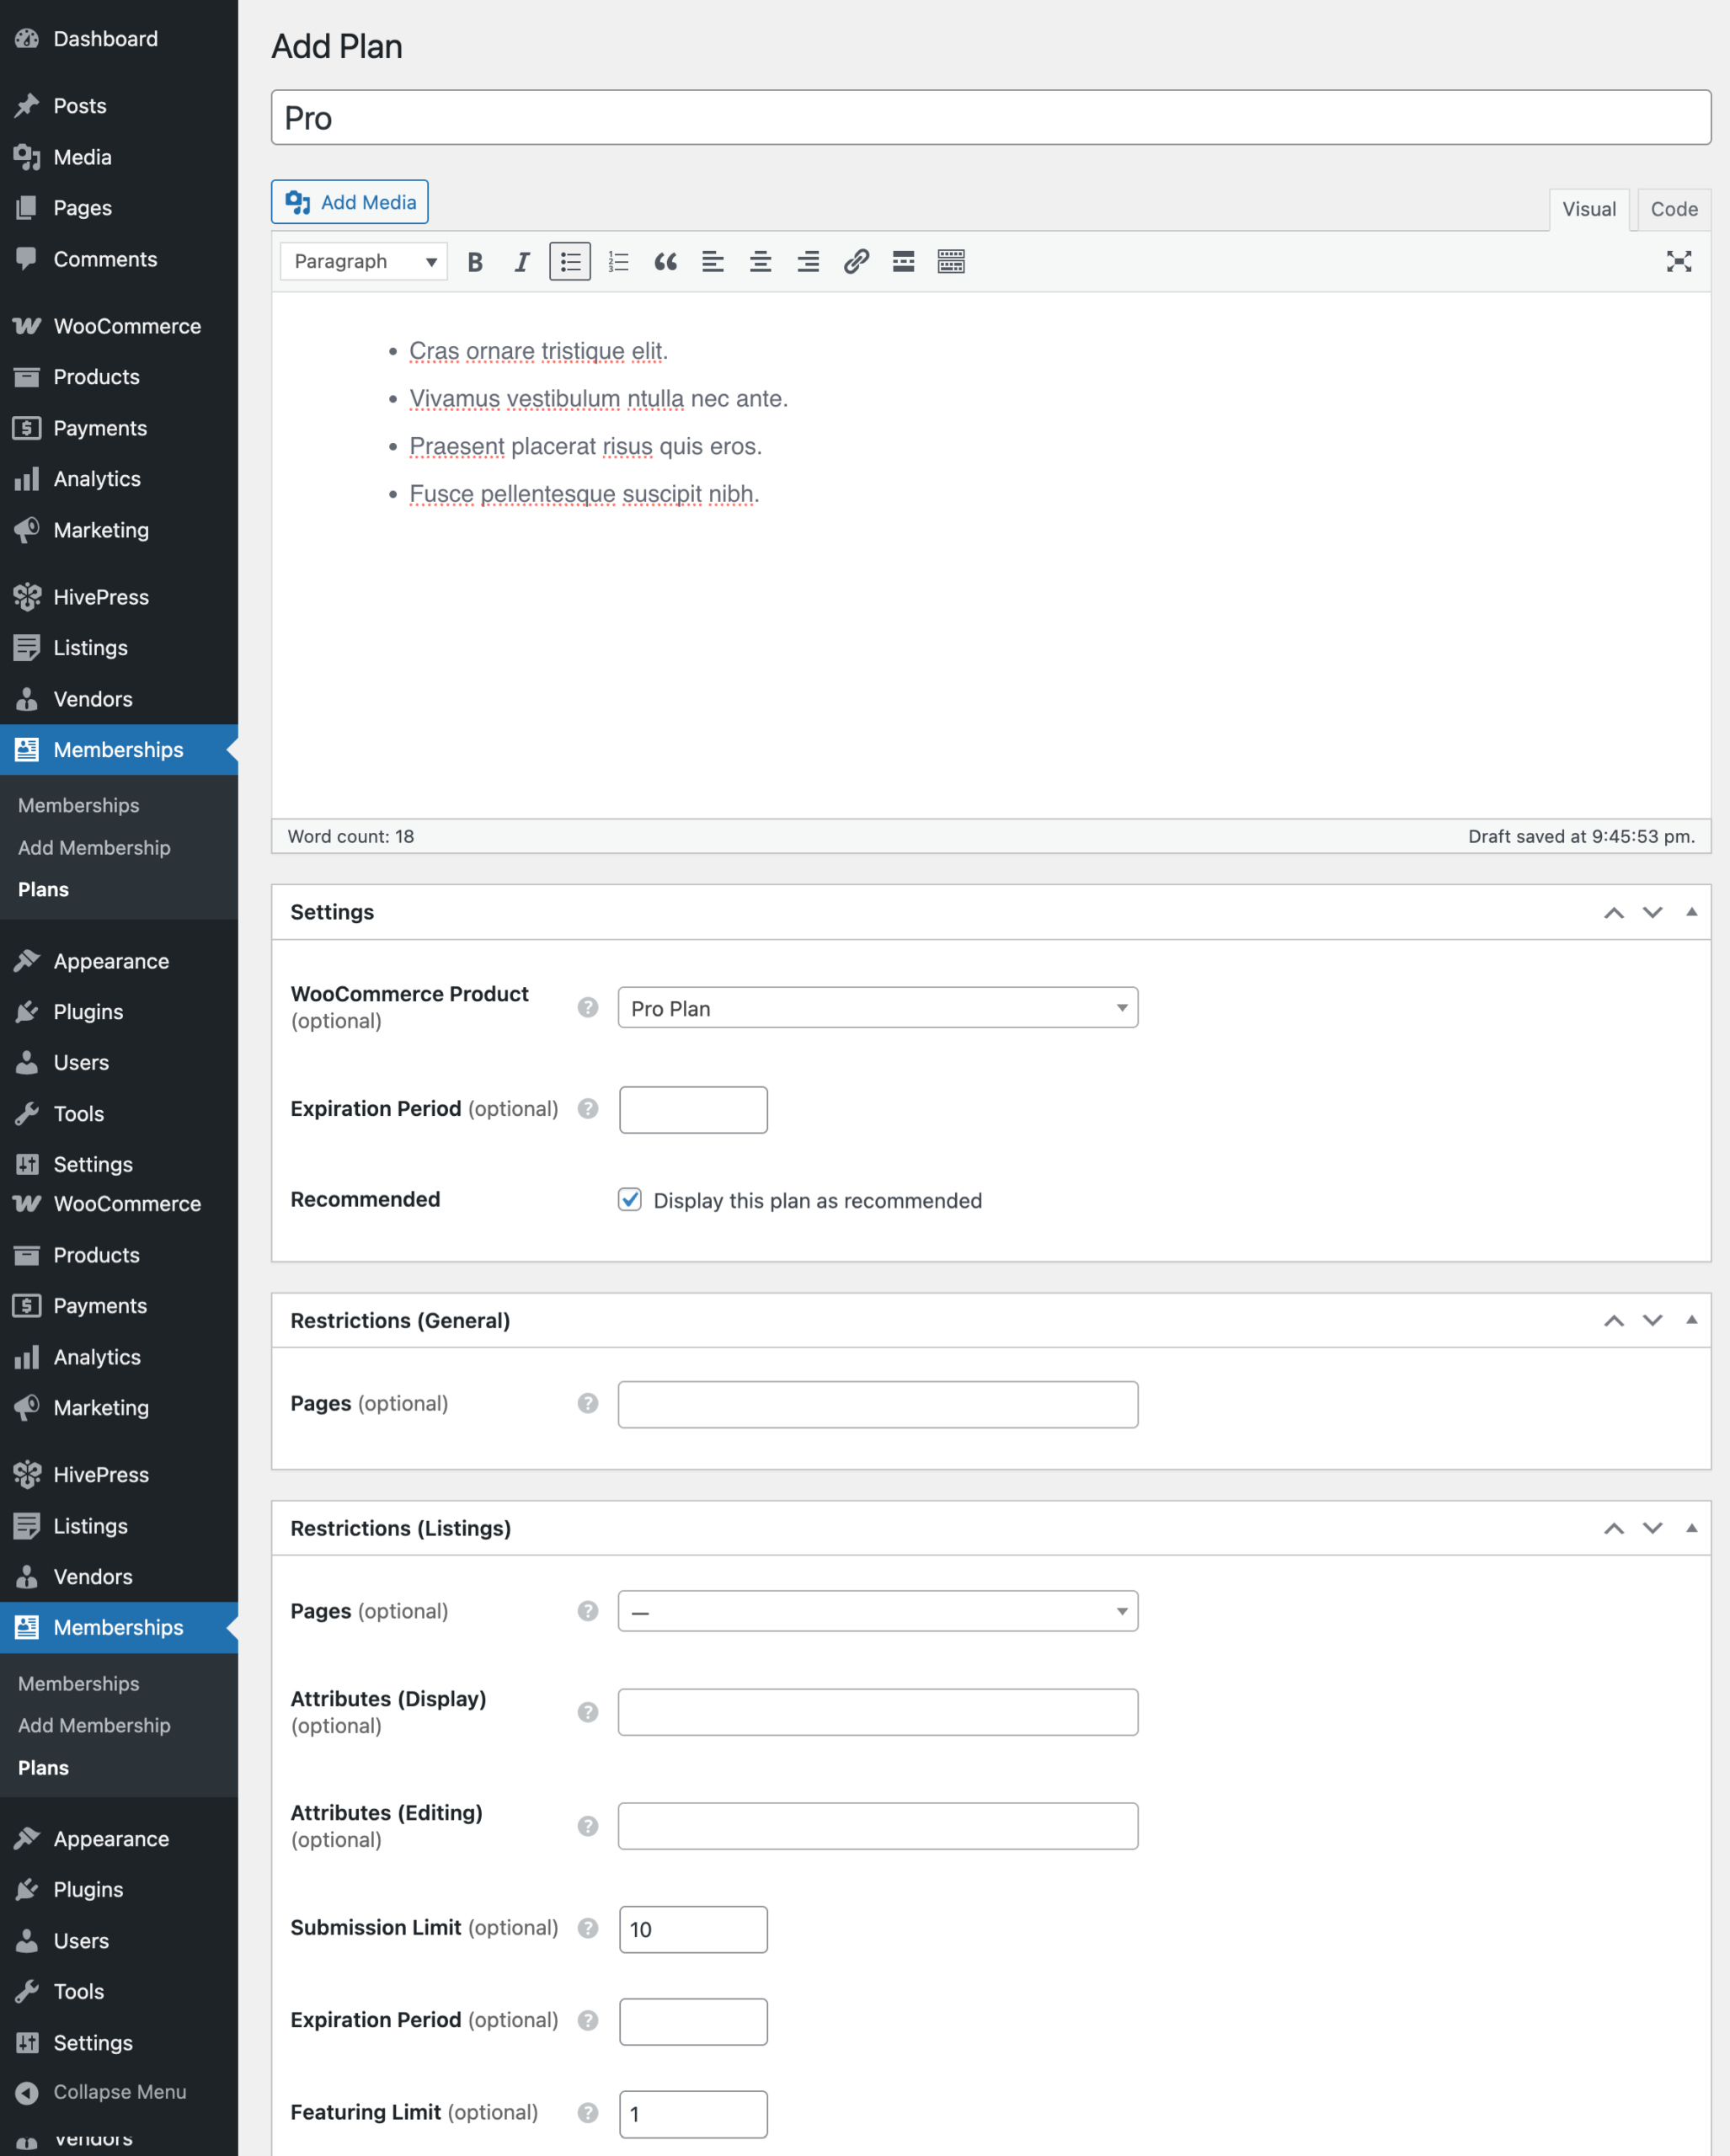
Publish them. Now, you can go ahead and test how they work by visiting the site and submitting a listing. From now on, when the user wants to add a listing, they will see a screen asking what plan they would like to choose after pressing Submit Listing.
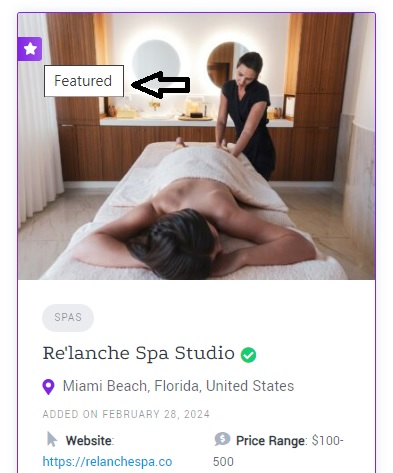
Additionally, as we said, you can charge users for promoting their salons. Featured listings appear at the top of search results, gaining more traction. This monetization trick is as old as the hills, but it always works.
That’s it! We hope that now you can create a WordPress salon directory that serves as a valuable resource for people seeking professional beauty services and helps grow businesses in this industry.
If you’re still unsure about your WordPress toolkit, consider HivePress and ListingHive. This powerful duo can provide you with an excellent foundation for your project, offering ease of use and a wide range of features to create a thriving salon directory.
A short guide on how to build an appointment booking platform for lawyers.

A complete walkthrough on launching a property rental website like Vrbo.

Create your own micro-jobs marketplace using WordPress.