
How to Create a Coach Booking Website with WordPress?
A quick guide on how to create a marketplace for coaches with WordPress.
A short guide on launching a scheduling platform with WordPress.

Today, if you are running a service business, having an online platform to schedule appointments can be a game-changer for both businesses and clients. Whether you’re a medical professional, a consultant, or a service provider, having your own appointment booking website can drastically improve user experience.
In this article, we’ll show you how to create an appointment booking website with WordPress without any coding skills. We’ll walk you through the whole process, from selecting the right plugins to monetizing your website.
Please note that this article will be useful for people who want to create an appointment booking website for their own business and for those who want to start their own multi-vendor marketplace.
Without any further ado, let’s get started!
An appointment booking website is a platform where customers can schedule appointments with different specialists like tutors, barbers, doctors, and so on. There are two types of such websites:
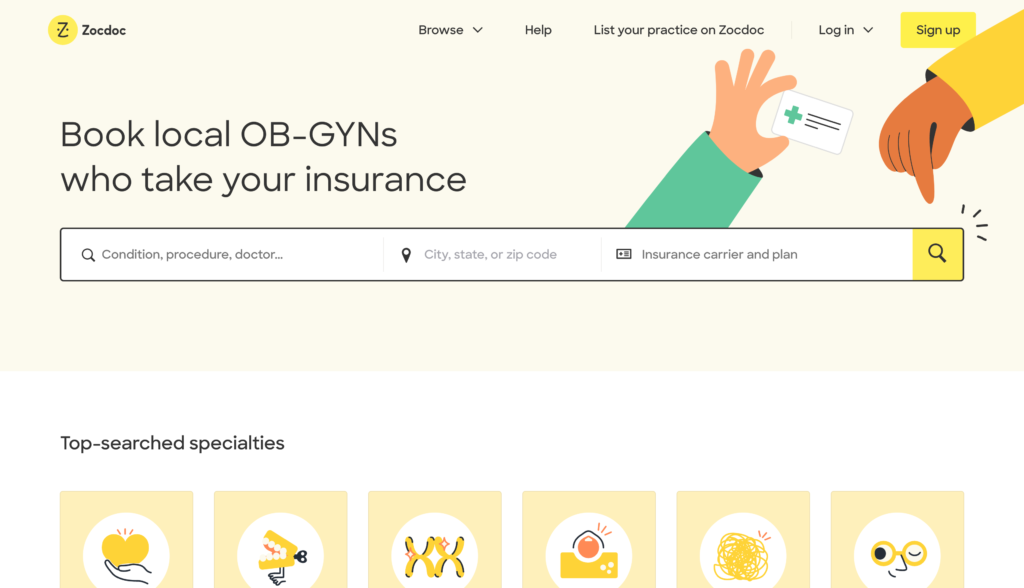
Such platforms allow clients to schedule, reschedule, or cancel appointments with businesses online by providing an interface for users to view available time slots and services in real time. A great example is a marketplace of doctors – Zocdoc. It allows you to find a doctor you need and book an appointment or get an online consultation.
Now, let’s talk about some prerequisites you need to have to create an appointment booking website with WordPress.
We recommend using MeetingHive, a clean and lightweight appointment booking WordPress theme, and HivePress, a multi-purpose WordPress plugin that will power all the booking and marketplace features.
So, let’s move to the tutorial part of this article and create an appointment booking website with WordPress!
For the sake of this tutorial, we’ll use the MeetingHive theme and the HivePress plugin since they are already packed with all the required features out of the box.
The first step is installing a WordPress theme. To do that, go to the WP Dashboard > Appearance > Themes section and click the Upload Theme button. Next, choose the MeetingHive ZIP file and upload it. Finally, install and activate the theme.
Once you install MeetingHive, you’ll be prompted to install recommended plugins, including HivePress. Since they power all the features on your website, it’s necessary to install and activate all of them. Simply click on the recommended plugin’s link and proceed with the installation.
You can check the video below, which shows how to install MeetingHive and the necessary plugins.
Also, if you want to keep things simple, you may proceed with importing MeetingHive demo content. In that case, you’ll get pre-made content that you can customize to better understand how everything works. Check the screencast below if you want to import demo content.
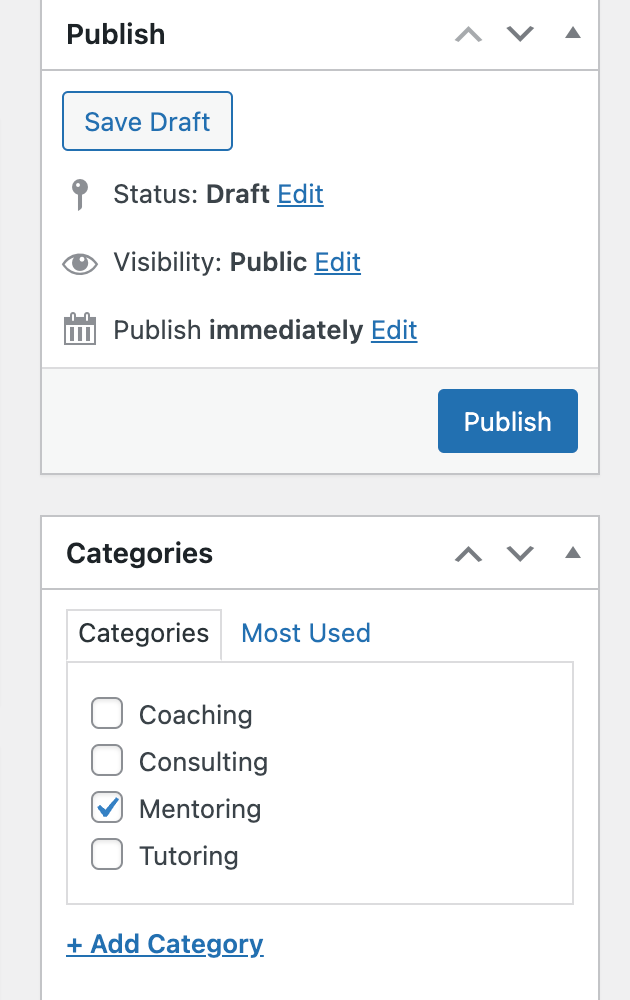
The next step is to add different listing categories to your appointment booking platform to make it more structured and easier for users to navigate.
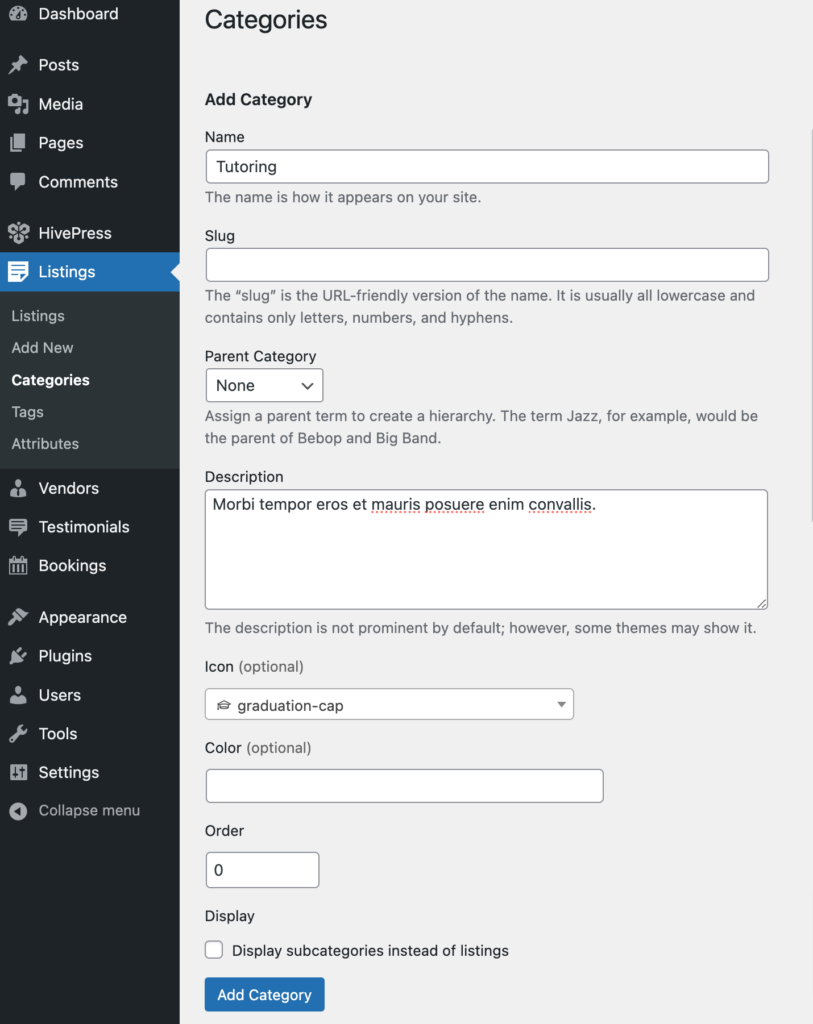
To add a new listing category, go to the WP Dashboard > Listings > Categories section. Here, you’ll be able to name your category (e.g., let’s add a “Tutoring” category), describe it, add a category icon and even create a hierarchy of categories.
For the sake of this tutorial, let’s add “Tutoring”, “Mentoring”, “Consulting” and “Coaching” listing categories. Keep in mind that you can add as many categories as you need for your appointment booking website by following these steps.
Once you finish setting up your category, click on the Add Category button.
Now, we’d like to show you how to create custom listing fields. By default, any listing has only title and description fields, but with MeetingHive, you can add your own fields and search filters. It allows you to customize the website to your needs and requirements since each site is unique and different details may be required.
To create a new listing attribute, go to the WP Dashboard > Listings > Attributes section and click Add New. On this page, you’ll be able to customize your listing field in three different contexts: editing, searching and displaying. We’ll discuss each of these contexts below.
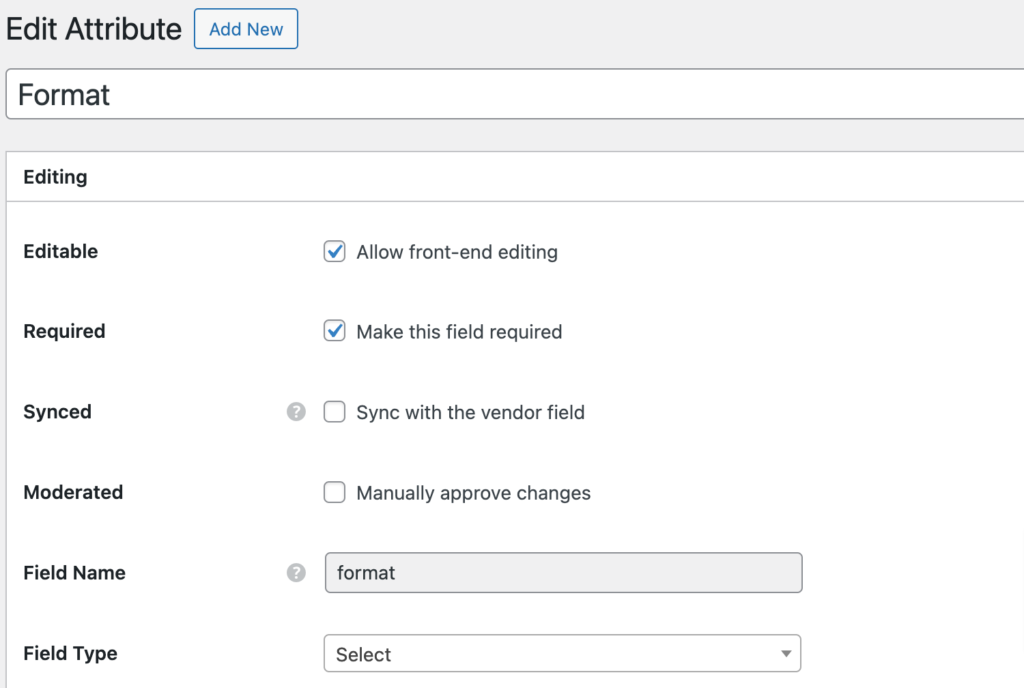
For example, let’s add a “Format” custom field so service providers can indicate whether they offer their service one-on-one or in groups.
In the first section, you can mark your field as editable to allow front-end editing (i.e., to allow vendors to fill it up when they list a new service). Then, choose whether it should be a mandatory field and set the moderation preferences. Finally, select the field type, in the case at hand, we’ll use the “Select” field type.
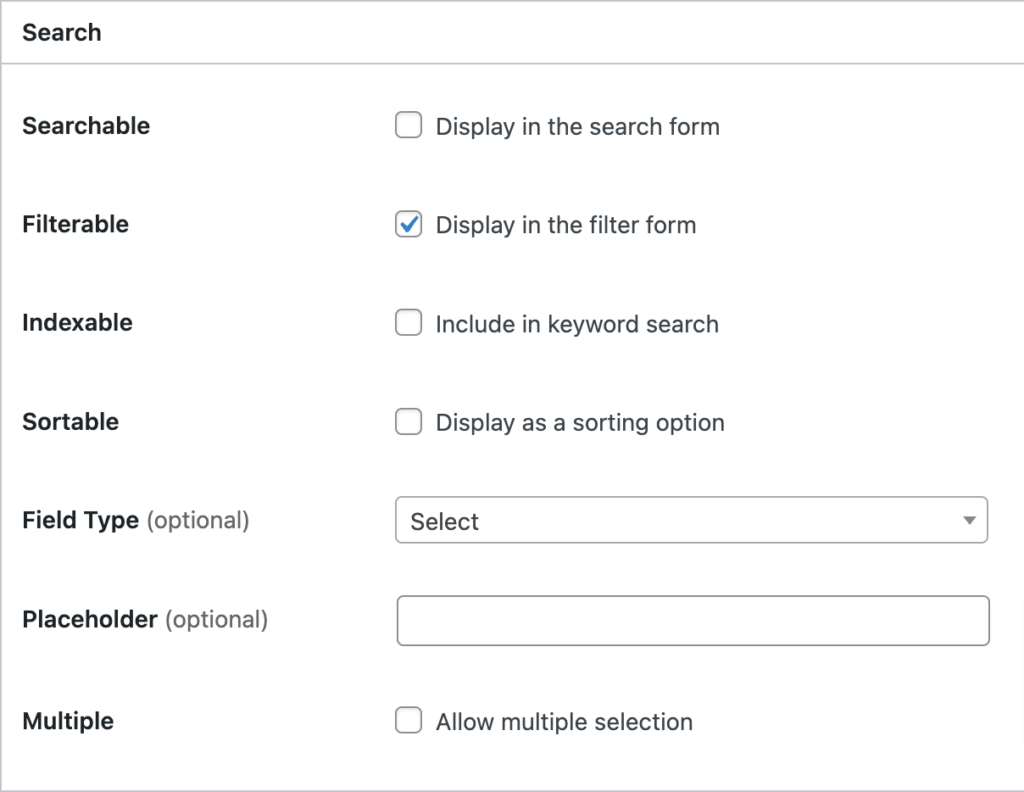
Here, you can turn your field into a search filter so users can filter different listings based on the attribute’s value. We’ll mark this attribute as filterable and searchable so it appears in the listing filter form. Also, we’ll set the “Select” field type here.
Within this section, you can define how your field will look on the front end. You can set its template areas and display format as well as choose a specific icon for it. To get a better understanding of how to set up attributes, check this doc.
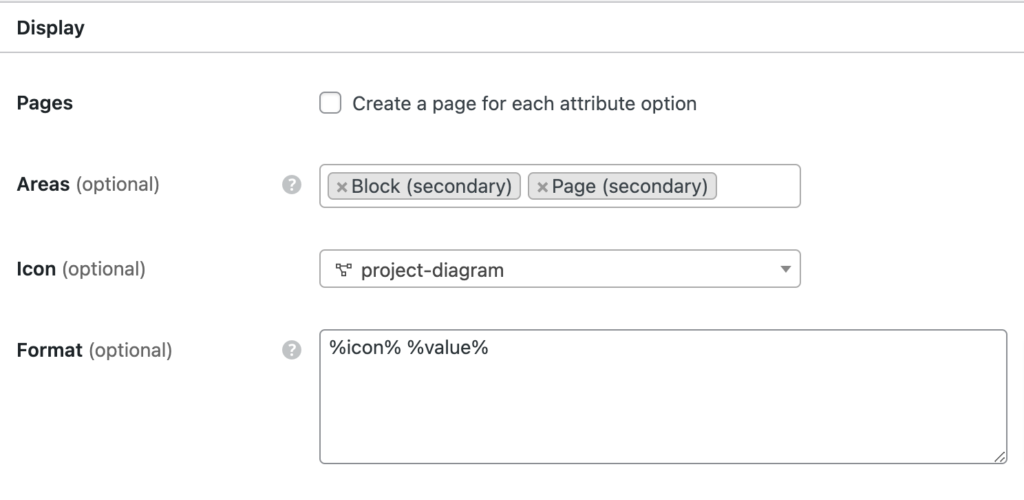
By the way, note that you can make any field “category-specific” by selecting listing categories where it should be applied. Once you finish customizing everything, click on the Publish button.
Since we added an attribute with a “Select” field type, we need to set some options to choose from. That’s why you have to click on the Edit Options button and add different options (we’ll add “One-on-One” and “Group”).

That’s it! This field will now appear in the listing submission form. By following the same steps, you can create many other custom fields, like “Hourly Rate,” “Setting,” etc. There are no limits, so feel free to add as many as required for your appointment booking website.
At this point, let’s add a first service listing to your website. As a website admin, you can add new listings via the WP dashboard or via the front-end listing submission form. Let’s add a new listing via the front end to get a better understanding of how it works for regular users.
To add a new listing, go to your website’s front page and click on the List a Service button. You’ll be redirected to the listing submission page.
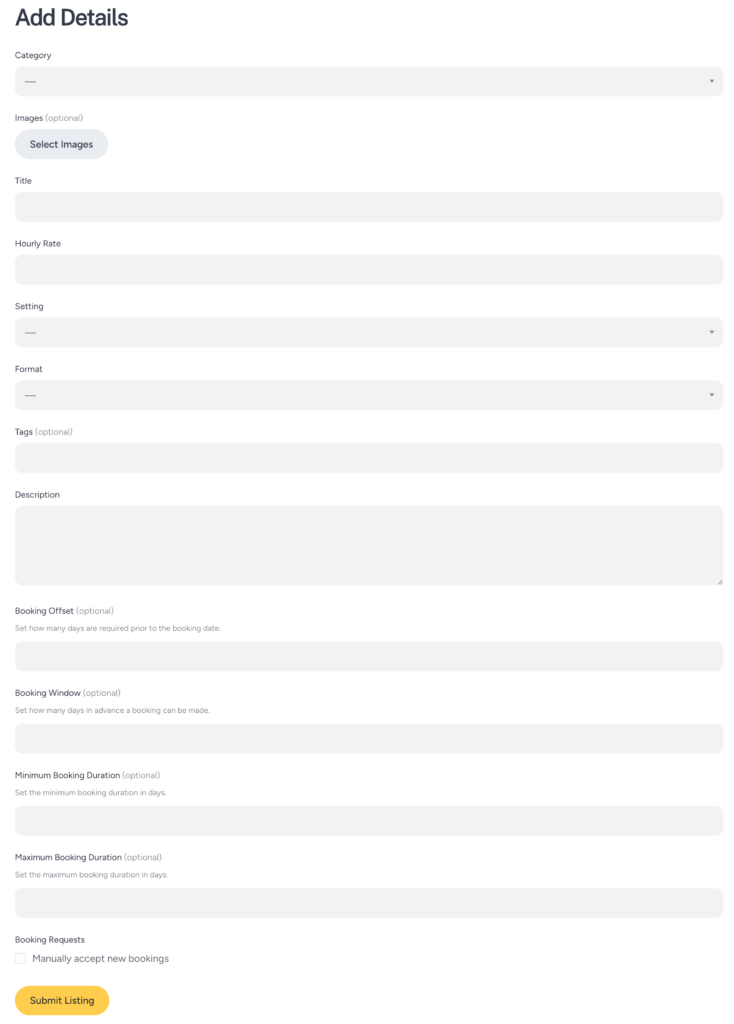
Here, you’ll see some common fields like title and description and many custom fields that you added in previous steps (e.g., on the screenshot, you can see a “Format” field that we added previously). Also, some fields, like booking fields, will be added by different HivePress add-ons.
Please note that this submission form is fully customizable, so you can add, change or remove different fields according to your website niche.
To add a listing, simply fill out all the fields and click on the Submit Listing button. Now the listing is submitted for review, and an admin can approve or disapprove it in the WP Dashboard > Listings section. But if you don’t want to accept new listings manually, you can simply disable moderation in the WP Dashboard > HivePress > Settings > Listings section.
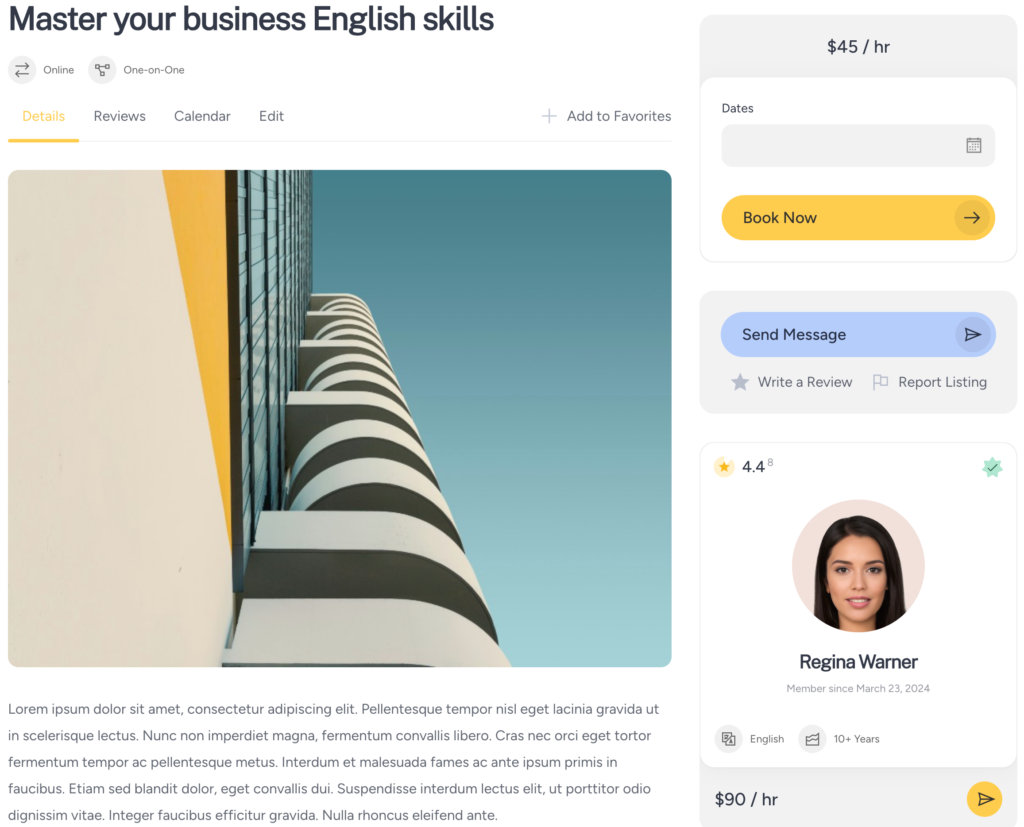
Once the listing is approved, it will appear on the front end.
The next step is to add a homepage for your appointment booking website. Since MeetingHive is fully integrated with Gutenberg, you’ll be able to create a stunning layout using blocks.
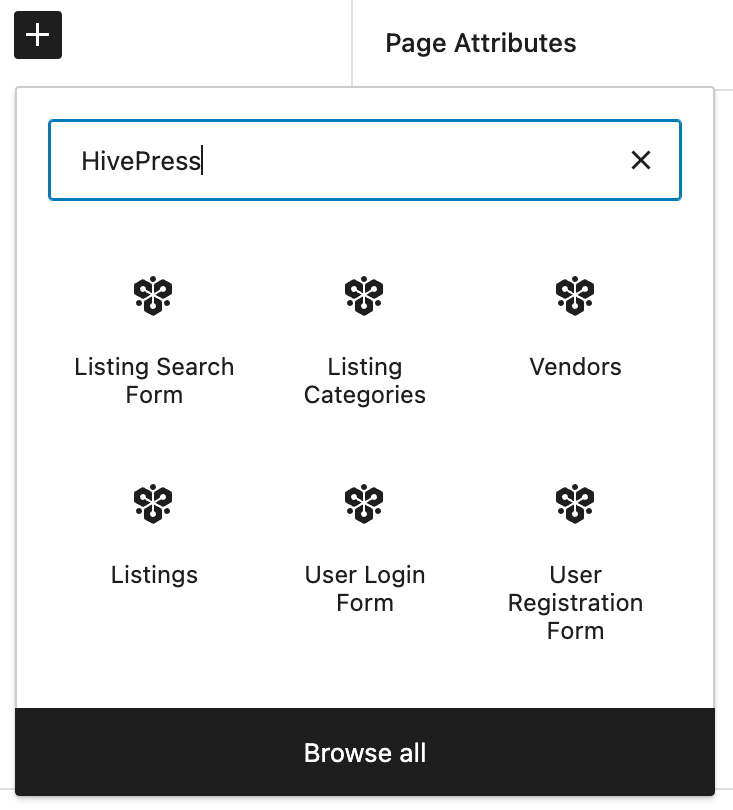
To add a new page, go to the WP Dashboard > Pages > Add New section. Here, you’ll be able to add different layout blocks by clicking on the “➕” icon. For example, you can add a “Search Form” block so users can search listings from the front page or add a “Category” block to display all the listing categories.
To make it easier, you can simply type “HivePress” in the block search form, and it will show you all the HivePress-specific blocks that you can add.
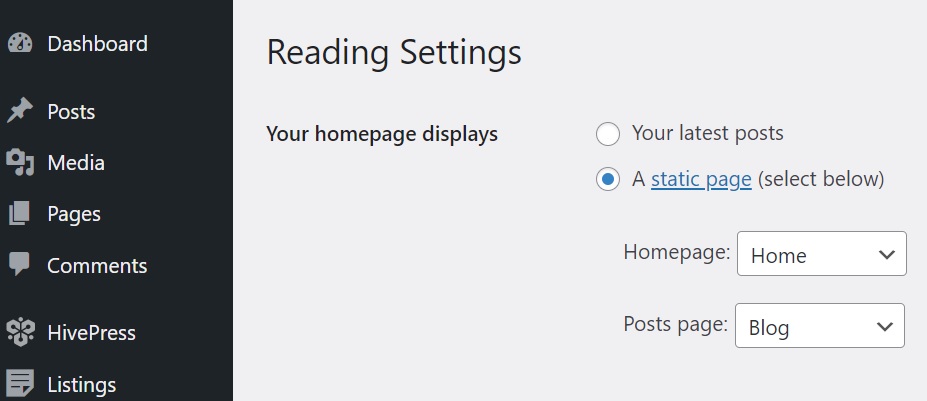
Once you finish customizing your page, you can simply click on the Publish button. Then, you have to go to the WP Dashboard > Settings > Reading section and set your newly created page as a homepage.
That’s it! Now, you can check out how it looks on the front end.

Additionally, we recommend checking all the customization options in the WP Dashboard > Appearance > Customize section to set up your website look and feel in the way you like.
Now, we’d like to show you how to enhance your appointment booking website with additional features. There are 15+ add-ons that you can use with MeetingHive to extend the core functionality. Simply navigate to WP Dashboard > HivePress > Extensions section to check the whole list of available add-ons.
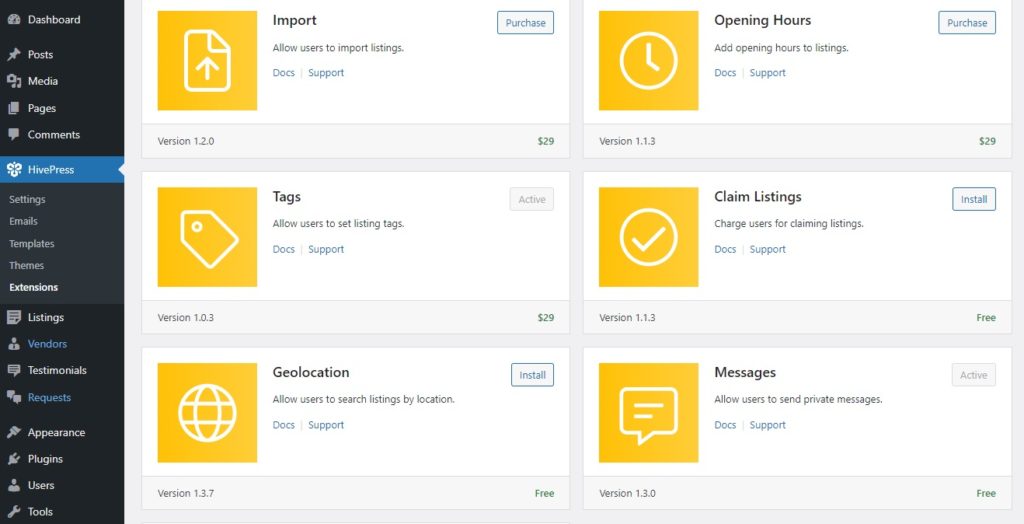
For example, you can install the Social Login add-on to allow website visitors to register on your website via third-party websites like Google or Facebook. Also, you may want to install the Geolocation extension to enable the location-based search on your scheduling platform. It may be helpful in many niches that offer services offline and have a brick-and-mortar place (e.g., spa salons, barbershops, etc.).
To install any add-on, please check this doc.
Finally, let’s talk about monetization of your service marketplace. With MeetingHive, you can monetize your website in a few different ways and below will show you two of them, namely:
So, let’s start with the “Paid Access” model.
The starting point is to purchase the HivePress Memberships add-on. Also, it’s necessary to install WooCommerce to enable payments on your website, so go to the WP Dashboard > Plugins > Add New section and install the plugin.
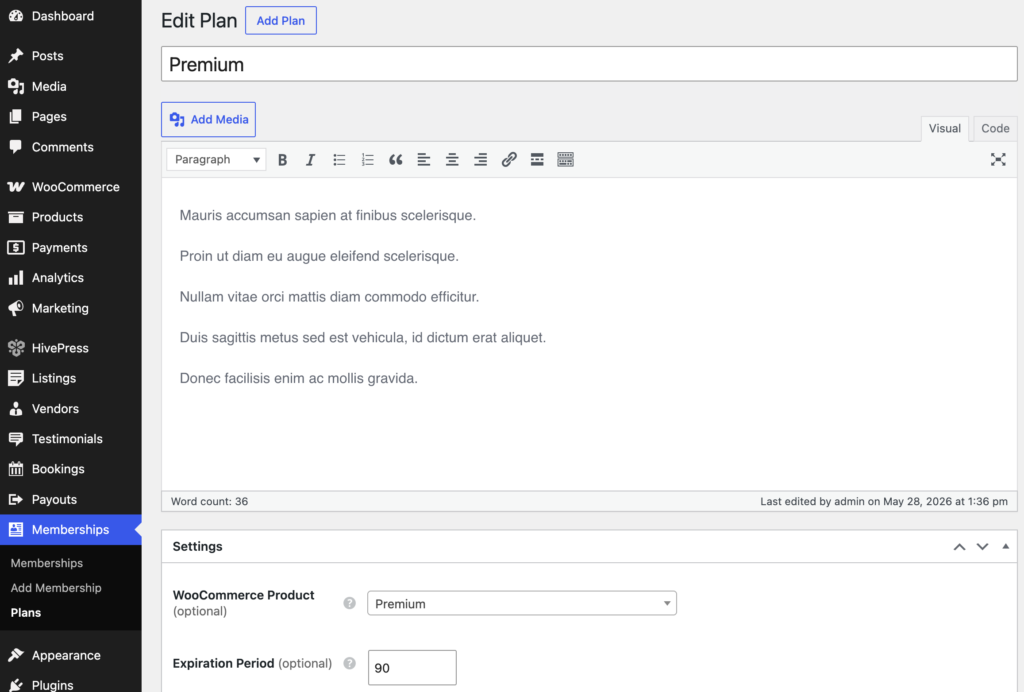
Once you have everything in place, you need to create WooCommerce products that will be used for payments. Simply go to the WooCommerce > Products > Add New section and fill in all the fields marked in the screenshot below.
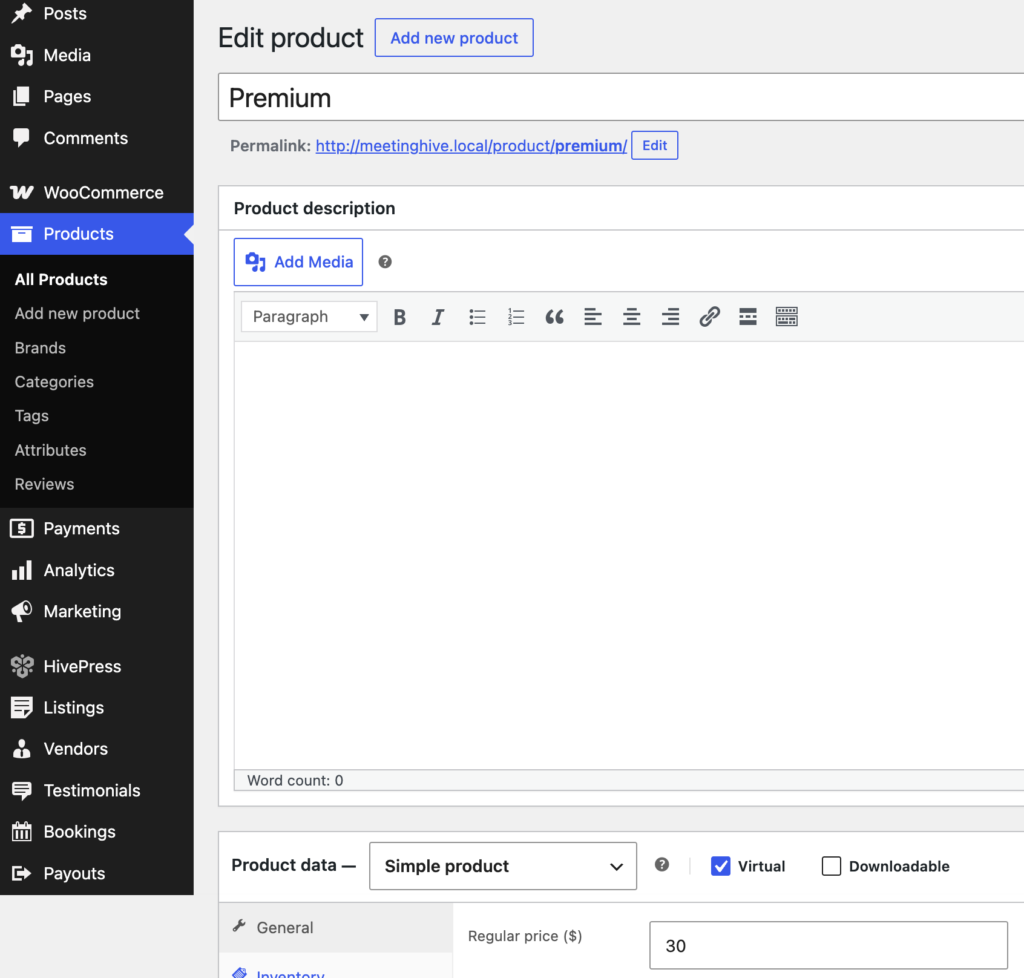
After filling out all the details, click the Publish button. We’ve now added the first product, which will be used to charge users for featuring their listings and allowing them to publish listings on the platform.
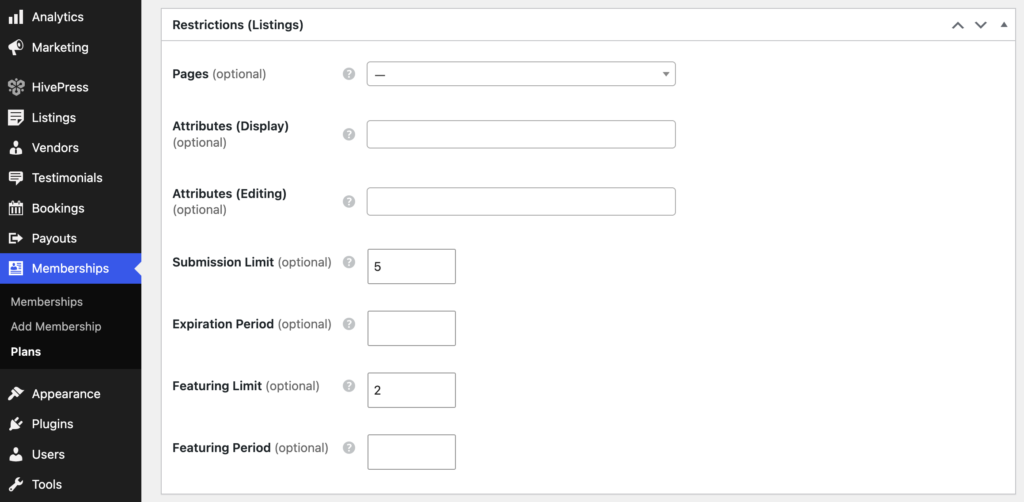
Next, go to WP Dashboard > Memberships > Plans and create a corresponding plan with the necessary limits for features and listing submissions.
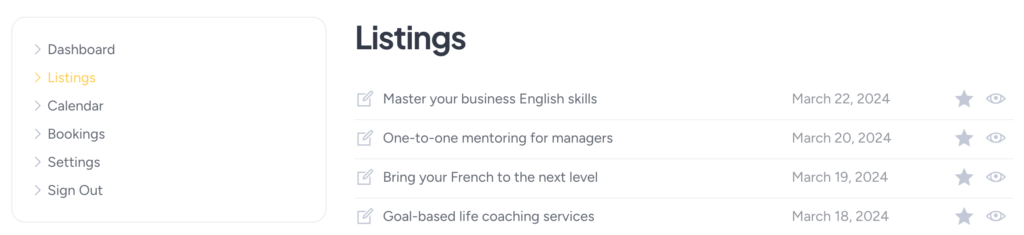
After saving the changes, you can check how everything works. Go to your website and open the user dashboard, then select any listing and click the star icon to make it featured. You’ll be redirected to the checkout page, where you’ll need to fill in the required details and complete the payment. Once the payment is successfully processed, the listing status will be updated automatically.
Now, you can check how it works by visiting your website and clicking the List a Service button. Once you fill in the listing submission form and click the Submit Listing button, you’ll have to choose one of the plans.
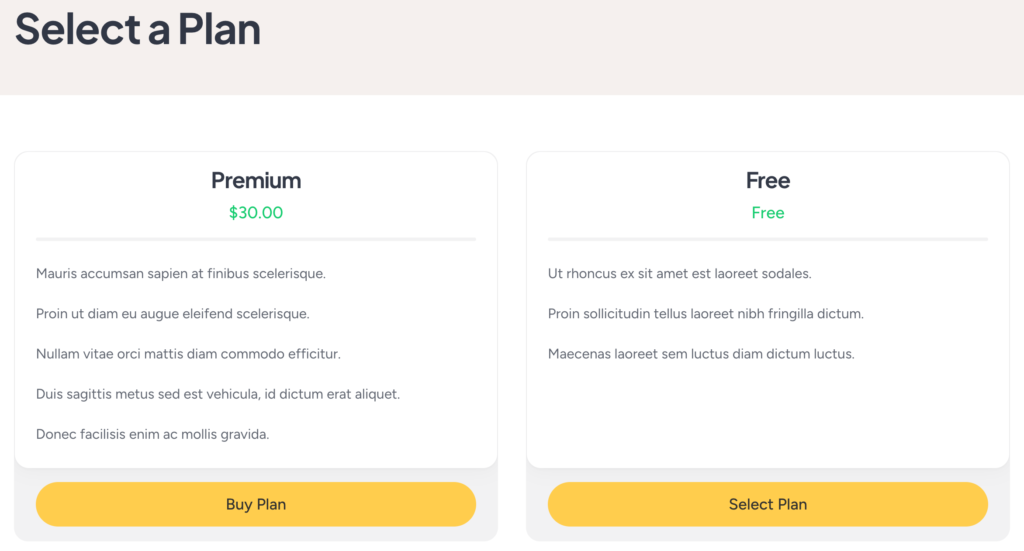
That’s it! Users who select a premium plan will be redirected to the checkout page, and their listing will be published only after the payment is completed.
You can also create separate plans for listing submissions and listing features, or combine them into a single plan as we did. Additionally, you can limit access to specific pages, restrict features such as messaging, and control other parts of the platform depending on the selected plan.
In this section, we’ll show you how to take commissions from each successful booking on your website. For example, if you have a marketplace for tutors, you can take a 10% commission from each lesson’s price that was booked via your platform.
To enable this business model, you have to install the HivePress Marketplace add-on. It was sent to you with your MeetingHive theme, so you don’t have to purchase it separately. You can simply download it from your purchase email and install it in the WP Dashboard > Plugins > Add New > Upload Plugin section.
Once the extension is installed and activated, navigate to the HivePress > Settings > Vendors section. Here, you can set two different types of commissions:

You can choose any type or use both of them at once. Also, you can set the same commissions for customers. Meaning that the commission will taken from the customer side. To do that, simply go to the HivePress > Settings > Users tab, and you’ll see the same settings for vendors.
That’s it! Now, you can take a commission from each transaction that is made on your appointment booking platform.
That wraps up our article on how to create an appointment booking website with WordPress. We hope that was helpful to you and now you have a better idea of how to start your own scheduling platform.
If you haven’t chosen the theme yet, you can check a MeetingHive overview article to get a better idea of its features. It’s a fully-featured appointment booking WordPress theme that comes with everything you need to start your website. Just plug and play.
Additionally, you may want to check our articles on:
A quick guide on how to create a marketplace for coaches with WordPress.

Build your own classified ads website without a single line of code.

Create a website like Booksy with WordPress hassle-free.