
5 Tips on Running a WordPress Business Directory
A few tips on managing your business directory website.
A quick guide on how to make money with your WordPress peer-to-peer marketplace.

Nowadays, thanks to the rapid growth of sharing economy, even a small niche marketplace can be a robust business opportunity if it uses a proper revenue model, and in this short tutorial, we’ll show you 4 best ways to monetize a service marketplace.
However, if you are only thinking about launching your own marketplace of services with WordPress, you can check one of our step-by-step tutorials:
Alright, let’s get started!
Before moving to the revenue models available for service platforms, we’d like to mention some prerequisites that will allow you to successfully monetize a service marketplace. The most crucial ones include:
Since every service marketplace is a two-sided platform, you should attract both customers and service providers to your website. That’s why there’s often a chicken-and-egg problem because it’s difficult to decide whether it’s more important to entice customers first to be an interesting platform for experts or vice-versa.
As a rule of thumb, it’s better to focus on service providers first to create a pool of freelancers. Also, in the beginning, it makes sense to avoid taking any registration fees or commissions from experts to encourage them to stay on your platform and offer their services.
Once you have a lot of freelancers on your platform, you can run an advertising campaign or use any other marketing channel to drive traffic to your marketplace and match customers with service providers.
Only after that we recommend using the monetization models described below.
Now, we’ll show you the popular monetization strategies that most service marketplaces use. You can choose the business model that best fits your website niche and requirements or combine several of them.
Please note that after each revenue model, we’ll show you how to set it up on marketplaces powered by the HivePress plugin. Also, we’ll use TaksHive, a micro-job WordPress theme with its demo content imported, as an example (just to show you how to monetize a service marketplace hassle-free).
So let’s check the first revenue model!
The most popular monetization strategy for service marketplaces is taking a cut from each transaction that occurs on your marketplace. However, it’s not only the most widely-used revenue model among service marketplaces, but it’s also the most lucrative and scalable one.
Commission from each sale is the main source of income for such famous service platforms like Fiverr, Thumbtack, Upwork, TaskRabbit, Airtasker and others.
On your platform, you can charge service providers or customers solely. But most marketplaces charge both parties (e.g., Fiverr charges freelancers with a 20% fee and buyers with a 5% commission). You should decide which model works best for you depending on your marketplace niche. But it’s better not to impose very high fees to remain a comfortable platform for your users.
If you already have the TaskHive theme and the HivePress plugin installed, navigate to the WP Dashboard > HivePress > Settings > Vendors section. Then, locate the Commission Rate field, where you can set a custom rate. The commission rate is set as a percentage value, e.g., if you set it as “10”, there will be a commission of 10% on each sale.
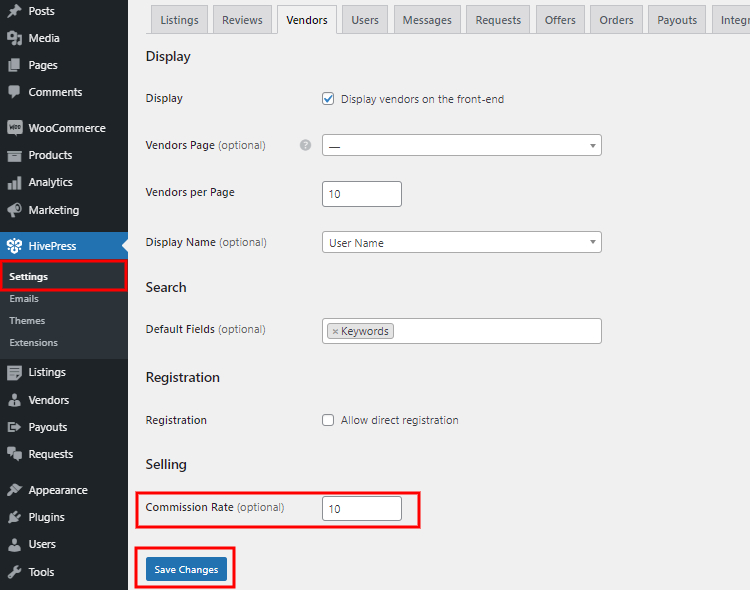
Once you set the commission rate, click on the Save Changes button.
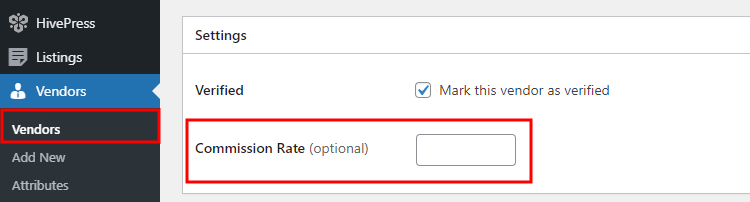
Also, it’s possible to set a custom commission rate for each service provider. Simply saying, you’ll be able to charge each user a different percentage if necessary. To do that, go to the WP Dashboard > Vendors section and select any of your service providers. Then, in the Commission Rate field, you can set a custom commission rate for this user.
Another revenue model for service marketplaces is charging freelancers for listing their services on your platform. For example, you can create a few listing plans with different per-category restrictions, so service providers will have to choose one of them if they want to list services on your peer-to-peer marketplace.
This business model is not so widespread among service marketplaces as commissions, but it still can be a great source of revenue, especially for niches, where it’s more reasonable to charge flat fees instead of commissions.
Firstly, you need to install the Memberships extension that allows you to create listing plans. You can purchase it in the WP Dashboard > HivePress > Extensions section.
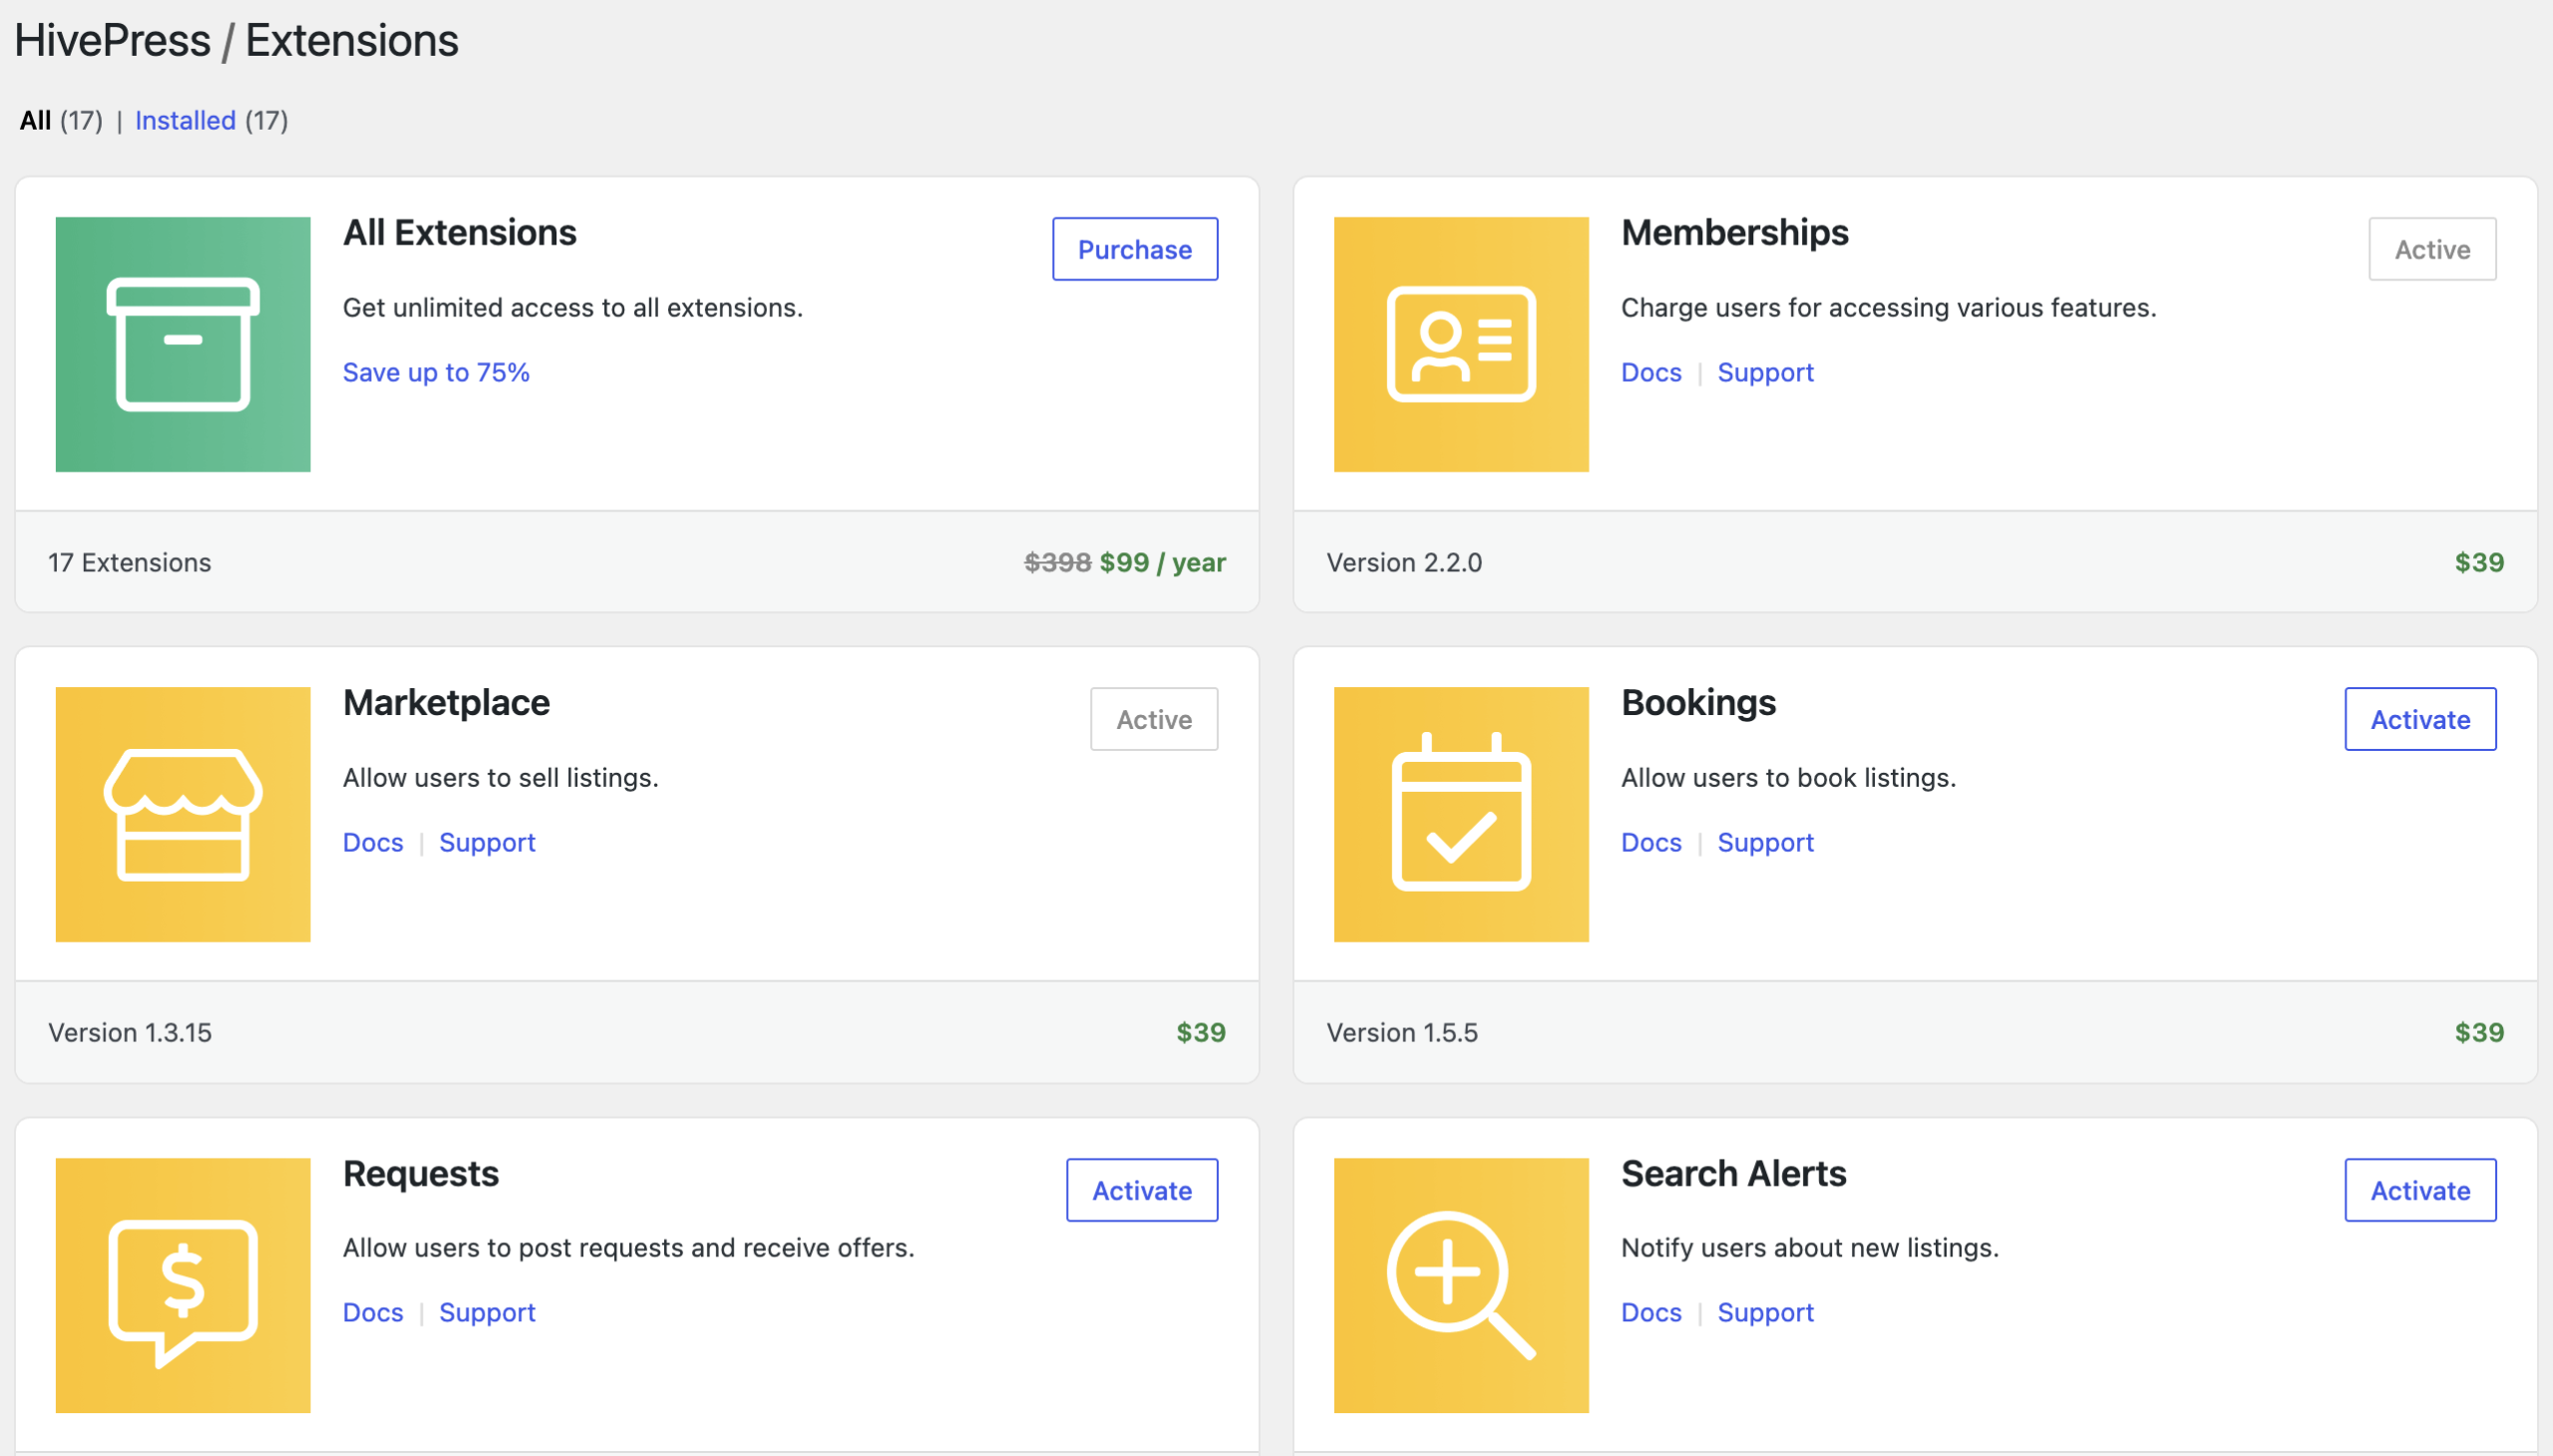
Within this page, you’ll see a list of the available HivePress add-ons that you can purchase or install for free to extend your service marketplace functionality.
Once you activate the extension, you can start adding the listing plans.
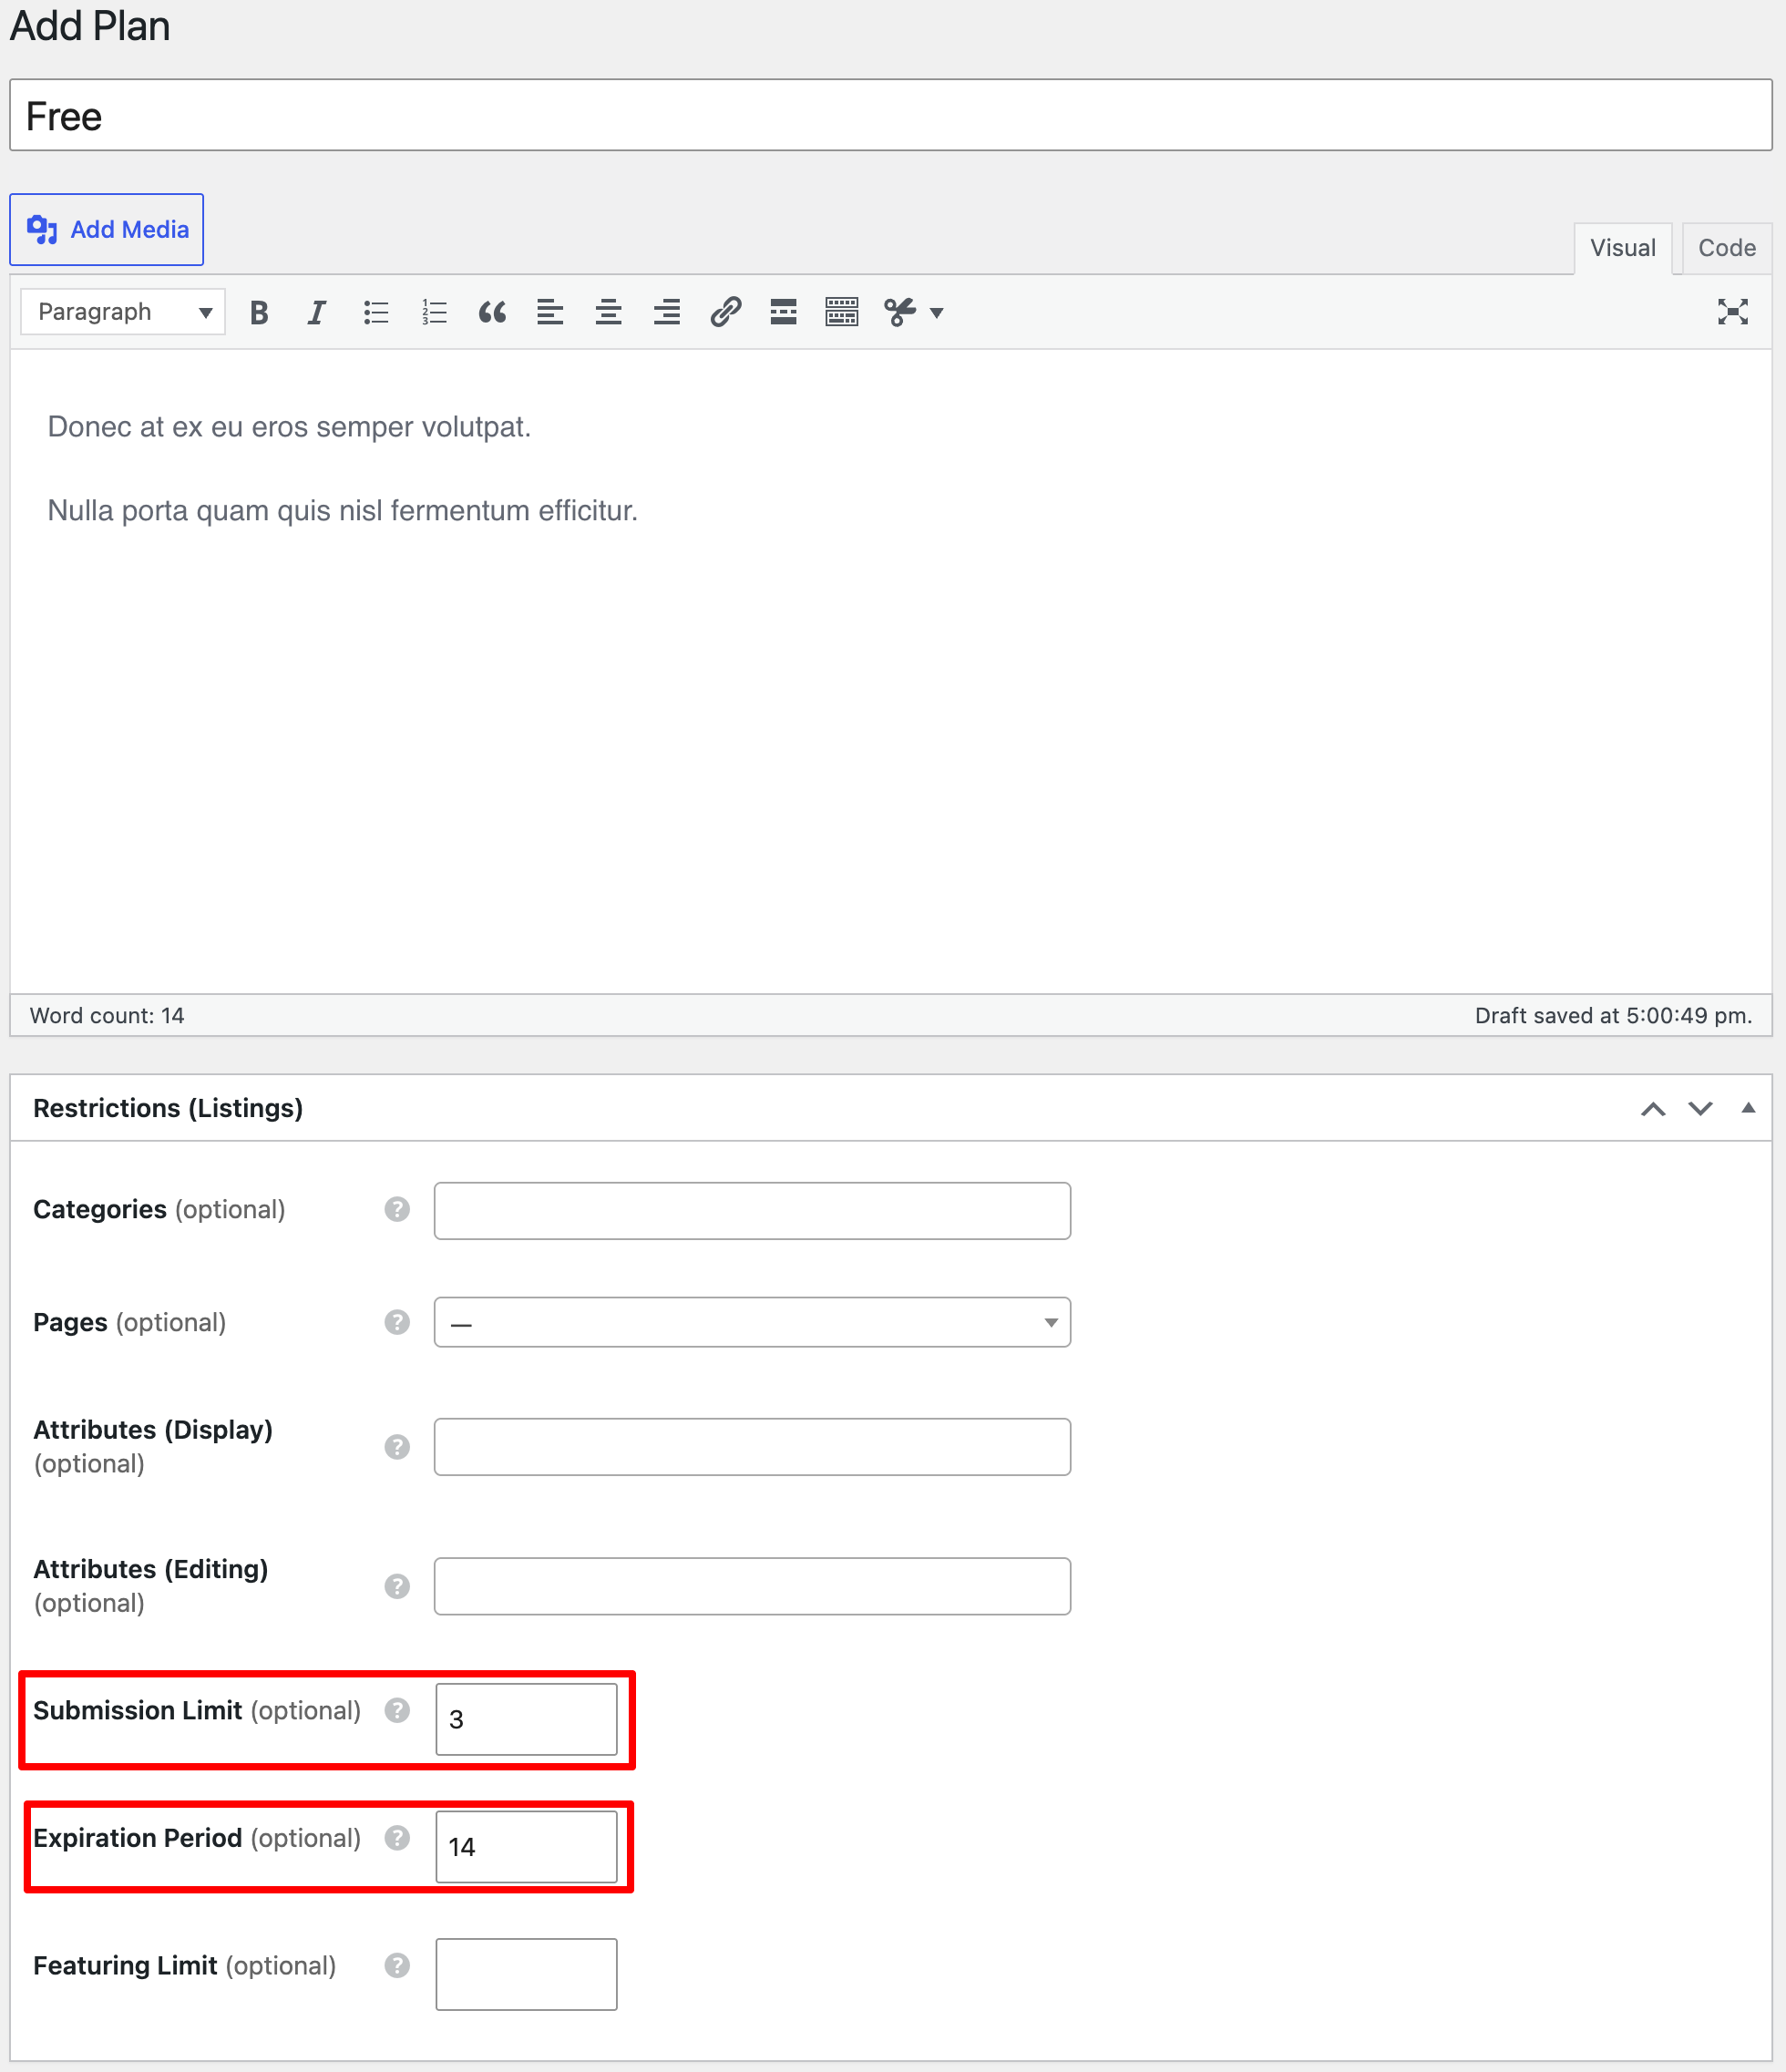
Go to the WP Dashboard > Memberships > Plans section and click on the Add New button. For example, let’s start with adding a free plan. Simply enter the plan name, describe it and set the maximum number of listing submissions.
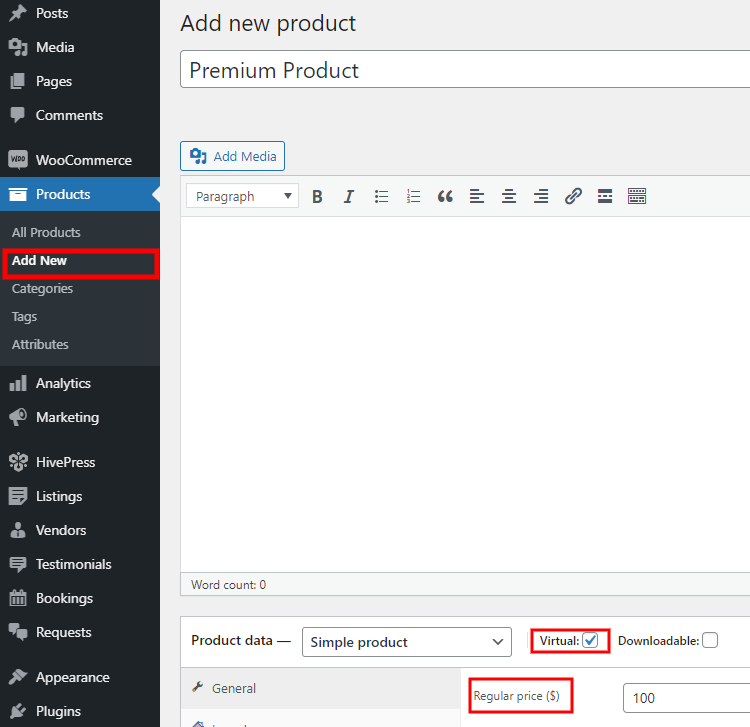
Once you are done with the free plan, let’s add a premium one. To do this, navigate to the WP Dashboard > WooCommerce > Products section to add a new product so you can link it with the plan later.
You need to fill in the name field, set the product price and mark it as a virtual product. Then, finally, click on the Publish button.
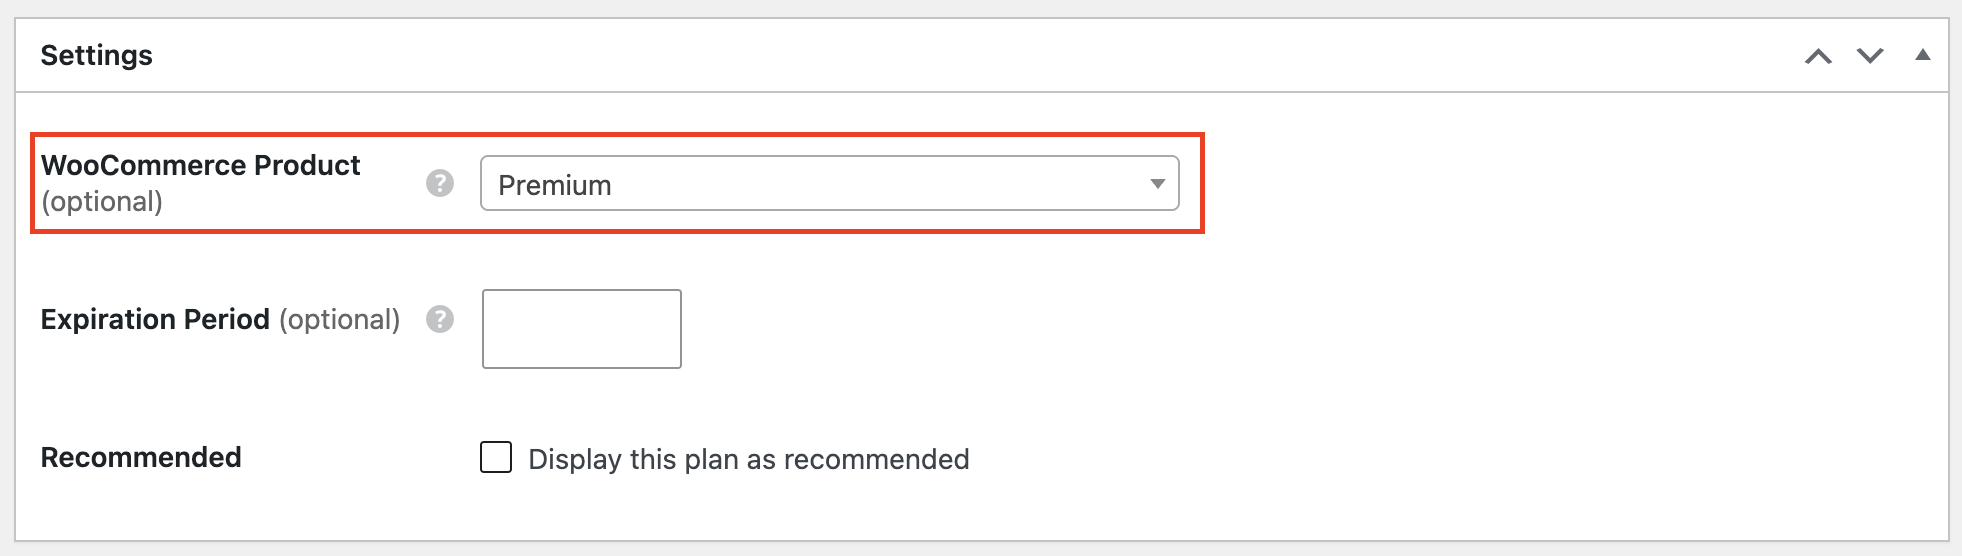
Now, let’s return to the WP Dashboard > Memberships > Plans section and add a new premium plan. Enter the plan name, fill in the description, set the maximum number of listing submissions, and finally select the WooCommerce product that you’ve created previously (check the screenshot below). When finished, click on the Publish button.
As mentioned earlier, you can also sell category-specific plans, offering higher rates for the most popular categories, for example. Just select the necessary category to which you want to apply the plan in WP Dashboard > Memberships > Plans > Your Plan > Categories.
The Memberships extension is truly versatile and allows you to monetize your website in different ways.
Most marketplaces offer various extra services, including a paid promotion. For example, some freelancers may want to stand out from the crowd and are willing to pay an additional fee to be featured somewhere at the top and get better visibility on the website.
By selling several additional services you can easily play a big game of small numbers.
Using the same HivePress Memberships extension, you can charge users for featuring listings. Simply create a new product in the WP Dashboard > WooCommerce > Products section. Mark it as virtual, set the price and click on the Publish button.
Next, move to the WP Dashboard > Memberships > Plans section, create a new plan and select a newly-created product from the drop-down menu. Also, don’t forget to set the featuring limit and period (the number of days after which a listing loses featured status). You can sell individual featuring plans or offer featuring within a listing submission plan.
That’s it! Now users can mark their listings as featured via their personal dashboards (after completing checkout, of course). As easy as pie, isn’t it? If you have any issues with setting up this feature, please check out the screencast below.
Finally, you can make money by selling advertising space on your website. There are different kinds of ads out there like banners, videos, images, contextual ads and so on. But most of the service platforms use ads as an additional source of revenue, and it’s rarely the primary revenue model.
Probably, the easiest way to display ads on your website is to integrate it with Google AdSense. It’s a free, simple way to earn money by displaying ads next to your online content. Additionally, Google AdSense will automatically match ads to your site based on your content and visitors, so you don’t have to mess with it on your own.
You can follow these instructions to integrate your freelance marketplace with Google AdSense and earn a commission every time someone from your audience clicks on ads.
Okay, now we’d like to demonstrate how the first two revenue models work on the front-end. To do that, we’ve created a simple service marketplace with the TaskHive theme and the HivePress plugin. We registered a new user account to show you how everything works for website visitors.
Firstly let’s try to list a service using one of the listing plans.
If you are using the TaskHive theme and you have set up the monetization models as described above, you can test everything on your own by registering a new user account. Then go to your website, click on the List a Service button. You’ll be prompted to select a plan.
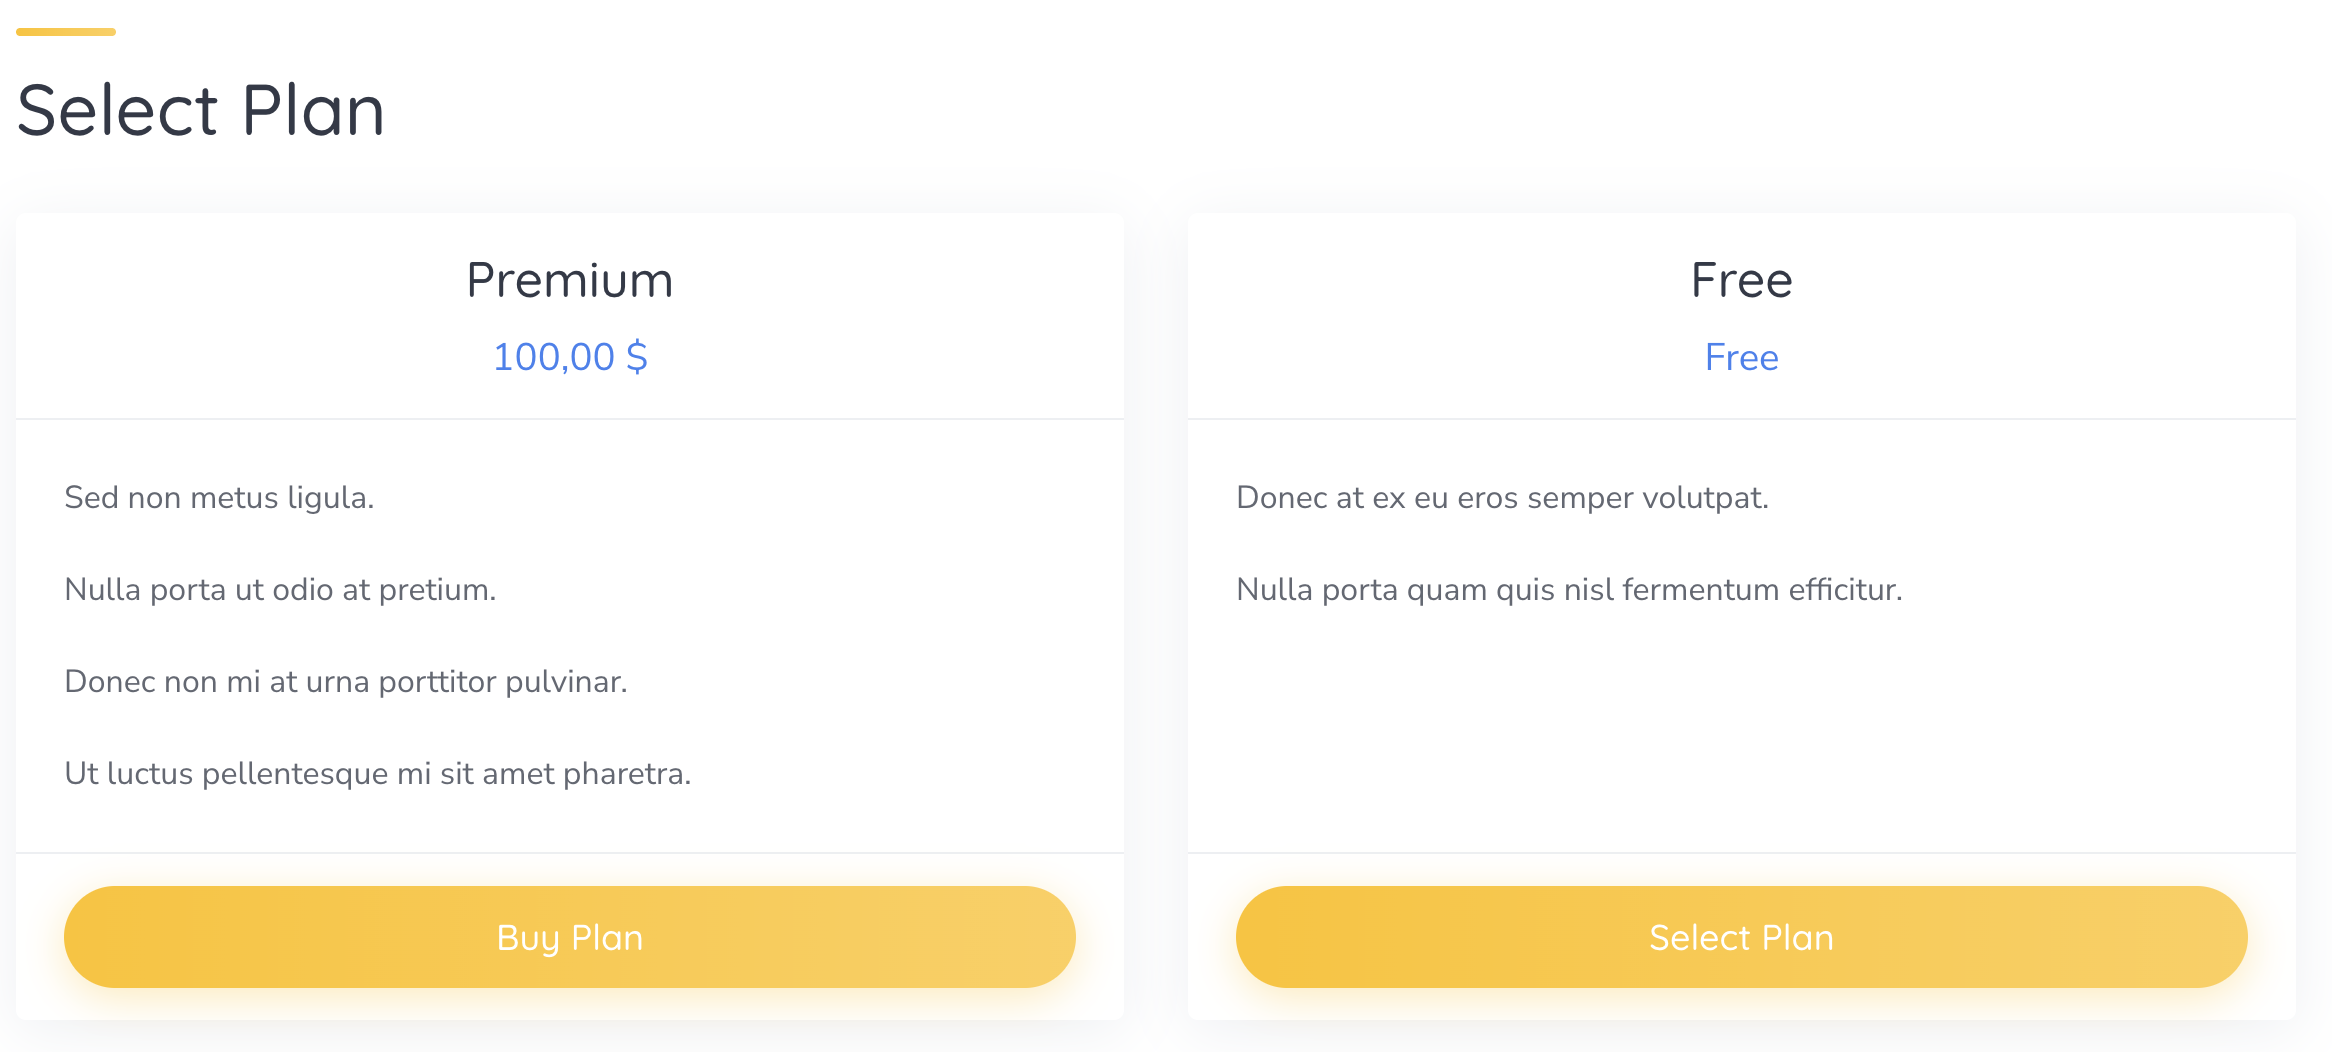
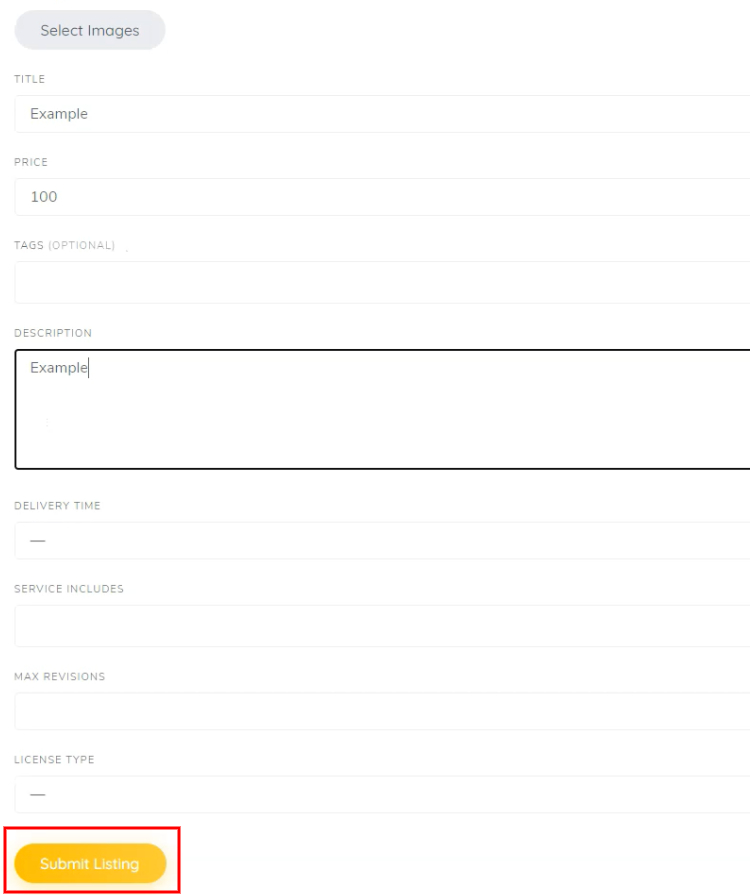
Once the plan is selected (Free) or purchased (Premium), you’ll be taken to the listing submission page, where you need to fill in all the listing details and click the Submit Listing button.
That’s how the first revenue model works! Now let’s take a look at the second one and check how the commissions work.
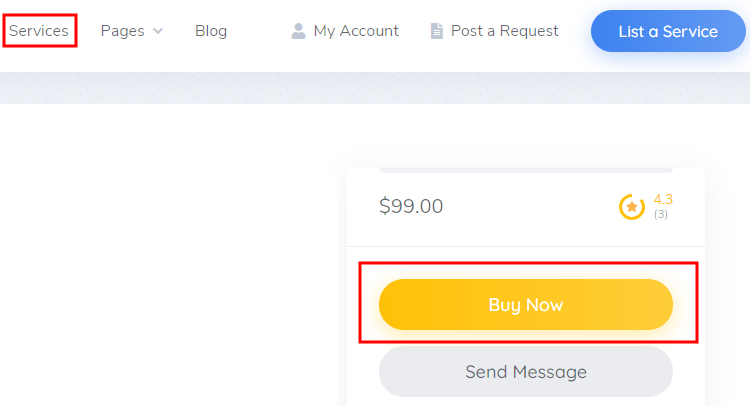
Now, let’s buy one of the existing services to check how the commission rates work. To do that, navigate the Services page, select any service and click on the Buy Now button (as shown on the screenshot below).
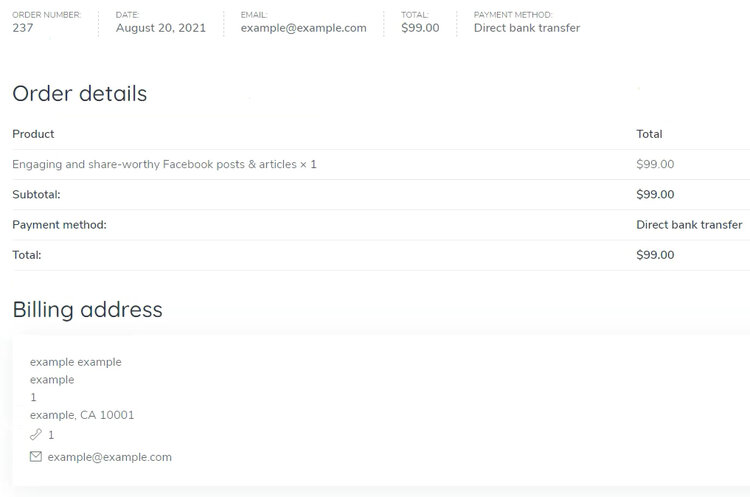
You’ll be taken to the checkout page. For the sake of this tutorial, we’ll fill in the details, proceed to payment and then mark this order as paid manually. Once the checkout is completed, let’s switch back to the admin account and check the vendor’s balance.
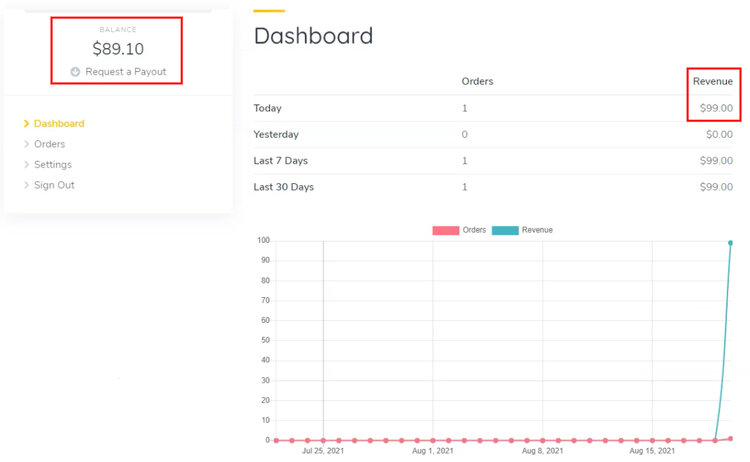
Once you log in as an admin, go to the My Account section. As you can see, the sales chart displays the revenue of $99, while the account balance displays $89.1 because the commission fee has been deducted from the order amount.
That’s how it works! We hope this article was useful to you, and now you have a better idea of how to monetize a service marketplace in several different ways using WordPress.
Also, keep in mind that if you want to create and monetize a peer-to-peer marketplace with WordPress, you can easily do it with the HivePress plugin and its TaskHive theme since they have all the required features for building a marketplace of services right out of the box.
Feel free to check our overviews of:
A few tips on managing your business directory website.

Check out 6 helpful tips on how to choose a niche for your website.

A list of 7 proven monetization strategies for WordPress directory websites.