
How to Create an Appointment Booking Website with WordPress
A short guide on launching a scheduling platform with WordPress.
A step-by-step tutorial on how to build your own Tripadvisor using WordPress.
Most travelers start their journeys by booking tickets, looking for accommodation, and searching for attractions, restaurants and other things online. That’s where travel directories come into play. They provide travelers with tons of trusted reviews and tips, helping people to travel with the wisdom of the crowd.
Recently it has become popular to create niche travel directory websites where people can share their tips and some “extraordinary traveling ideas”.
That’s why, in this short guide, we’ll show you how to create a travel directory with WordPress. We’ll walk you through the whole process of making your own website, starting from the theme installation and ending with the monetization options.
So, let’s dive in!
A travel directory is a website that includes all the necessary information you may need when planning to travel to new places, from travel guides and tips to lists of good restaurants and hotels. It’s like a guestbook, a place where people record the highs and lows of their holiday experiences.
The most prominent travel directory is Tripadvisor. It’s a go-to website for travelers since it gives them information about accommodations, relevant prices, attractions, etc., straight from other travelers who have actually visited those places.
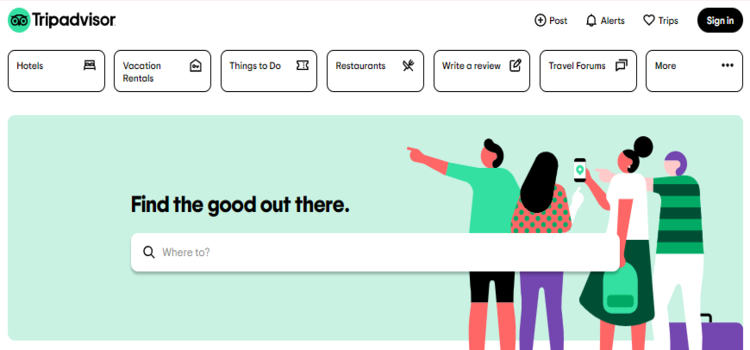
In a nutshell, Tripadvisor works as an intermediary between travelers around the globe. Anyone can check all the reviews and rates about places they are going to visit and share their own opinions after visiting them.
Additionally, Tripadvisor allows website visitors to check deals from its partners. For example, they can find car rental deals, cheap flights and accommodation available for booking. Users may click on any link to be taken directly to a partner website, knowing they have found the best deal.
There are not so many factors that affect the average cost of building a WordPress website if you are doing it on your own. Generally, it only depends on the WordPress theme you will use (free or premium) and the hosting provider you prefer.
We’ll show you how to create a travel directory website with a free WordPress theme and an open-source WordPress plugin, so you’ll be able to kick-start your website for less than $30-100 (depending on your hosting plan).
For the sake of this tutorial, we are going to use:
They are both lightweight, easy to use and intended to work hand in hand, so no compatibility issues occur.
Alright, now we can move to our first step – theme installation.
ListingHive is a free WordPress theme, so you can find it in the WordPress repository and install it directly from your dashboard. To do so, navigate to the WP Dashboard > Appearance > Themes page and click Add New. Next, find it via the search bar and proceed by installing the theme. Finally, click on the Activate button.
When the theme is activated, you’ll get a suggestion to install HivePress, the plugin that powers ListingHive directory features, so it’s essential to install it. Simply click on the recommended plugin’s link, and proceed by installing and activating HivePress.
Please follow the step-by-step screencast below if you have any troubles with installing ListingHive.
Once you finish installing the theme and the HivePress plugin, it’s time to add some extra features to your travel directory in order to extend its core functionality. Navigate to the WP Dashboard > HivePress > Extensions section to check a list of the ListingHive extensions.
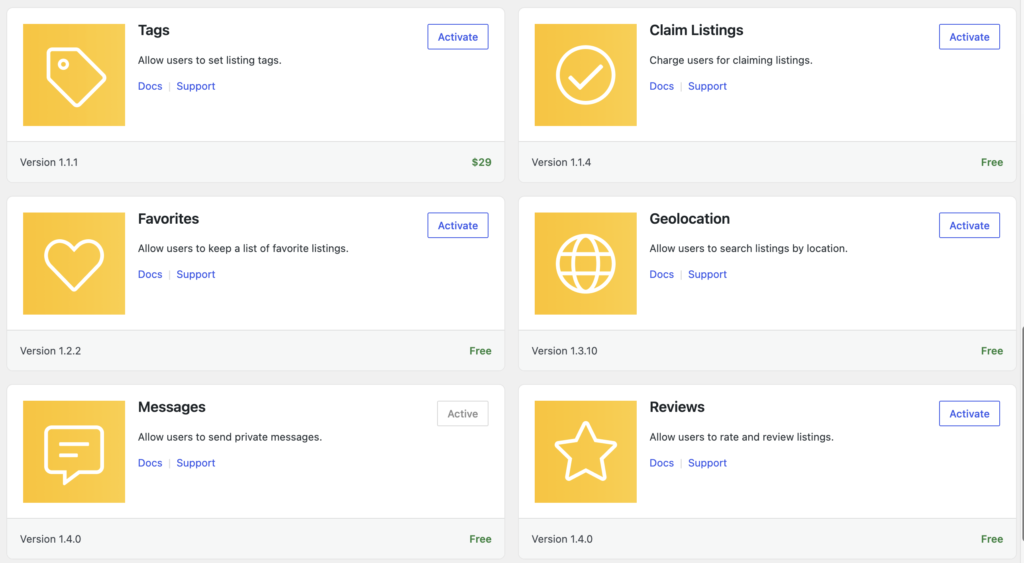
There are more than a dozen add-ons that you can install in a few clicks in order to extend your website functionality. Let’s examine some of them:
For example, you can install the Favorites extension to allow users to keep a list of favorite listings. It’s a convenient feature for users because once the listing is marked as a favorite, they won’t need to search for it again when returning to your website. Since travel planning often is a time-consuming process with a lot of options to choose from, the ability to keep a list of favorite listings becomes a helping hand.
Another great extension is Reviews. It allows users to rate and review listings. It’s a crucial feature for a travel directory since many tourists choose hotels, restaurants, attractions, etc., only after checking reviews of other travelers. Also, you can install the Messages extension to allow users to communicate on your website via messages.
One more essential feature for any travel directory website is a location-based search that allows users to specify their destination and show results only from the chosen area. You can easily enable this feature on your website with the Geolocation extension. Moreover, in order to make it easier for you, we’ve prepared a step-by-step guide on how to integrate Google Maps into your directory website so you don’t have to handle it on your own.
Finally, if you want to improve the UX on your website, there is one more handy feature. You can install the Social Login extension to allow users to sign in via different third-party services (Google, Facebook).
As you can see, there are a lot of options to enhance your travel directory website. We recommend checking the whole list of available add-ons to install only those you need on your website. Bear in mind that you can create a travel directory website with unique functionality by simply combining various extensions.
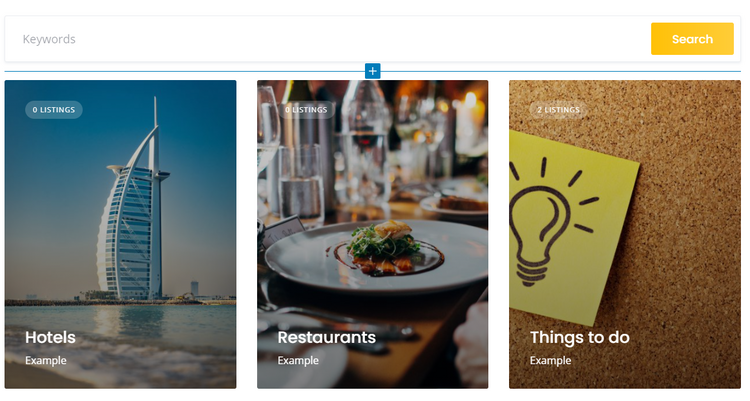
The next step is to split your travel directory into categories depending on the types of listings you want to have on your website. For example, the main Tripadvisor categories include “Things to do”, “Hotels” and “Restaurants”. To add a new category, navigate to the WP Dashboard > Listings > Categories section.
First of all, you need to enter the category name, let it be “Things to do,” then fill in the description if necessary. Also, there’s an option to turn your category into a subcategory by setting a parent category for it. Finally, you can upload the category image. When finished, click on the Add Category button, so it appears on the front end.
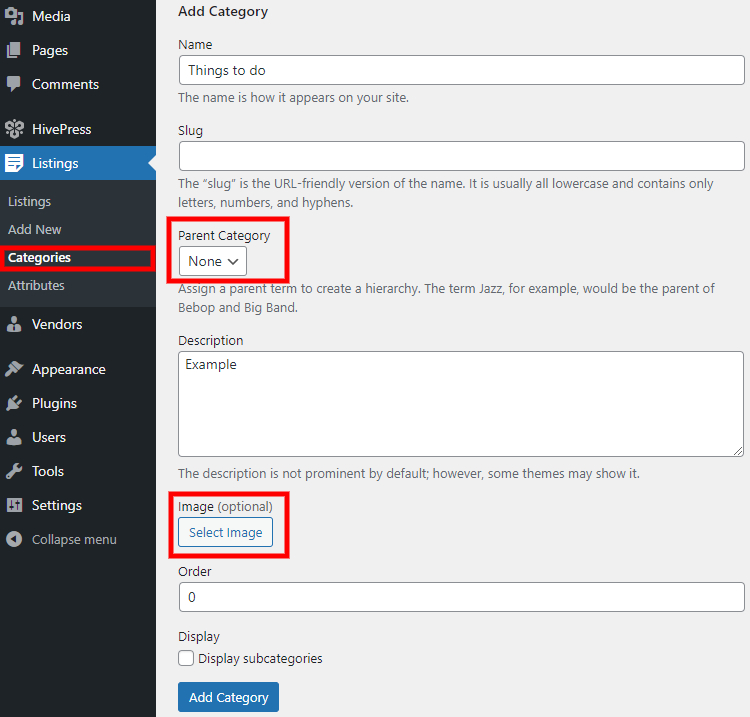
Keep in mind that similarly, you can create as many categories as required for your website. Now let’s move on to the next step and try to add some fields specific to travel directory listings.
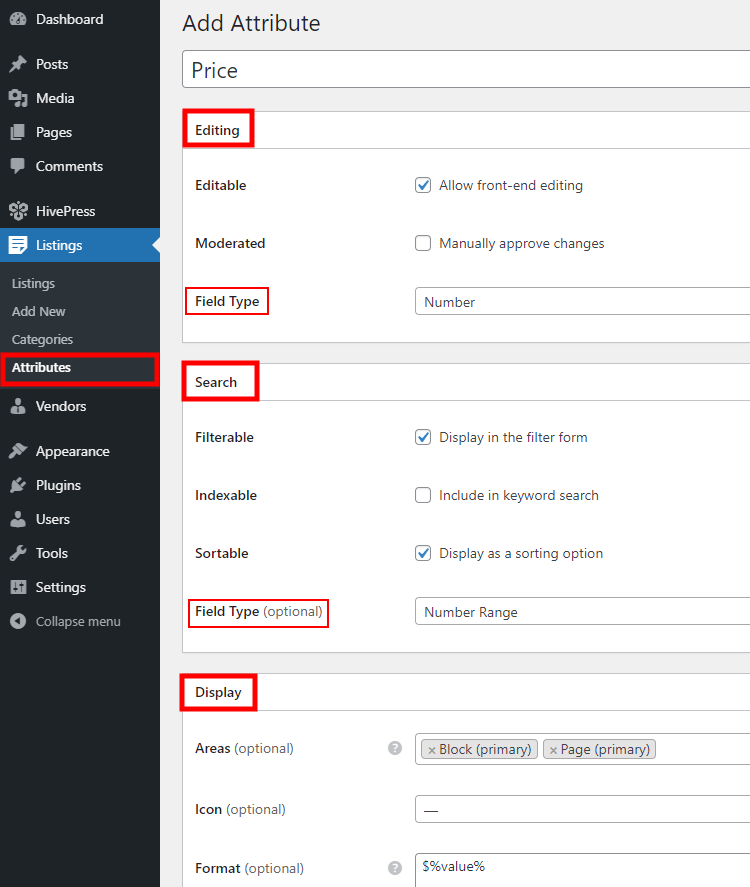
You can add custom listing fields by going to the WP Dashboard > Listings > Attributes section and then clicking Add New. For example, let’s add the “Price” attribute, so users will be able to set the price range when they are looking for some events nearby. Once you enter the attribute title, you need to go through each section to set up the attribute. Let’s briefly cover them:
In this section, you can customize the main attributes settings – select its field type, allow users to edit it and enable moderation if necessary. For the “Price” attribute, select the “Number” field type and allow front-end editing so users will be able to specify the price when adding a new listing.
Within this section, you can set up a search filter for your attribute. For example, it’s better to mark it as filterable and sortable – in that way, users will be able to search and sort listings by this attribute. Then you need to select the search field type for your attribute. We recommend selecting the “Number Range” field type so visitors can set a price range according to their budget instead of searching by specific price.
In the last section, you can define how the attribute value appears on the listing pages by setting its display format. For example, you can use the $%value% format, but if you need a different currency, it’s not an issue – simply change the symbol, and that’s it.
Finally, you can make any attribute category-specific so it will be used only for the listings from that category. Once you are done with setting up the attribute, click on the Publish button.
Likewise, you can add many different custom fields and search filters. There are no limits, so you can create as many as you need for your travel directory website. Alright, now it’s time to add a new listing, so let’s move to the next step.
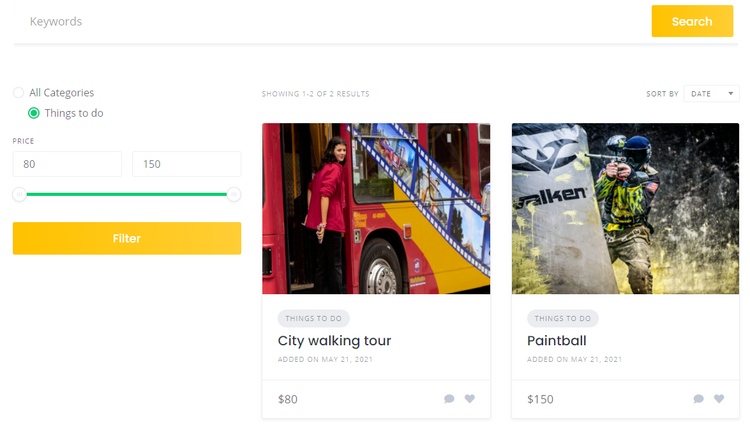
Let’s add the first listing to the “Things to do” category but do it from the front-end to get a better understanding of how it’s gonna work for users. To do this, go to your website, click on the Add Listing button, and select the “Things to do” category.
Now you need to fill in the submission form. You can upload the listing image, enter the listing title, let it be “City walking tour,” fill in the description, set the price (our recently added field) and submit the form.
Keep in mind that as a website owner, you can customize the submission form in the way you like by adding or removing different fields as well as making them optional or required.
Finally, in order to make the listing visible on the front-end admin has to approve it in the WordPress dashboard. Simply navigate to the Listings section, locate the pending listing and approve it. If you don’t want to approve each listing manually, you can disable moderation in the WP Dashboard > HivePress > Settings > Listings > Submission section.
Your next step is setting up a front page for your travel directory website. Since HivePress is integrated with Gutenberg and Elementor page builders, it won’t be an issue for you to customize new layouts with blocks.
In order to add a new page, go to the WP Dashboard > Pages section and click on the Add New button. Firstly, enter the page title. Then try adding some layout blocks. For example, you can add the listing search form so travelers can search for tourist attractions by keywords via the search bar on the homepage. Simply click on the ➕ icon and select a block you want to add. Similarly, you can add a block that displays listing categories. When you finish setting up the front page, you can publish it.
Now you need to make this newly-created page the front page of your website. To do this, go to the WP Dashboard > Settings > Reading section and pick this page in the drop-down menu, then save changes. Additionally, if you want to make your travel directory website truly unique and exceptional, we recommend visiting the WP Dashboard > Appearance > Customize section and going through all the settings there. Play around a bit with customization options to find a perfect look and feel for your website.
Finally, let’s talk about the available monetization options. With the ListingHive theme, you can monetize your travel directory in several different ways and let’s examine each of them:
As you can see, there are several ways of monetizing your directory website. You can choose any model for your website or use them all at once. Everything depends on your travel directory website niche and requirements.
That’s it! Now you know how to create a travel directory website like Tripadvisor with WordPress without a single line of code. Running your own website is not an easy deal, and it requires a lot of effort to attract first visitors. However, where there’s a will, there’s a way, so just be patient and keep going with your website, and sooner or later, it will pay off to you.
Finally, keep in mind that one of the easiest ways to build a travel directory website with WordPress is by using the ListingHive theme and the HivePress plugin that go with all the necessary features right out of the box. So you can enjoy creating your website with greater ease and comfort.
By the way, you can check how HivePress and ListingHive stack up against other directory plugins and free directory themes in our comparison articles.
A short guide on launching a scheduling platform with WordPress.

A short tutorial on how to create a booking website without any coding skills.

Just a few simple steps to create your own event directory website.