
How to Create a Directory Website with WordPress for Free
Create your own directory website with WordPress in a few simple steps.
Create and monetize a real estate directory website in 6 steps.

The Internet has created an enormous opportunity in the home-selling market. To be precise, almost the entire industry moved online – according to the National Association of Realtors, in 2020, 97% of homebuyers used the Internet in their home search.
So it’s obvious that many people are thinking about launching their own real estate site.
In this article, we’ll explain everything you need to know if you want to create a real estate website with WordPress. We’ll cover the types of property sites, the monetization models, explain how much it costs to get your website up and running and finally show step-by-step how to launch your real estate website using WordPress.
So let’s get started!
Real estate websites attract so many eyeballs every month because they are mutually beneficial for sellers and buyers.
Simply saying, real estate sites work as an intermediary between property owners and buyers or renters. These websites show current listings of homes available for rent or sale and facilitate the whole process of searching, communicating and closing deals.
To get a better understanding of how in-demand real estate websites are, you can take a look at the chart below that shows website traffic (in millions) of the most popular property sites.
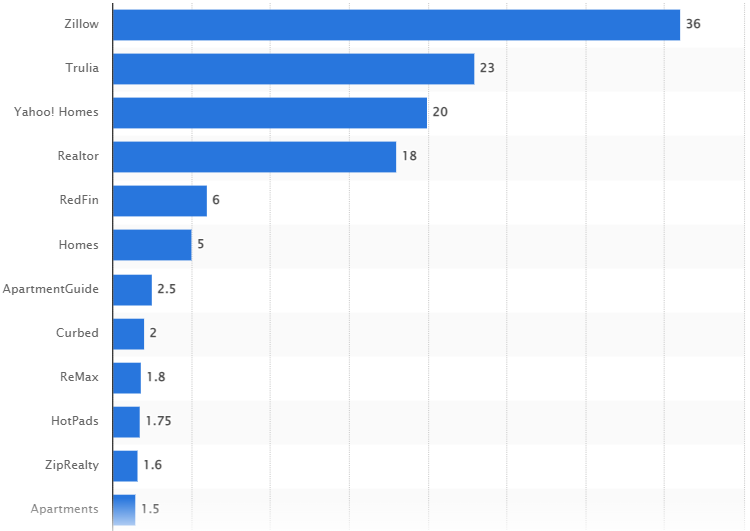
(Most popular real estate websites in the United States as of October 2021, based on unique monthly visits – Statista)
As you can see, there are millions and millions of people using real estate websites during their house hunt. So the demand is pretty high, and you can take advantage of such growing popularity by launching your own real estate site.
So let’s move on to the following sections and find out what types of property websites are there, how they make money and, of course, how to launch your own real estate website with WordPress.
It doesn’t matter whether you buy, sell or rent an apartment, you know how stressful the whole process of searching could be. In each case, there are different pain points and obstacles, so that’s why there are several types of real estate websites that serve different customers.
While there are many specific types of property sites, we’d like to cover two of the most common ones.
A real estate directory is a platform that allows users to find houses for rent and sale. However, the key point here is that homeowners can’t list their property without an agent. Also, such websites are often managed by real estate agencies.
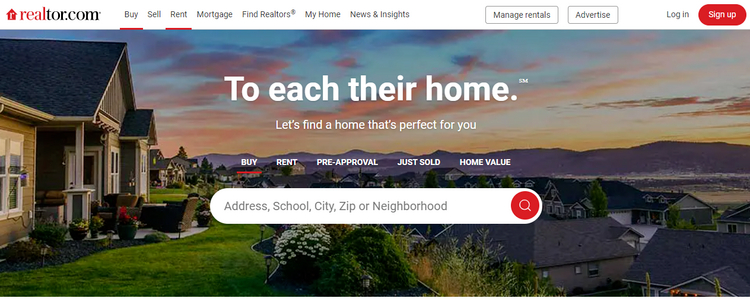
As an example, you can take a look at Realtor.com. It’s a highly-popular real estate listings website that gets more than 20 million website visits each month and has thousands of properties in its database, and all of them are listed by agents.
A real estate marketplace is a two-sided platform that works as a mediator between property owners and buyers. On such websites, sellers are in the driving seat, they can register accounts, list and promote their properties, check the analytics (i.e., views, visits, likes, etc.), and so on. On the other hand, customers can easily search for properties and contact owners directly.
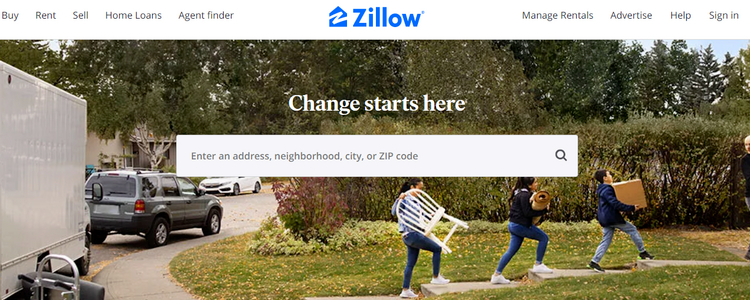
Zillow is the best example of a real estate marketplace where anyone can register and list their property. In addition, buyers and sellers can use this platform for free, without any hidden fees, since Zillow makes its money by displaying ads.
Bear in mind that WordPress allows you to create both real estate directories and marketplaces without any coding skills, and you’ll be able to do so after finishing this tutorial.
Now, let’s move on and find out how you can actually monetize your future WordPress property website.
If you want to create a real estate website with WordPress, you are probably interested in making money with it. Here are 3 most popular monetization models for real estate sites:
You can choose either one monetization model for your real estate website or mix a few.
More than 40% of websites around the globe are powered by WordPress, and there are a few reasons for that:
We’ve mentioned some of the most prominent advantages, so now you have a better idea of why WordPress is the best solution when it comes to launching a website.
Now we’d like to give you a piece of advice on how to select a suitable WordPress plugin that has all the necessary features for building a WordPress real estate website.
There are various WordPress plugins out there, so it may be challenging to find the best one that includes the essential features for creating property listing sites. To make it easier for you, here’s a list of features that a plugin should support if you want to create a real estate website:
So, now you have a better idea of what features you should be looking for. For the sake of this tutorial, we are going to use the HivePress plugin. It’s a free WordPress directory & classifieds plugin that is suitable for building any type of listing websites.
Additionally, you may want to check our overview of the excellent free WordPress listing plugins and choose a plugin that best fits your project.
Finally, we’d like to cover one more topic before moving to the tutorial part of this article, namely – costs associated with creating a real estate website. While WordPress is free to use, there are still some things you have to pay for if you want to launch any kind of website.
An important question to ask yourself before starting your own online business is – how much does it cost?
To create a real estate website with WordPress, you’ll need:
So launching your own real estate website costs approximately $200 if you want to use a premium real estate WordPress theme.
However, the good news is that you can cut costs a little bit since we’ll show you how to create a fully-functional property listing website with the free ListingHive theme. ListingHive is a highly customizable theme that goes with all the essential real estate website features right out of the box.
Moreover, at the time of writing, it’s the most popular free WordPress directory theme in the WordPress repository, with more than 8000 active installations, and such numbers speak volumes.
Okay, now let’s start building a real estate website with WordPress and move to the first step – theme installation.
As we mentioned before, we’re going to use ListingHive because of its versatility. In order to install it go to your WordPress admin area, then proceed to the Appearance > Themes section and click “Add New”. Now, simply type “ListingHive” in the search bar to find, install and activate it.
Upon activation, you’ll get a suggestion to install the HivePress plugin. We recommend installing it to enable the core functionality for your future real estate directory. Also, you’ll get a notification to start with the ListingHive demo content. You can download and import the demo content to start with some existing layouts, listings and categories – it’s always easier to edit existing content than create it from scratch. Feel free to check the ListingHive live demo before importing it to get a better idea of its look and feel.
However, if you don’t want to start with the demo content or are highly familiar with creating and editing content in WordPress, it’s not an issue. We’re going to walk you through each step, one by one, to explain how to set up your directory by yourself from scratch. So let’s go to the next step and create a custom category.
If you have any trouble installing ListingHive, you may follow a step-by-step screencast that shows how to do it.
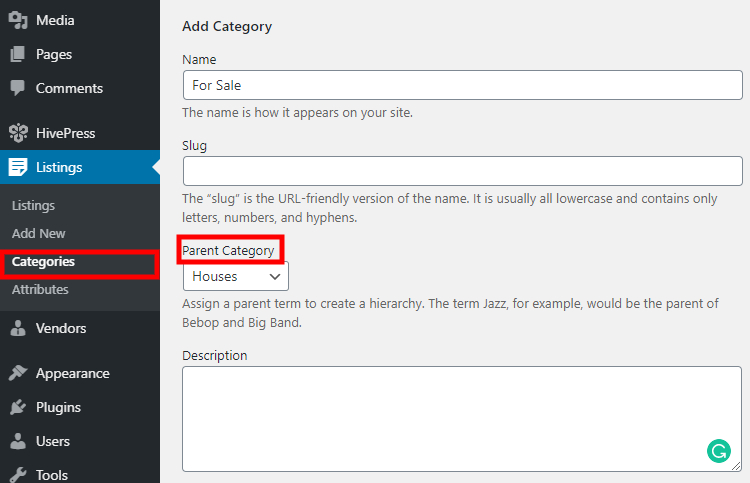
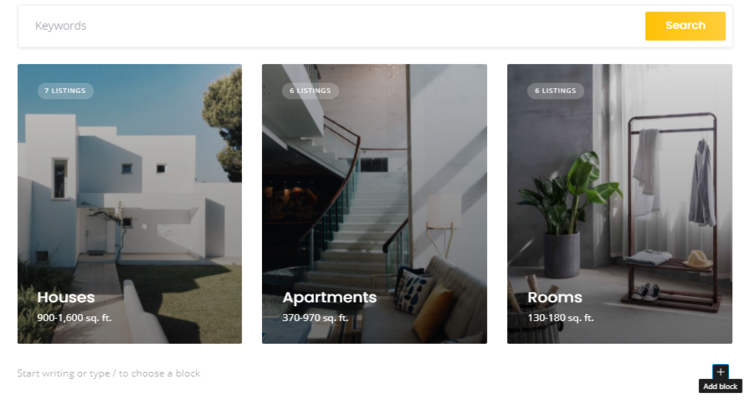
First, you need to add some listing categories in order to split your content into smaller and more specific sections, so it’s easier for users to navigate your directory website. For example, let’s create a “Houses” category to display houses for sale there. To do this, go to the Listings > Categories section. Here you can name the category and describe it if necessary. It’s essential to select an appropriate category image too. Finish by clicking the “Add Category” button so the category appears on the front-end.
After you create the first category, you may add several more. For example, let’s add “Apartments” and “Rooms” categories in the same way. You may also want to separate listings into “For Rent” and “For Sale” subcategories (or make these top-level). You can easily do it within the same Categories section by selecting the parent category you want to split.
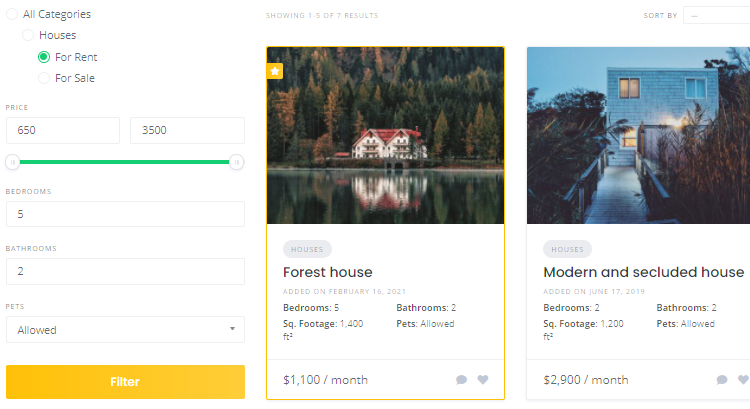
Once you create several categories, you can add the essential attributes for your property listings. For example, let’s add a new “Price” attribute to every listing. Simply go to the Listings > Attributes section and click on the “Add New” button. Here you can set up the attribute in 3 different contexts. Let’s briefly go through each of them:
In the first section, you set up your attribute functionality by allowing front-end editing and choosing the field type. For example, for the “Price” attribute, it’s necessary to enable front-end editing so users can indicate the price when adding a new listing. Also, this attribute should have the “Number” field type. After you publish it, you’ll be able to set it as a required field when adding new listings.
You can specify if the attribute should be used for searching or sorting listings. For example, if you mark it as filterable, users will be able to narrow down the search filtering results by different attributes. The sorting option allows customers to search for listings with this attribute in a particular order. For the “Price” attribute, you need to set it as filterable and sortable. It’s also essential to select the “Number Range” field type so that users can set a price range.
Here, you’re setting up the attribute’s appearance and how it’s going to look on the front-end. You can indicate the area of listings where you want to place it, assign some icon to it, and define its format. In our example with the “Price” attribute, we’ll choose the $%value% / month format to display the currency symbol along with the rent period.

As you see, you can add as many attributes as you find necessary for your website. But still, keep in mind that you can install ListingHive demo content that already includes pre-configured attributes suitable for a real estate website.
The next step is to add a new page to display the search form, listing categories, recent listings, and any other custom content you may want to add. You can build a new page using the WordPress block editor. Let’s navigate to the Pages section in the WordPress dashboard, click “Add New” and name the page “Home” (we’ll set it as front-page later).
Now, simply click on the “Plus” symbol and choose the block you want to add. For example, let’s add a search bar and “Listing Categories” block that shows categories of listings. Once added, publish the page by clicking on the “Publish” button.
After that, go to the Settings > Reading section and set this page as a front-page of your website. That’s it, you may now take a glance how the newly created homepage looks like.
To customize the overall styling, go to the Appearance > Customize section. You can change primary and secondary colors, logo, background images, fonts, and so on. Go through all the sections to tailor the website look and feel to your needs.
Now you can try adding a new listing to one of your categories with new attributes. For example, let’s add a “Forest house” listing to the “Houses” category. But try to do it from the front-end instead of the WordPress dashboard so you can test how it’s going to work for your users. Simply go to the main page of the directory and click on the “Add Listing” button. It will take you to the submission form, where you should fill in the required fields to submit a listing.
After you fill in the title and description, upload an image, and complete the other fields, simply click on the “Submit Listing” button. Once the listing is submitted, the site administrator will get an email notification and will be able to approve or reject it in the Listings section. If you want to disable listing moderation, you can do so in the HivePress > Settings > Listings > Submission section.
Once you set up the essential functionality, it’s time to add some advanced features to your real estate directory website. There’s a list of different HivePress extensions that you can add to your website.
For example, you can add the Favorites extension to allow users to keep a list of favorite listings. It’s a handy feature for a real estate directory website since people often lose the properties they liked among thousands of other listings while browsing. With a list of favorites, they can bookmark a property they liked and return to it later.
You may also want to enable location-based search so that users can easily find real estate in a particular area. Without a doubt, it’s a vital feature for property listing websites since everybody is looking at the real estate location before buying or renting it. You can easily enable Google Maps on your website with the Geolocation extension.
One more convenient feature is to allow users to sign in via third-party services like Facebook or Google with the Social Login extension. It saves users time and eliminates the need for keeping another login and password just for your website.
As you can see, there are many different ways to improve your real estate directory and make it handy for users. You may check the following screencast that shows how to install HivePress extensions from the WordPress dashboard.
Previously we’ve mentioned what business models most real estate sites use. But now we’d like to share some tips on how to make money with the HivePress-built real estate website. There are several ways how to monetize a directory website.
It’s the most common but at the same time most demanding way to monetize a real estate directory since it generates a decent income for high-traffic websites only. For example, you can sell a specific area on your website and display sponsored banner ads there. You may also integrate your website with Google AdSense and earn a commission for each ad click.
You can create plans with different limits on listing submissions and featuring, listing expiration dates, and more, using the Memberships extension — a paid add-on that lets you create and sell different plans. This way, you can offer a free tier for basic use while reserving premium features for paying users, giving people a clear reason to upgrade.
Once you build a real estate website and it gets decent traffic, you can go ahead and start monetizing it in many different ways. However, be careful with displaying too many ads on your website since it may look unprofessional and annoy users.
As you see, it’s crazy easy to create a real estate website if you’re using the right tools. Once you build your directory website, start to fill it with content and useful features. Make sure that users are your main priority and try to fulfill their needs. With this in mind, you’ll be able to make money from your directory website when it gets enough traffic.
If you are about to build a real estate directory website with WordPress, you may want to try the HivePress plugin with its default ListingHive theme. They are both free, extensible by design, and allow you to build any type of directory website without a hitch.
Additionally, feel free to check out our overview of the most popular mistakes that people make when building a WordPress listing website.
Create your own directory website with WordPress in a few simple steps.

A short tutorial on how to create a pet services website with WordPress.

Create a website like Booksy with WordPress hassle-free.