
How to Create an Affiliate Website with WordPress for Free
Launch your own Amazon or AliExpress affiliate marketing website and start making money on commissions.
Just a few simple steps to create your own event directory website.

Despite the whole pandemic thing, the event market is still running. Many event organizers redesigned their business model and moved events online since the people’s desire to meet up is still there. So event directory websites are still popular and can be a reliable source of income for their owners.
In this tutorial, we’ll show you how to create an event directory website using WordPress. We’ll also explain how to extend its functionality and monetize it in several different ways.
So, let’s get started right away.
Basically, an event directory website is an intermediary between event organizers and event visitors. Such websites allow users to browse, create and promote various local events, from music festivals, marathons and conferences to gaming competitions and air guitar contests.
The most prominent example of an event directory website is Eventbrite. It’s a self-service ticketing platform that promotes tons of events around the globe and brings the world together through live experiences.

Any event website works as a two-way platform:
It’s a mutually beneficial website for both event-goers that have a list of all the upcoming events at their fingertips and organizers who can post their events under different categories like music, entertainment, business, sport, etc., and entice new visitors.
With the global pandemic, the recent years have felt a lot like a bad movie we’ve seen before, and you may have a pretty reasonable question “Isn’t the events industry dead?”.
Not by a long shot!
Indeed, in 2020 the events industry faced a new threat to revenue, but it’s not dead – it’s changing and gaining traction again. To make sure, you can look at the statistics that show the potential revenue from selling tickets in the next few years.
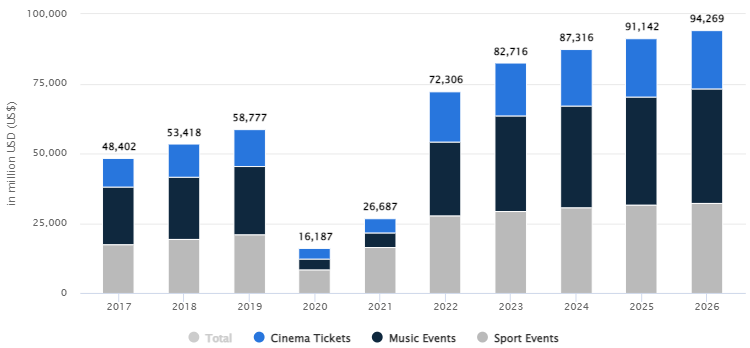
As you can see, the events industry is recovering, so creating an event directory website still may be a profitable online business, especially if you launch a niche event directory to avoid direct competition with market giants like Eventbrite.
If you decided to create an event directory website with WordPress, there are a few things you should have prepared. Besides some obvious stuff like domain name and WordPress hosting, you need to choose:
However, instead of jumping into the WordPress repository and spending a lot of time and effort trying to find a perfect directory plugin for your events website, it’s easier to check our overviews of:
Both lists include the best options available, so you can choose a plugin & a theme that suit your project the best.
For the sake of this tutorial, we are going to use HivePress, a free WordPress directory plugin that allows you to create any type of directory and listing websites, and ListingHive, the most popular free WordPress directory theme on WordPress.org.
It’s a pretty common question, and there’s no cookie-cutter answer since the cost heavily depends on the website requirements and features you want to offer to your visitors.
The good news is that WordPress is open-source software, so you only have to pay for a domain name, a hosting plan and a WordPress theme (if you choose a premium theme) to get your website up and running.
So an approximate price to create an event directory website with WordPress could be $100-200 if you are using a premium theme and about $50-150 using a free directory theme.
Alright, now let’s move on and check out the 6 main steps you need to follow if you are about to launch an event directory website using WordPress.
Firstly, you need to install ListingHive, a free WordPress directory theme in order to get basic layouts and styles for your event directory. Since it’s a free theme, you can install it directly from the WordPress dashboard. Navigate to the Appearance > Themes section, click Add New, and find ListingHive via the search bar. Then install it by clicking on the Install button and finally activate it.
Once the theme is activated, you’ll get a suggestion to install the HivePress plugin. In order to create an event directory website, it’s necessary to install and activate the plugin since it enables the core functionality of your directory.
If you have any difficulties installing ListingHive, you can follow this step-by-step screencast.
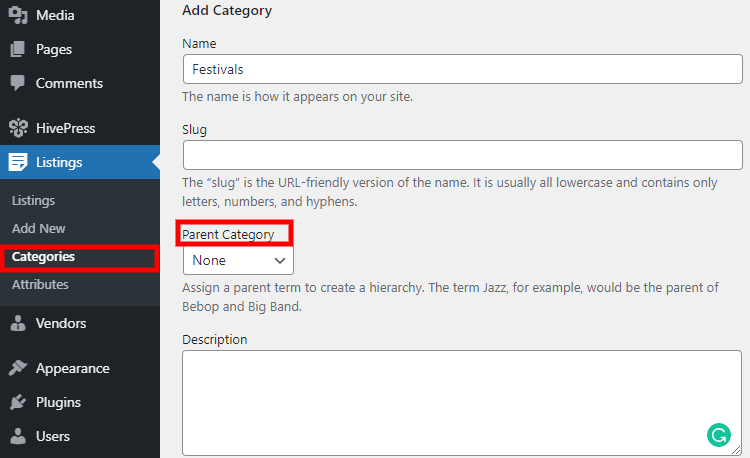
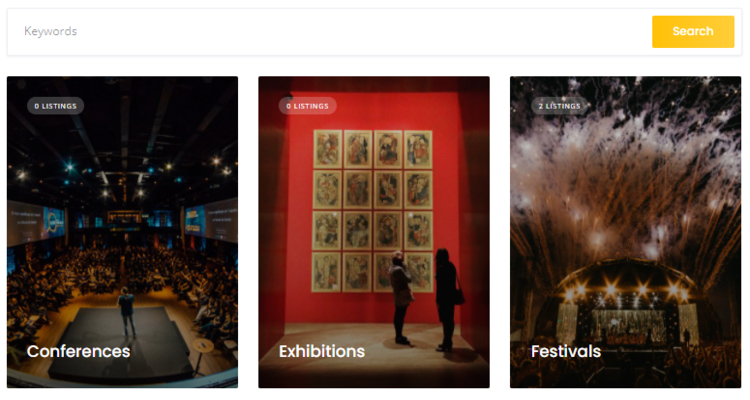
Let’s divide your event directory into categories to make it easier to search through your website. To do this, simply hover over the Listings menu item and click on the Categories link. Now you need to enter the category title, let it be “Festivals,” then fill in the description if necessary and upload the category image. When finished, click on the Add Category button, so the category appears on the front-end.
Now, you may add several more categories, for example, “Conferences” and “Exhibitions.” You can add as many categories as you need depending on your event directory niche and requirements.
Also, bear in mind that you can turn any category into a subcategory by editing it and then selecting the “Parent Category” for it.
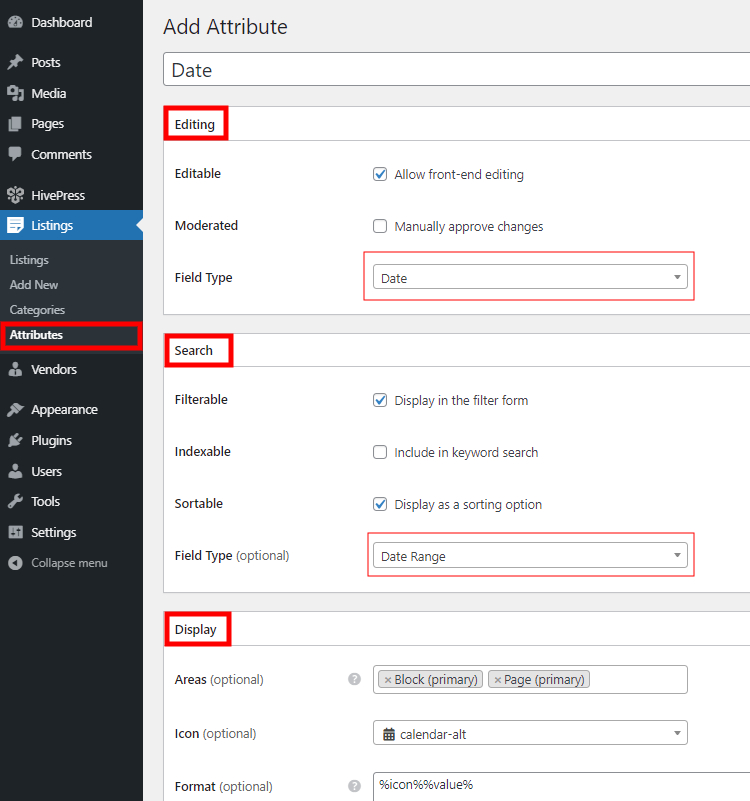
Once you are done with setting up categories, it’s time to add some custom event fields that will be displayed on the listing page. You can do it by going to the Listings > Attributes section and clicking on the Add New button. First of all, you need to enter the attribute title, for example, “Date.” Then go through all the other settings and adjust them depending on the attribute type and restrictions. Let’s take a look at each settings section to get a better understanding of how it works.
%icon% %value% format.In the same way, you can add as many custom fields as you need. You can also make attributes category-specific by assigning them to different event categories. It may be useful if you list a few types of events that require some custom details or search filters.
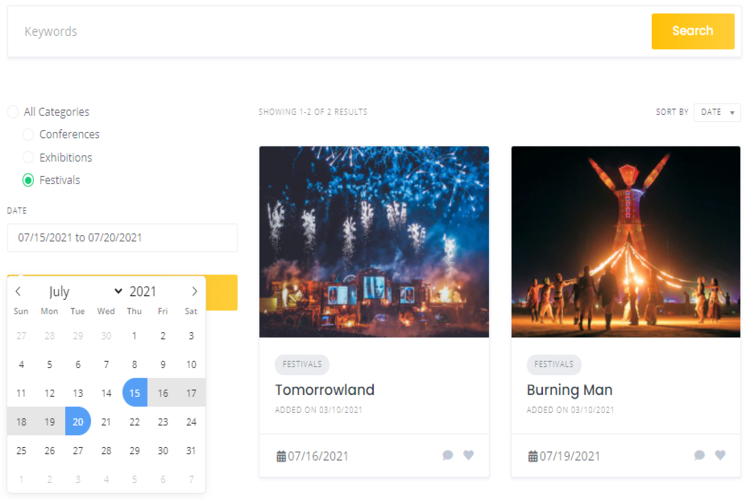
The next step is to add the first listing to your event directory website. In order to understand how it works for users, let’s submit a new listing via the front-end. Navigate to your website’s home page, click on the Add Listing button, and select a category. On the next page, you need to upload the image, enter the title, fill in the description and specify the event date (this is a custom attribute we previously added). Once finished, click on the Submit Listing button.
Now the listing should be approved by the admin in the Listings section. Simply find the pending listing and click on the Publish button, so it appears on the front-end. However, if you don’t want to approve and moderate newly submitted listings, you can disable this in the HivePress > Settings > Listings > Submission section.
When you approve the listing, you can go to the Category page and check the newly-added listing there.
Now let’s add a front page to your event directory website. It’s crazy easy to add and customize new layouts since HivePress is integrated with the WordPress block editor. To add a new page, navigate to the Pages section and click Add New. Firstly, you need to fill in the page title, e.g. “Home”, then you can start adding layout blocks.
Let’s add a search bar to your homepage. To do this, click on the ➕ icon and select the “Listing Search Form” block. You may also want to add the “Listing Categories” block to display event categories. You can easily do it in the same way by clicking on the ➕ icon and then selecting the block. Feel free to check all the available blocks and add those that you need.
Once you are finished with layout blocks, click on the Publish button. Now you need to set this page as the main one on your event directory website. Go to the Settings > Reading section and select your freshly-created page as the homepage of your directory.
Also, we recommend going through all the customizing options in the Appearance > Customize section. You can change your website’s look and feel in the way you like to stand your event directory out of the crowd.
At this point, your website already has the core functionality, but there’s always room for improvement. The finishing touch of setting up your event directory is to extend its functionality.
For example, you can install the Social Login extension to allow users to sign in via third-party services (like Facebook and Google). It may seem like a simple feature, but it’s highly useful for your website visitors. You may also want to add the Reviews extension to allow users to rate and review event listings. If there are recurring events on your directory website, it may be really helpful since they’ll be able to check the event rating before buying a ticket.
The Favorites extension implements one more excellent feature that allows your users to keep a list of favorite listings. For example, they can mark some events as favorites while browsing the directory and return to them later without having to search for them again. Moreover, if you want to allow users to search events by location, you can install the Geolocation extension to enable the location-based search.
You can check the whole list of free and premium HivePress extensions that you can install directly from the WordPress dashboard in order to extend your event directory’s functionality.
An event directory website can be a profitable online business since it’s a platform connecting event organizers with event-goers. Besides selling tickets, there are several more ways to monetize a directory website. Let’s go through some of the most notable:
As you can see, there are many different ways of monetization, and you can choose any of them according to the type of event directory you’re building. But keep in mind that profit comes when there’s decent website traffic, so we recommend taking care of it first before monetizing your event directory.
That’s it! As you can see, you don’t need to be a website wizard to create an event directory website. Now you need to spend time promoting your website and gaining the trust of users. But it’s worth its salt because when your website starts receiving enough traffic, it can turn into a great source of income.
If you’re looking to build an event directory with WordPress, you may consider the HivePress plugin. It’s a free easy-to-use plugin with tons of features that doesn’t require any coding skills to create and set up a directory website. It’s already trusted by 10,000+ websites and has a growing community of website owners sharing tips and showcasing their projects built with HivePress.
Launch your own Amazon or AliExpress affiliate marketing website and start making money on commissions.
Learn how to create a directory website with WordPress using ChatGPT, InstaWP’s MCP server, and HivePress.

A quick guide on how to build a WordPress lawyer directory website.