
Create a Real Estate Website with WordPress for Free
Create and monetize a real estate directory website in 6 steps.
A complete tutorial on how to add location search in WordPress.

There are many different ways to improve your directory website and one of them is enabling location-based search. If you’re running a directory or classifieds website similar to Yelp, TripAdvisor, Craigslist, or any other similar one that requires the location-based search, you can easily do this by integrating it with Google Maps. It’s an essential feature for some users since they are able to search for products, services, or places in their area. Also, the Google Maps platform has a free monthly limit that should be enough if your website gets moderate traffic.
In this step-by-step tutorial, we’ll explain how to add location search to your directory website. We’re going to use HivePress, a multipurpose WordPress plugin that allows you to create a directory website in a blink of an eye. Also, will use ListingHive, a free WordPress directory theme, along with the HivePress Geolocation extension for integration with Google Maps.
However, if you already have a directory website built with another plugin or theme, you can skip the first steps and scroll to “How to Fix “Oops! Something went wrong. This page didn’t load Google Maps correctly” ” section for troubleshooting the most common errors.
So, let’s move to the first step!
First of all, you need to install HivePress. You can install it as any other free plugin in WordPress. Simply navigate to the Plugins > Add New section and find it with the search bar, then install and finally activate it by clicking on the “Activate” button. Once you’re done with installing, you can proceed to the next step – installing extensions.
Also, if you find it difficult, you can follow the screencast below to install HivePress directly from the WordPress dashboard.
The next step is to install the Geolocation extension to allow users to search listings by location. To install it, simply hover over the HivePress section and click on the “Extensions” link. Find the Geolocation extension in the list, click on the “Install” button, and finally activate the extension.
Also, the following screencast shows the common process of installing HivePress extensions, so you can follow it step by step.
Once you’re done with the plugin installation and the Geolocation extension, it’s time to create a project on the Google Cloud Platform. Assuming you already have a Google account, you should be able to access this dashboard without any issues. However, if you don’t have one, then it’s essential to sign up for a Google account.
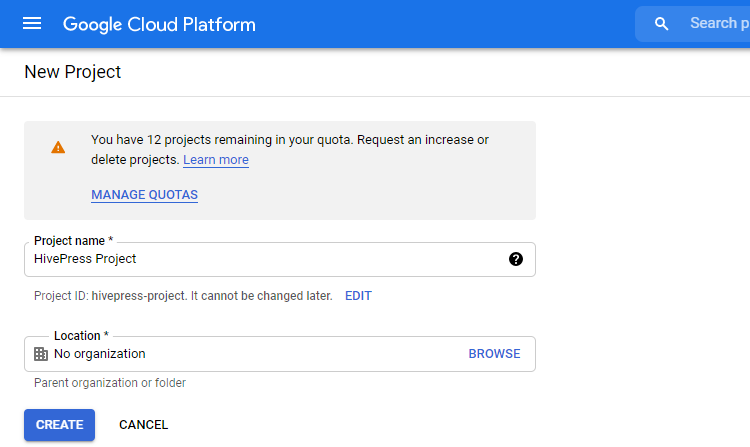
Now you need to create a project by clicking on the “Create Project” button, then name it, and finally, click on the “Create” button.
Now, if you don’t have a billing account with Google, you need to create a new one to enable the project billing. But, don’t worry, you don’t have to pay anything now, it’s only one of the requirements for using the Google Maps API. Simply follow the link and fill in all the form fields, including the payment method details.
You’ll get a $200 free credit every month, and in most cases, it’s more than enough to cover the expenses for using Google services on your website. Also, it’s possible to set up limits and notifications, so you never exceed the free credit. You can check the Pricing in order to get a better idea of how it works and to ensure that you can use maps for free.
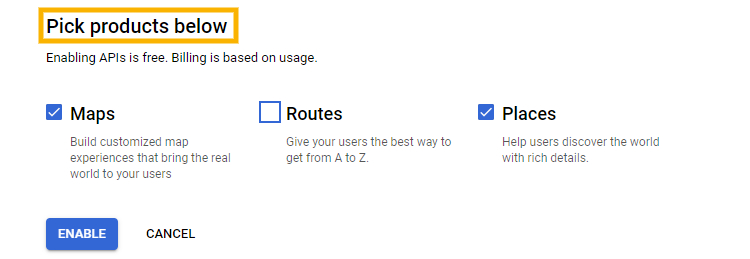
After you add your billing info, you’ll get a pop-up window with types of APIs you want to enable. Select Maps and Places as on the screenshot below and click on the “Enable” button. Also, if there’s no pop-up window, you can enable these APIs via the Google APIs Library page.
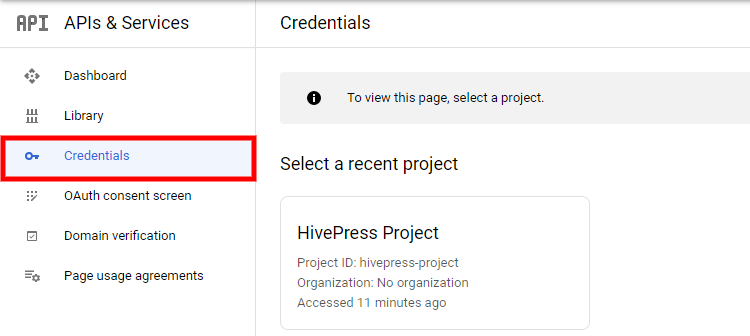
The next step is to create an API key for your website. To do so, navigate to the Credentials page and select your project.
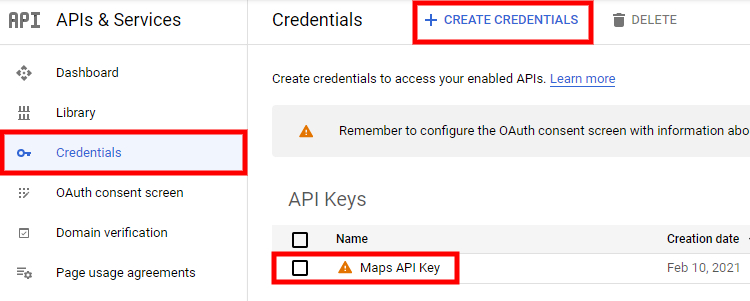
On the Credentials page, you can see the already generated API Key. If you’ve just created your billing account, then a key might be generated automatically. In this case, you can simply click on it to edit. However, if there’s no API Key on the page, you can create a new one in the Create Credentials > API key section.
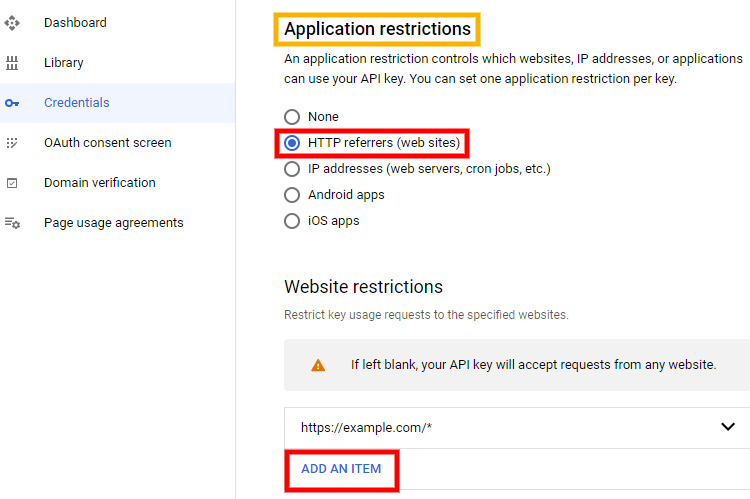
Next, you need to set up your API Key by setting the Application restrictions. It’s essential because if you simply embed the key, it will show in plain text in your website’s source code. That’s why you need to restrict this so other people can’t use your API Key for their projects. In order to do this, simply add the HTTP referrer to allow the API requests from your website only. Simply set your website address, but also add the “/*” part at the end to allow API requests from any of the website subpages, so Google Maps will work on all pages of your website.
Now you need to set API restrictions in the next field. Click Restrict key and select Maps JavaScript API, Places API, Geocoding API from the dropdown menu. If some of the mentioned APIs are not listed, you need to enable them on the Maps API Library page first. Once all three Google APIs are enabled and selected in the dropdown menu, click on the “Save” button.

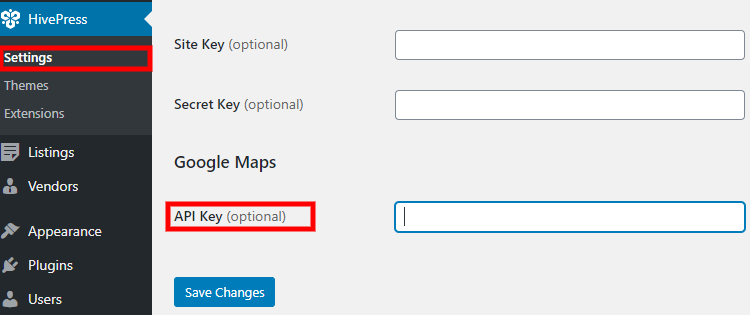
That’s it! You’ve just created an API Key, and the finishing touch is to enable Google Maps on your website. First of all copy the API Key on the APIs & Services > Credentials page. Now, if you’re using the HivePress plugin, navigate to your WordPress dashboard and go to the HivePress > Settings > Integrations > Google Maps section. Then just paste your API Key in the appropriate field and click on the “Save Changes” button to add location search to your website.
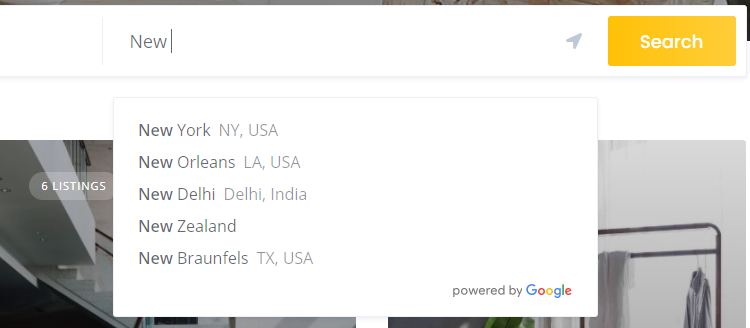
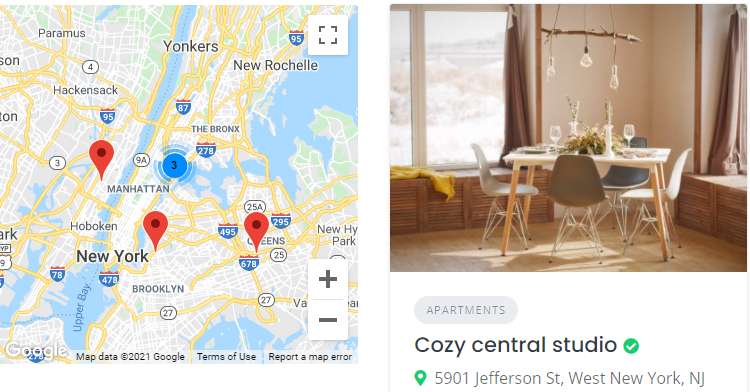
Congrats! From this moment, your website is integrated with Google Maps, and now you can add locations to existing listings in the Listings section. Also, users will have to set the location for the newly added listings. Additionally, there’s a location search field on your website and a Google Map, so you can try it out and search some listings by their location.
If there are any issues with the API key you created, the map may display the “Oops! Something went wrong. This page didn’t load Google Maps correctly” error. It’s a quite common error since setting up an API key is not a very user-friendly process, and users often skip some of the setup steps. However, you can fix it in next to no time if you know the roots of the problem.
To find out the reason for that error, you need to open JavaScript Console. You can open it with a few keystrokes that differ depending on your browser. Check the answer on StackOverflow that explains how to open JavaScript Console. If you use the Chrome browser, you can simply pressCTRL+Shift+Ito open it. Once you open it, you should see the error message, something like this one.

It’s important to know exactly what is causing the error so you can fix it. There can be several different errors, but we’ll show how to solve the most frequent ones:
However, if you have an error that is not listed above, then check the Google Maps API Error Messages documentation to find out what’s wrong and how to fix it.
This error means that there’s no API key at all, so you need to create one if you want to enable Google Maps on your website. If you get this error, we recommend you follow this tutorial starting from the first step in order to create an API Key and set up maps correctly.
This error appears when you’re using the wrong API Key. Most probably you’ve created it but didn’t add it to your website correctly. To fix this error, go to the Credentials page and copy the API Key.

If you’re using the HivePress plugin and its Geolocation extension, then go to the WordPress Dashboard > HivePress > Settings > Integrations > Google Maps section, paste your API Key in the appropriate field, and click on the “Save Changes” button.
If you get this type of error, it means that you didn’t enable the required APIs. There are many different APIs in the Google Maps API Library, so you need to go to the Library and enable those that are required for your project. Once you enable them, remember to also add them to the API Restrictions section in your API key settings in the Credentials section.
For example, if you’re using the HivePress plugin with its Geolocation extension and you want to add location search to your directory website, you need to enable and allow access to the following Google APIs: Maps JavaScript API, Places API, Geocoding API. You can take a look at the screenshot with the necessary APIs.
This error occurs if the API referrer restrictions are not set correctly. For example, if maps work on one page of your website and don’t work on others, then most probably you faced the same issue.
The good news is that you’ve set up and entered an API Key correctly, and there’s only one tiny detail you need to fix. Go to the Credentials page and click on your API Key to edit it. In the Application restrictions section, select “HTTP referrers (web sites)”. Then fill in the website restrictions as shown below but replace “example” with your domain name and click on the “Save” button. It may take up to 5 minutes for settings to take effect.
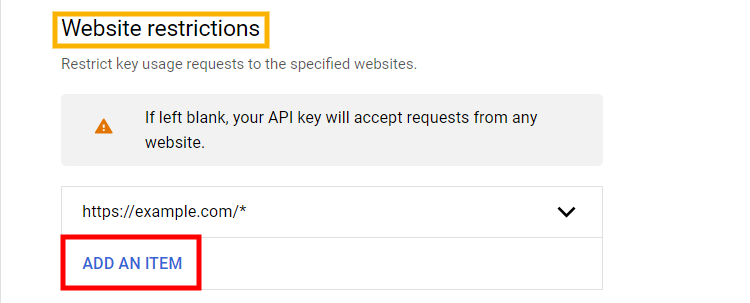
It’s important to add the “/*” part at the end to allow API requests from any of the website subpages, so Google Maps work on all pages of your website.
That’s it! They say if there’s a will, there’s a way. You have just added a location search feature to your directory website, and now your users can search listings by location. It’s a really important feature for most of the directories. Although it may look like a bit of a complicated process to add Google Maps, it’s worth its salt. Once you add location search to your website, it will positively affect the user experience. UX is highly important for any website since it’s one of the cornerstones of good traffic.
As you can see, you can integrate Google Maps into your website without any coding skills. If you haven’t decided yet what plugin to use for building your directory website, you may consider HivePress. It allows you to create directory and listing websites of any type. Also, it already includes a free extension that enables location-based search and several more free features that you may find useful.
Additionally, feel free to check our articles:
Create and monetize a real estate directory website in 6 steps.

Get your marketplace of digital assets up and running with WordPress.

A short tutorial on how to create a booking website without any coding skills.