
How to Add Social Login to Your WordPress Directory Website
A quick guide on adding Google & Facebook login buttons to HivePress-built websites.
The complete guide to building a wedding marketplace with WordPress — no coding required.

The wedding industry is one of the most lucrative markets in the world, with couples spending an average of $30,000 or more on their big day. Behind every successful wedding is a network of vendors — photographers, venues, caterers, florists, DJs, and planners — all competing for attention in a crowded marketplace.
This is where wedding directory websites come in — these platforms have proven to be highly profitable business models in the wedding industry. For example, WeddingWire, a popular wedding marketplace founded in 2007, has grown to connect couples with over 400,000 wedding vendors globally, generating approximately $150 million in annual revenue. The platform’s success comes from a straightforward approach: charging vendors subscription fees for enhanced visibility and collecting commissions on bookings, with nearly 90% of revenue coming from subscriptions and advertising.
Here’s the good news: in 2026, you don’t need to be a web developer or hire an expensive development team to create a wedding directory. With WordPress, a free and open-source content management system powering over 40% of all websites on the internet, and a specialized directory plugin like HivePress, you can build a fully functional vendor marketplace without writing a single line of code.
Before diving into building your platform with WordPress, make sure you have these essential elements ready:
In this tutorial, we’ll use RentalHive — a clean, modern WordPress theme designed for directory and marketplace websites. The theme works well for showcasing vendor offerings with its image-focused layout. RentalHive comes bundled with essential plugins that provide all the core marketplace and booking functionality needed to run a wedding vendor platform.
Combined with the powerful HivePress plugin (available for free), you’ll have everything needed to create a fully functional wedding platform with essential features, including:
All of these features work together to create a professional wedding marketplace that effectively serves both engaged couples and vendors.
Now that you understand the opportunity and have a roadmap for building your wedding website, it’s time to take action.
Begin by navigating to your WordPress admin panel and accessing Appearance > Themes. Click the Add New button, followed by Upload Theme. Choose the RentalHive ZIP file from your computer, then complete the installation process and activate the theme.
After activation, WordPress will prompt you to add several essential plugins. Among these is HivePress, which serves as the foundation for all other marketplace and booking features. Click the provided link to begin adding these recommended plugins. Once installation is complete, activate each one.
You can also refer to the step-by-step video tutorial below for visual guidance.
Beyond the suggested plugins, you can explore additional free and premium HivePress extensions by navigating to HivePress > Extensions in your dashboard. Here you’ll find useful add-ons, including Geolocation (for location-based searches), Claim Listings (allowing vendors to claim existing profiles), and other features that enhance your platform’s functionality.
If you’d prefer not to build your wedding directory from scratch, consider importing the demo content. This gives you a fully populated site that you can customize to match your specific needs, saving significant time during the initial setup phase.
The next phase involves adding payment functionality via WooCommerce, a popular e-commerce plugin for WordPress. WooCommerce supports dozens of payment gateways, allowing you to accept payments on your site easily with options such as Stripe, PayPal, and many others.
To get started, head to Plugins > Add New from your admin panel. Use the search function to locate WooCommerce, then proceed with installation and activation.
Upon activation, WooCommerce automatically launches its configuration wizard. This guided process walks you through essential settings to properly set up payments on your site. If you need assistance during configuration, consult the official WooCommerce documentation for detailed guidance.
With payment processing configured, you’re ready to start adding content to your wedding marketplace. Begin by creating categories that will be used to organize listings on your platform.
Organizing your marketplace into clear categories helps engaged couples quickly locate the services they need while browsing. When couples can easily find photographers, venues, caterers, or officiants through well-structured categories, they’re more likely to explore multiple wedding vendors and spend more time on your site.
HivePress lets you create separate category structures for both vendors and listings, giving you flexibility to organize content however you like. For vendor categories, you might focus on business types like “Wedding Photographers”, “Catering Services”, “Hair & Makeup”, “Florists”, and so on. For listing categories, you could organize by specific services such as “Full-Day Photography Package,” “Cocktail Hour Catering,” or “Bridal Alterations.” This dual approach allows couples to browse by vendor type or by the specific service they need.
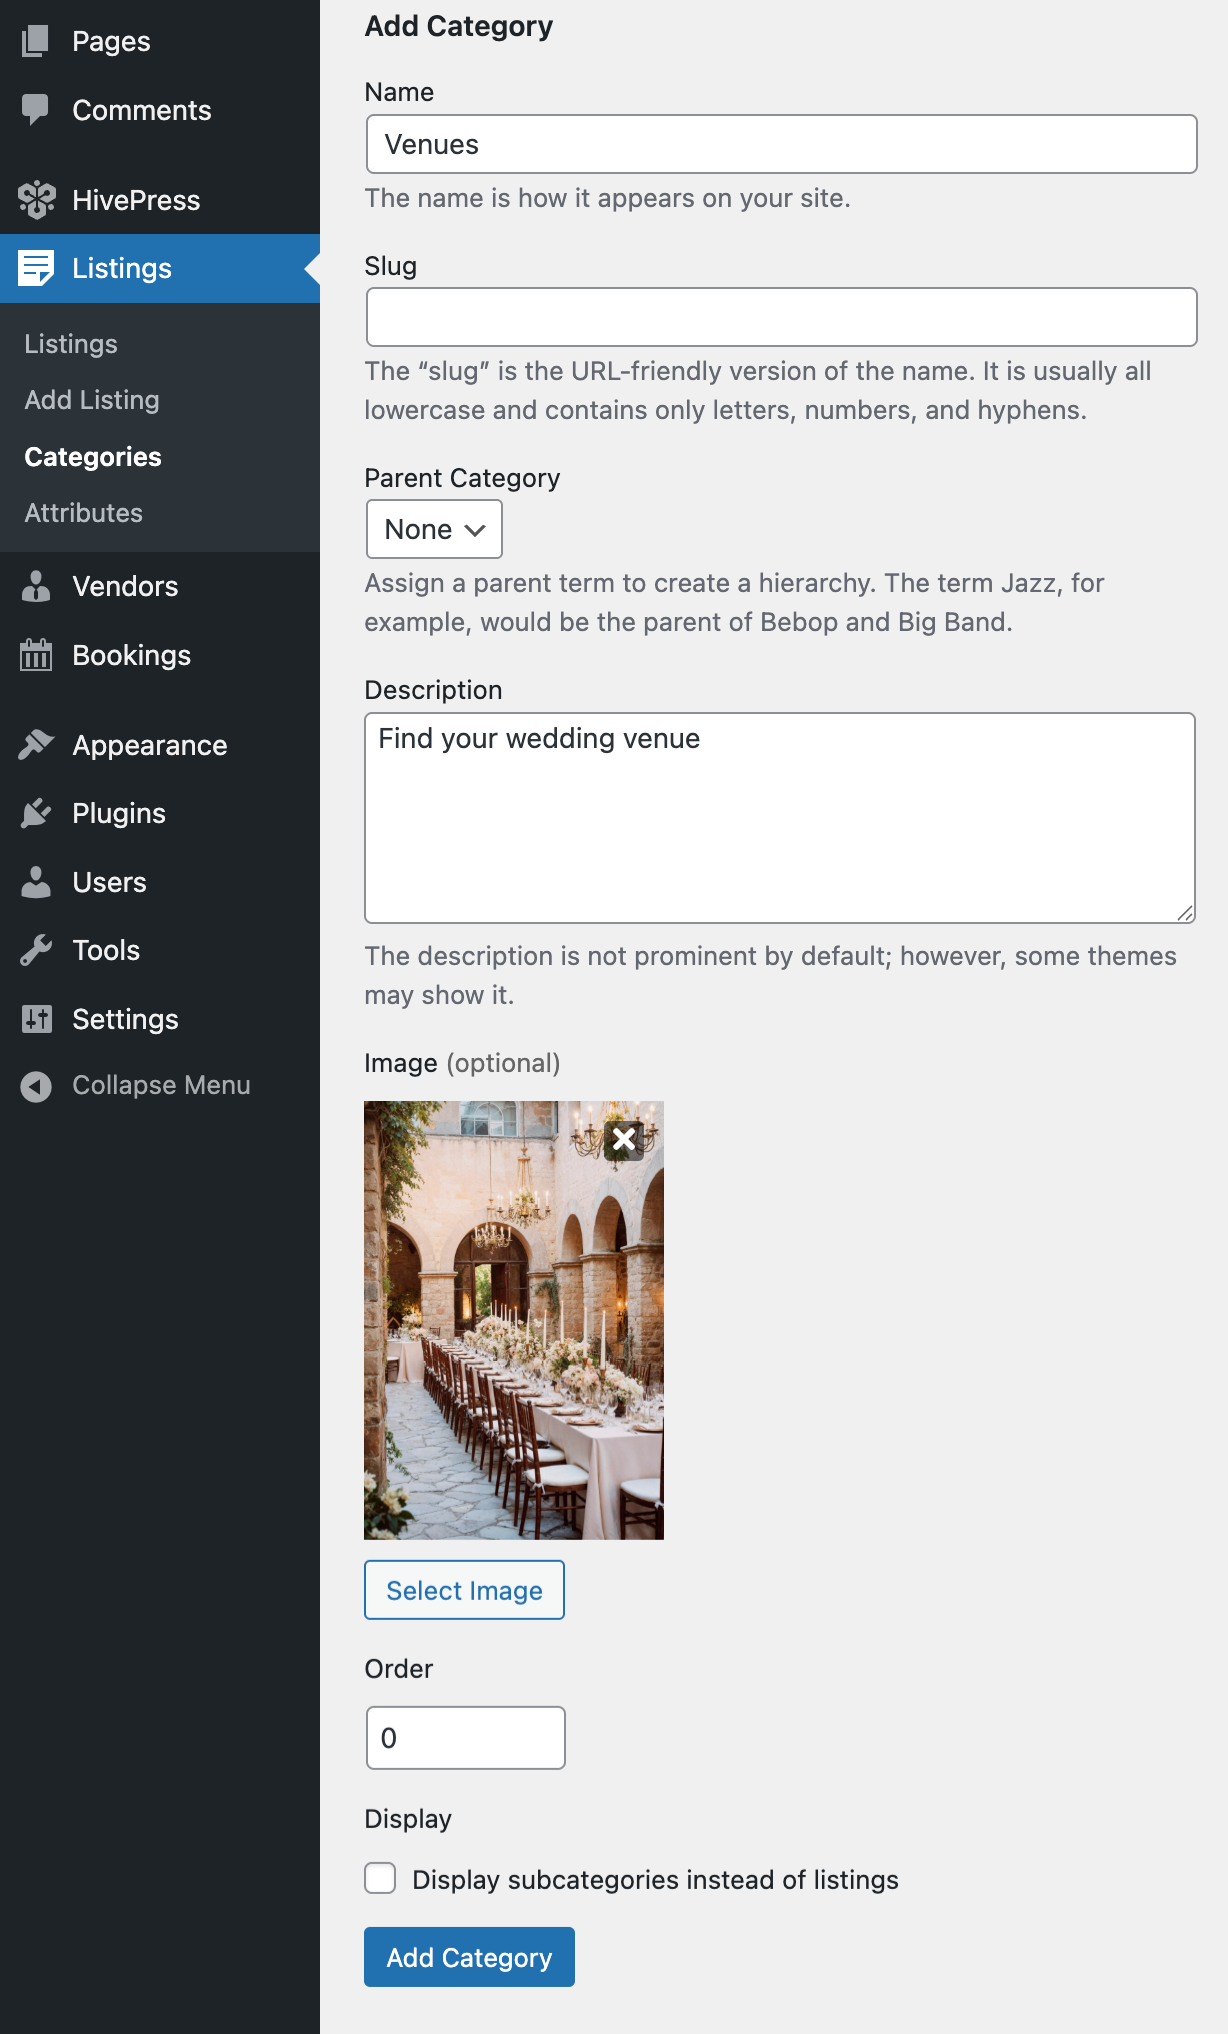
To create categories, go to Listings > Categories in your dashboard. Start by adding the essential wedding service categories that will form the backbone of your wedding vendor directory.
For each category, enter a descriptive name and add optional details explaining what services fall under that category. If you want to build a wedding directory business with a hierarchical service structure, you can create subcategories — for example, making “Ceremony Venues” and “Reception Venues” subcategories under “Wedding Venues.” Finally, select an appropriate image for each category to make it visually distinctive.
You can follow these instructions to create vendor categories as well.
With your categories in place, the next step is configuring custom fields that capture the unique details couples need when evaluating vendors. These attributes allow you to collect specific information — such as service areas, pricing ranges, availability, and capacity — making your platform more functional and user-friendly.
Navigate to Listings > Attributes in your admin panel to begin adding custom fields. Let’s create a “Guest Capacity” attribute as an example, which helps couples filter venues and caterers based on their wedding size.
Each attribute can be configured across four distinct sections:
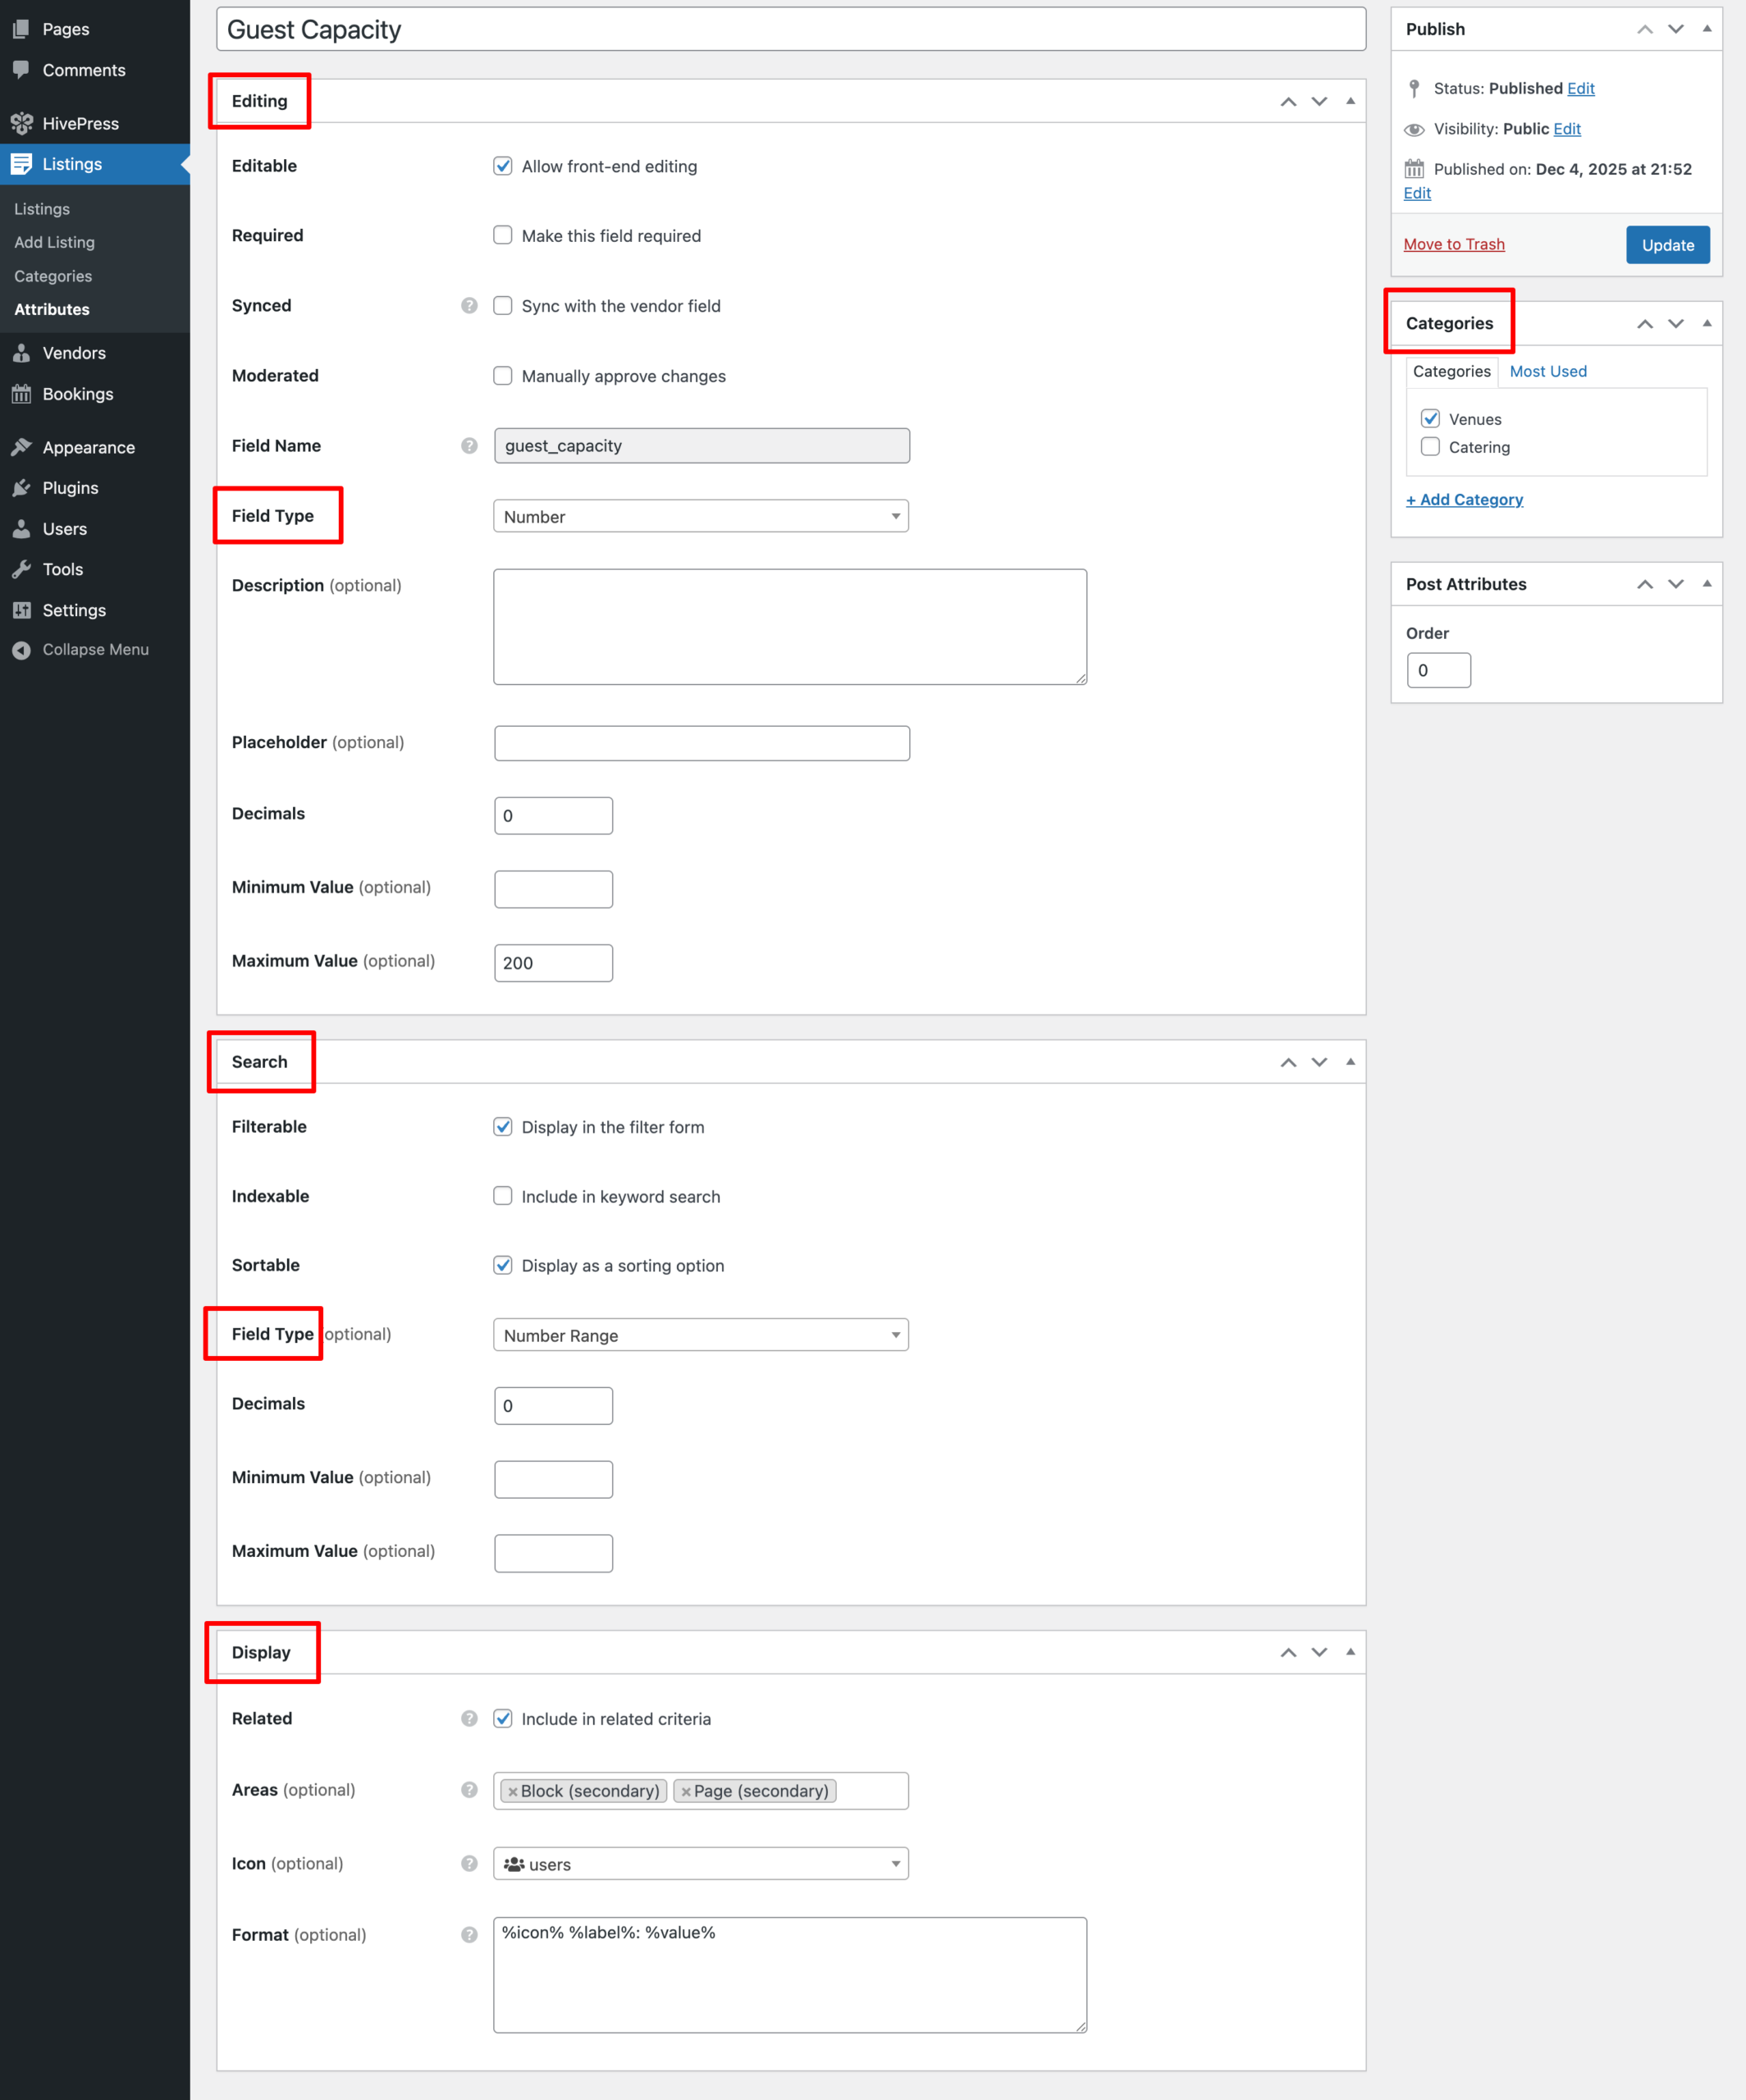
Repeat this process for other wedding-specific attributes, such as “Service Area” (for local wedding planners and photographers) or “Price Range” (to help budget-conscious couples). The more relevant details you collect, the more valuable your platform becomes for couples planning their big day.
As with categories, these custom field configurations work identically across vendor profiles and service listings, enabling a consistent structure across your entire business.
Your wedding platform needs compelling pages that guide visitors, showcase your value, and establish trust with both couples and vendors. RentalHive’s integration with the WordPress block editor makes page customization straightforward — no coding or complex shortcodes required.
Start by building a homepage that clearly explains what your site does. Access Pages > Home (or create a new page and set it as your homepage under Settings > Reading). Use the block editor to build a layout that captures attention:

If you haven’t imported the demo content, you’ll need to create and designate your homepage. Go to Pages > Add New, create your homepage with the block editor, then navigate to Settings > Reading and select this page as your Static Page.
Create a new page named “Listings”. After creating it, go to HivePress > Settings > Listings > Listings Page and select it as your listings page. This is where all wedding service listings will be displayed with search and filter options.
Similarly, create a “Vendors” page. In HivePress > Settings > Vendors > Vendors Page, assign this as your vendors page. This page will show all registered vendors on your platform, allowing couples to browse vendor profiles rather than individual services.
Beyond your homepage, you’ll need to set up several essential pages for your directory to function properly. Consider launching a blog to share wedding-planning tips, vendor spotlights, real-wedding features, and industry insights. This provides value to couples and helps with SEO by creating fresh content that can rank in search results. Simply use the default Posts section in WordPress. To set this up: Create a new page in Pages, then go to Settings > Reading and assign this page as your “Posts page.” WordPress will automatically display all your blog posts on this page using the standard blog template.
Depending on your business requirements and local regulations, you may also want to create an About page, a Contact page, a How It Works page (with sections for both couples and vendors), a Vendor Pricing page (if charging for listings), and legal pages such as Terms of Service and Privacy Policy.
Testing your platform from a user’s perspective ensures everything functions smoothly before launch. Start by experiencing it as a vendor would when joining.
Log out of your administrator account, then click the sign-in link to create a new vendor account by completing the registration form with the required details.
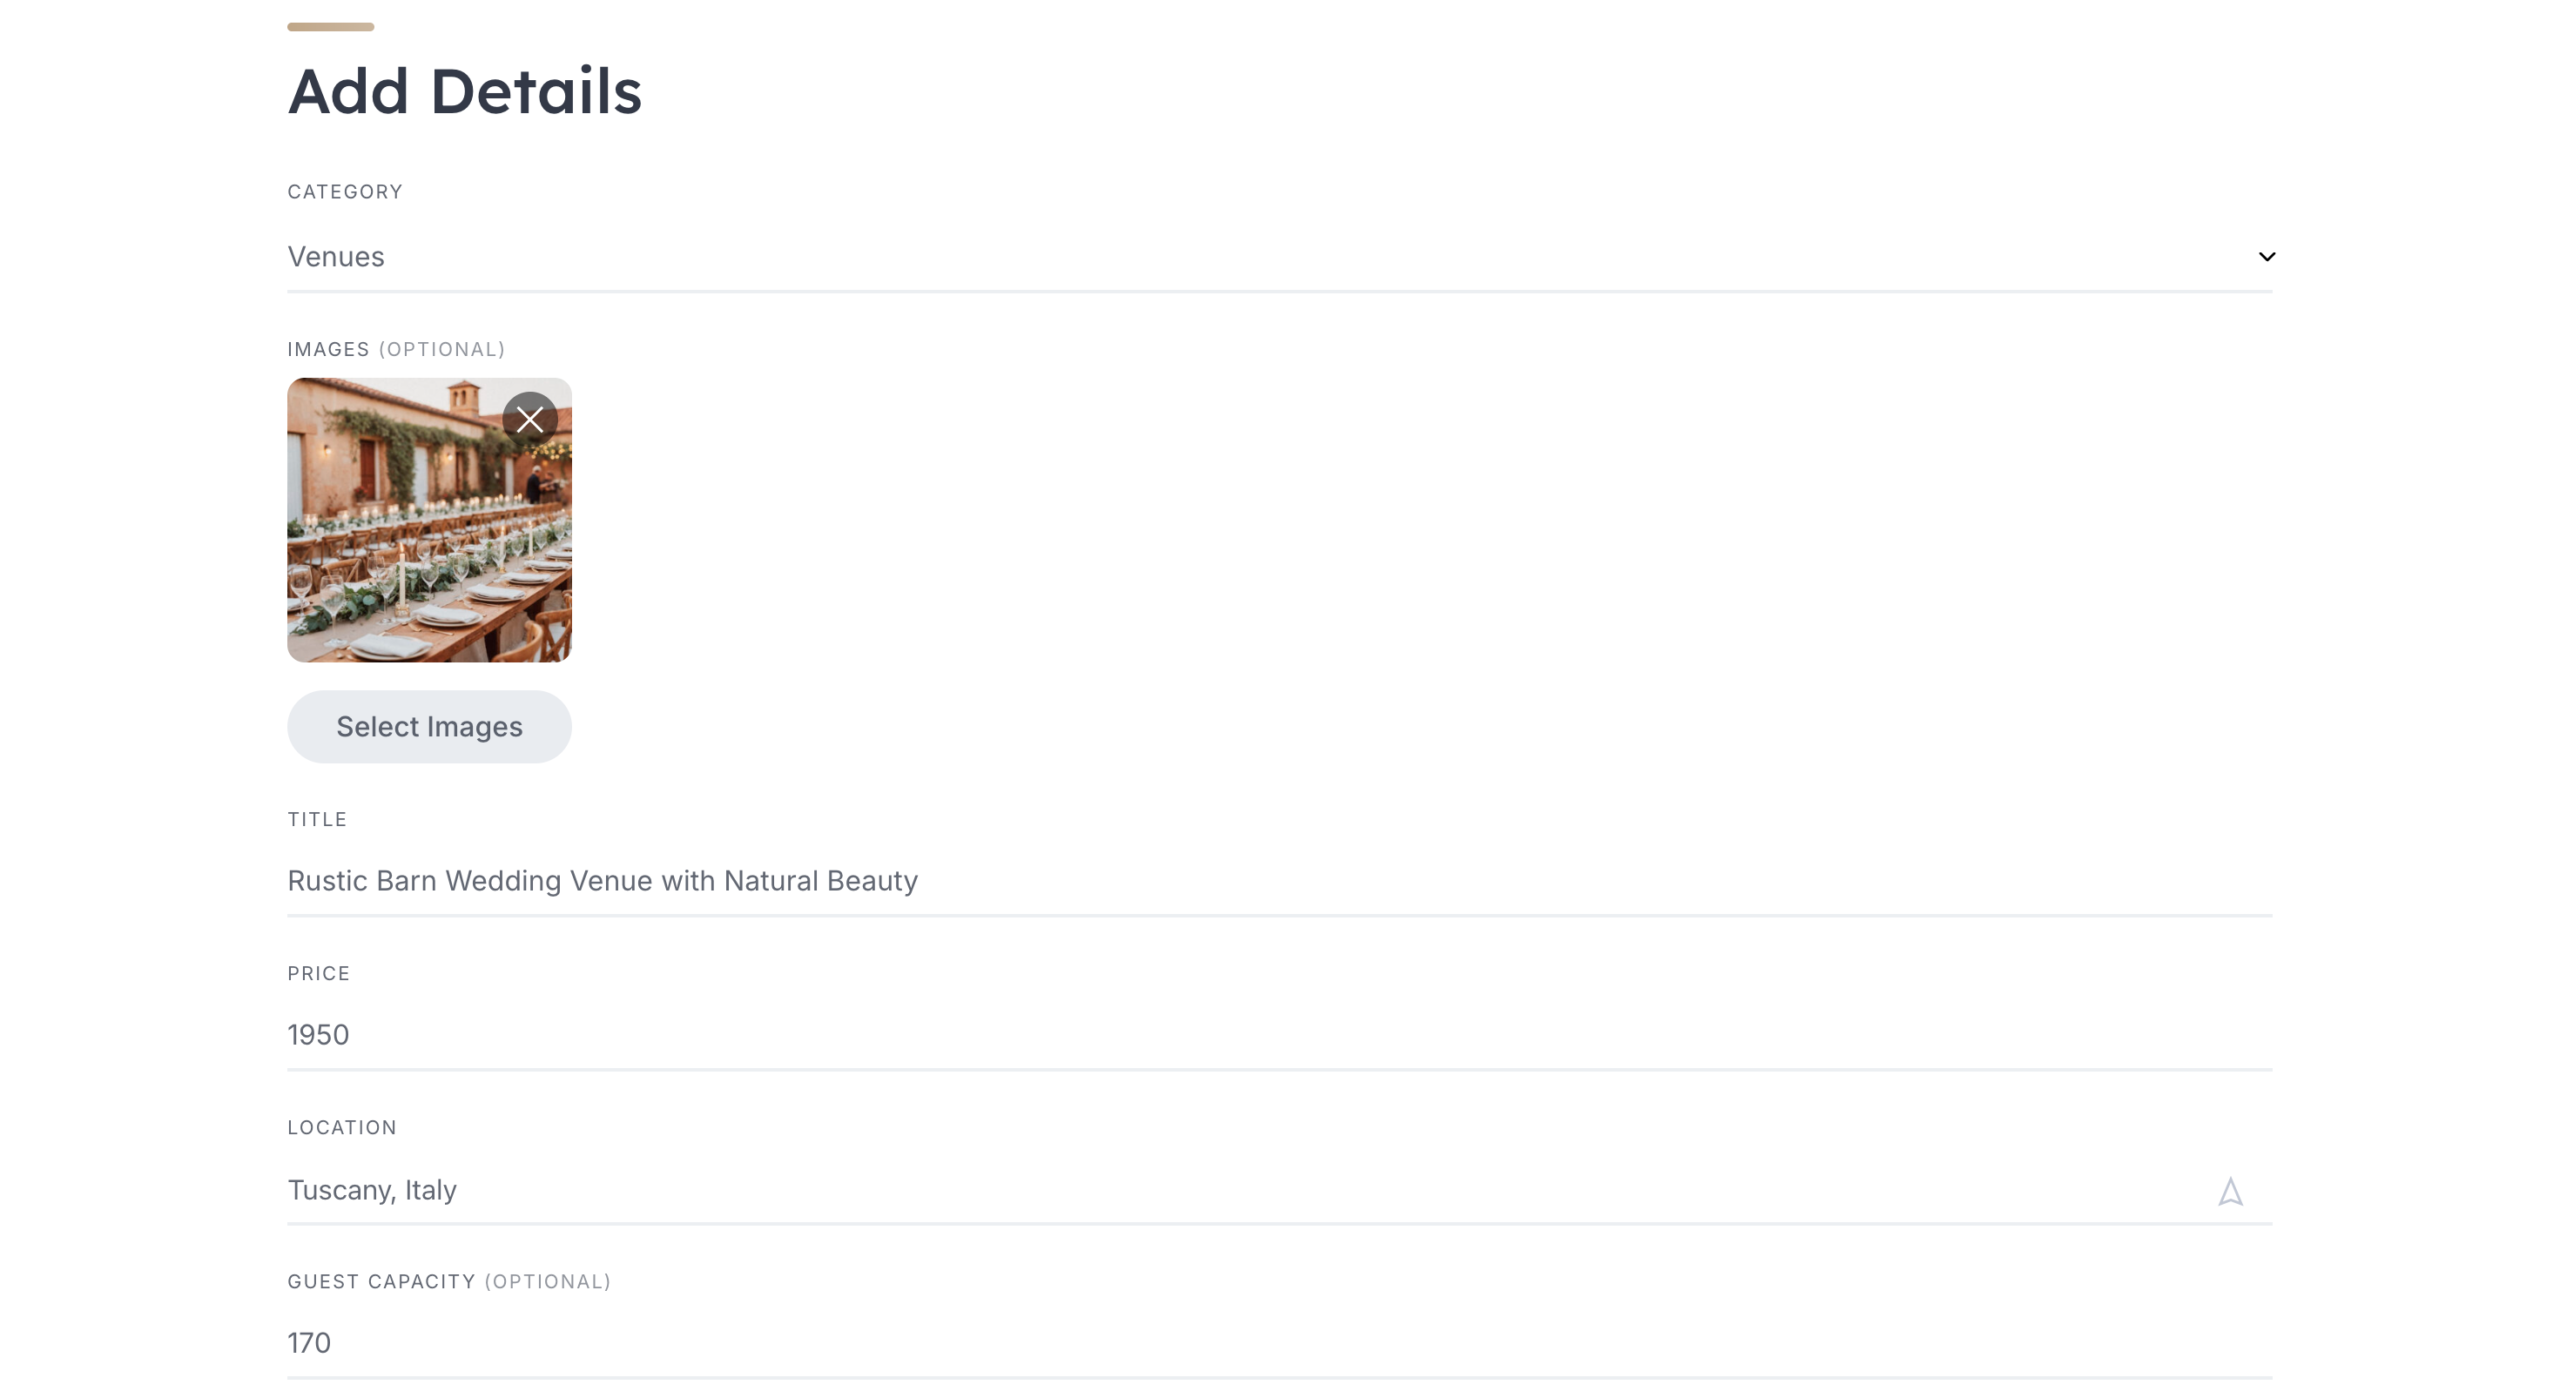
Once logged in, locate the submission button and begin creating a listing. Select the appropriate category, e.g., “Wedding Venues”. The submission form will display all the fields you configured earlier, including your custom attributes like guest capacity, pricing, and available dates. When everything is complete, submit the listing for review or publication, depending on your moderation settings.
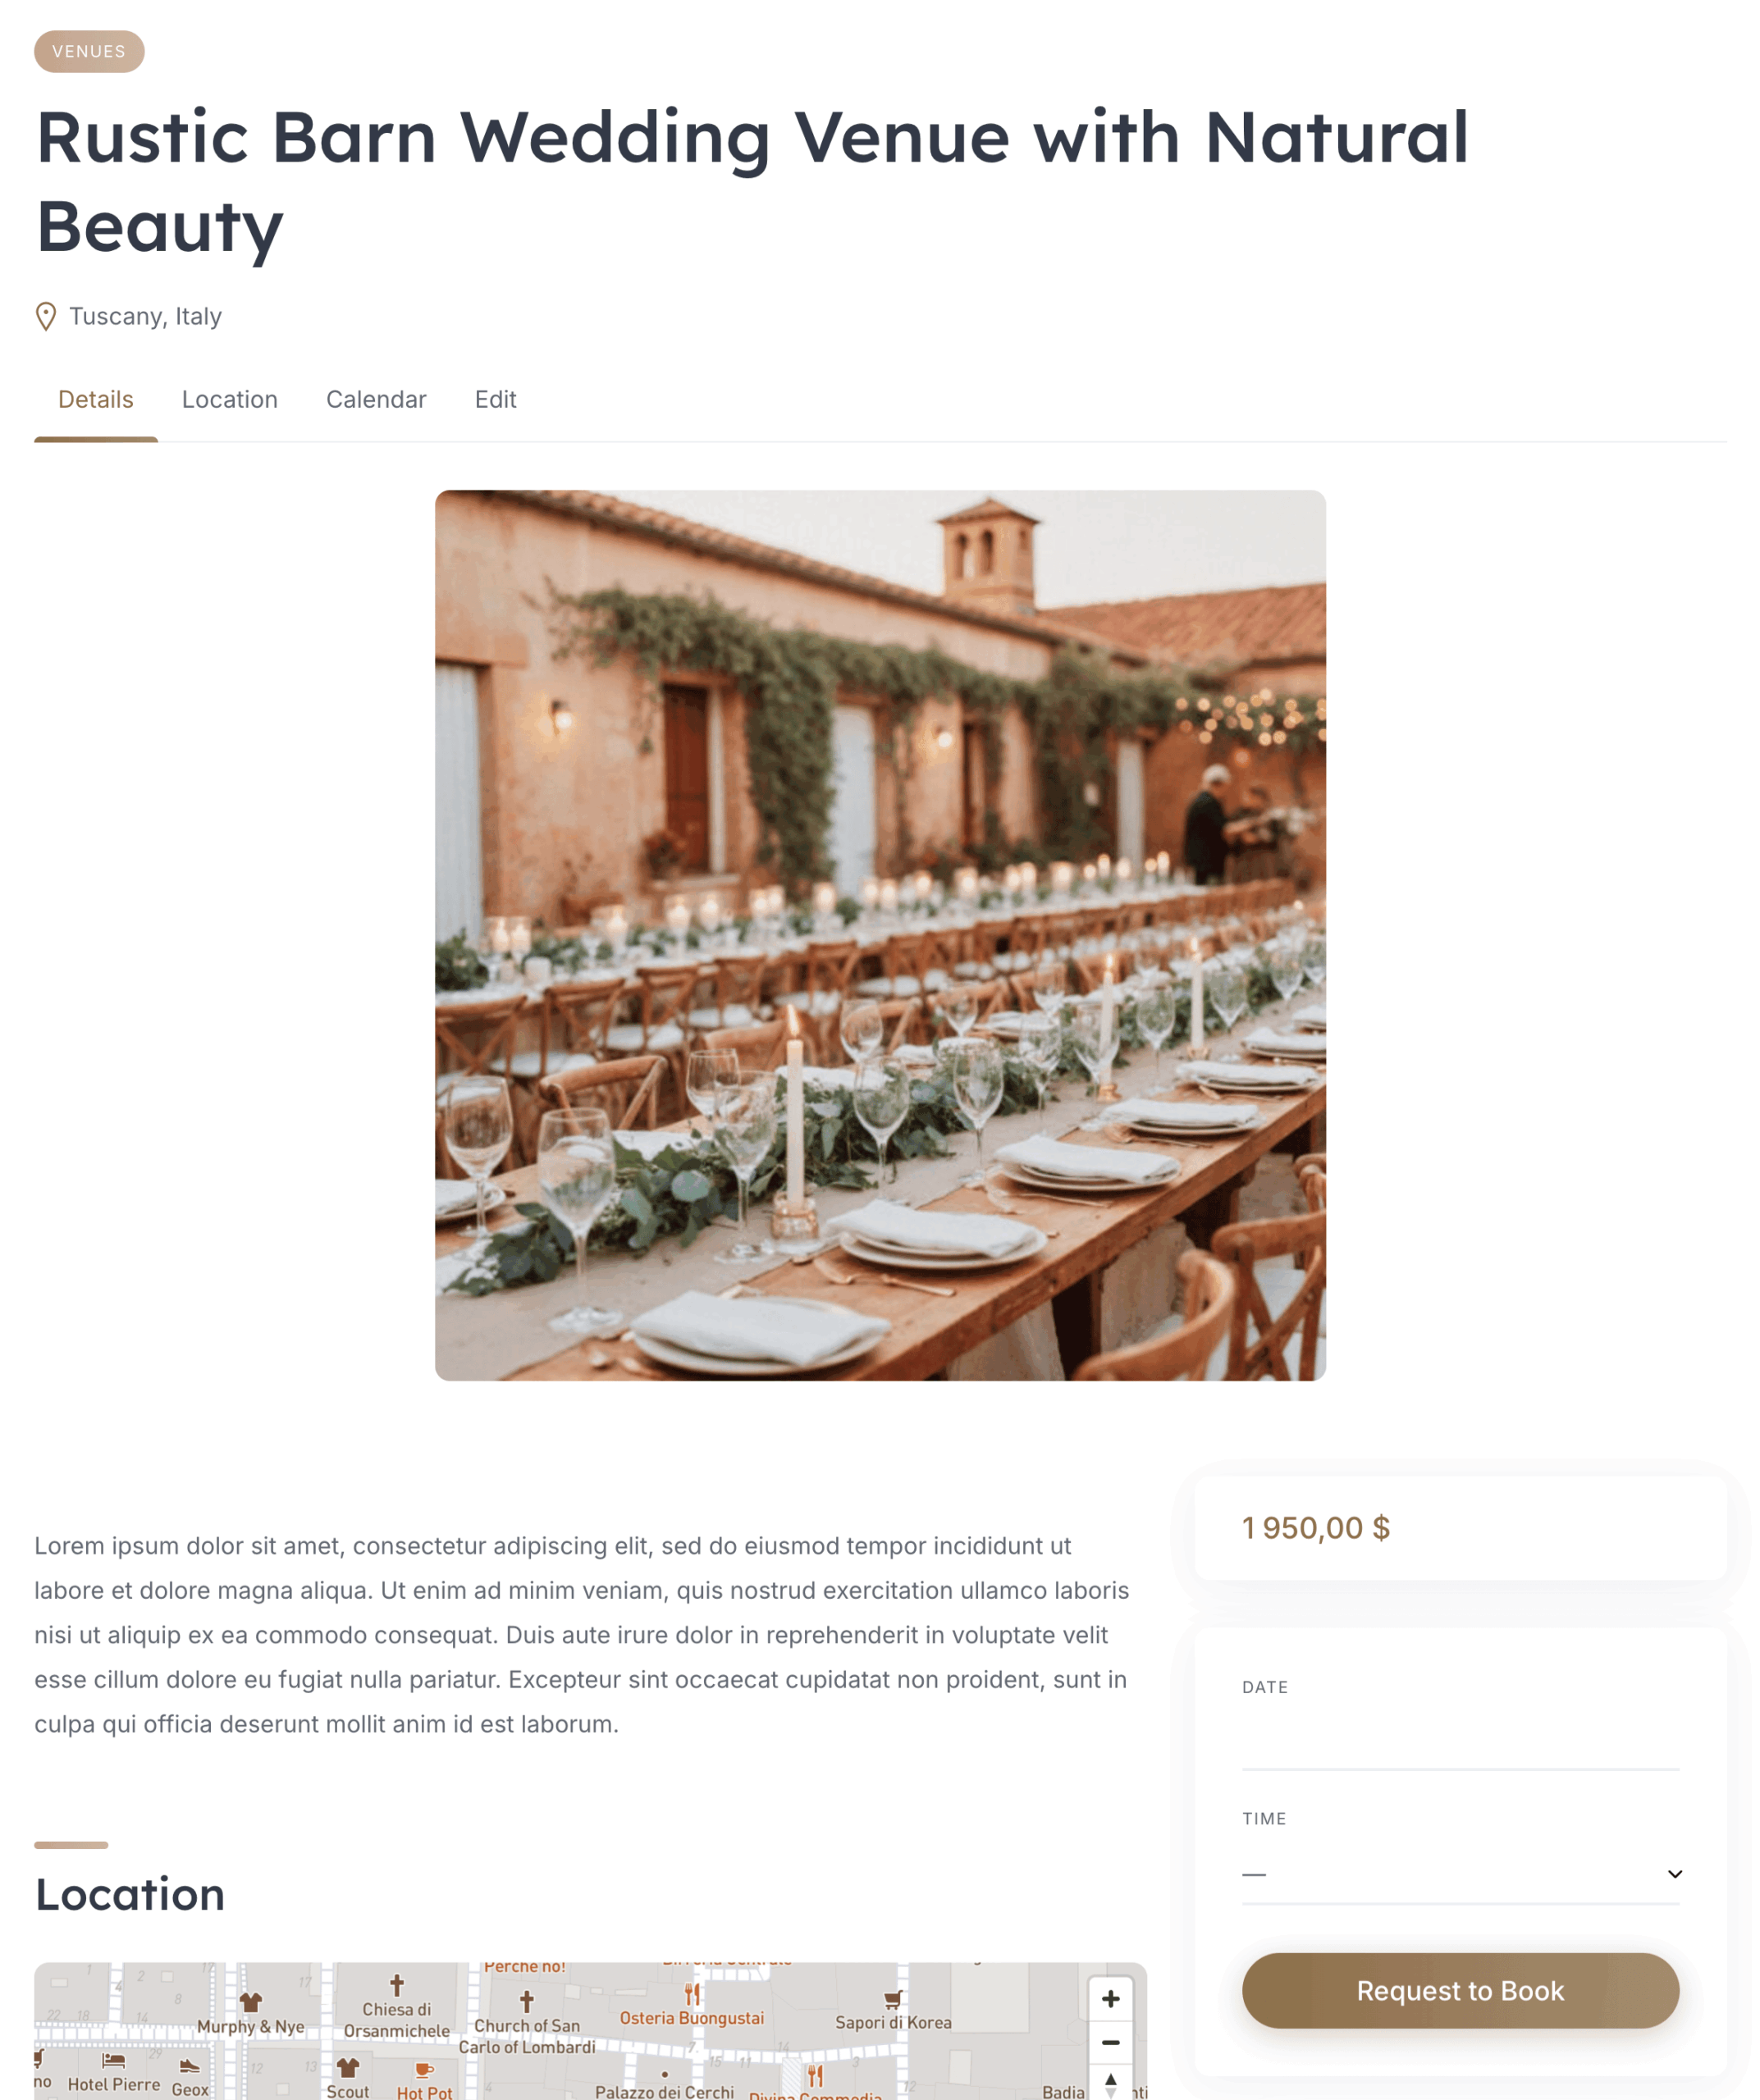
Switch back to your admin account to experience your marketplace from a couple’s perspective. Browse to the Venues category, select the listing you just created, and explore how the profile displays. Verify that all information is displayed correctly, images load properly, and the inquiry or booking system functions as intended.
If you’ve enabled booking functionality, test the complete workflow: submit an inquiry, check that notification emails are delivered, and verify that the messaging system allows communication between couples and vendors. For platforms with direct booking capabilities, walk through the entire reservation process to ensure dates, pricing, and confirmation systems work seamlessly.
This testing phase helps you identify friction points in your wedding directory website before real vendors and couples start using it, allowing you to refine the user experience and resolve any issues.
Your wedding platform can offer flexible revenue options. You can set commission rates for bookings made through your site (percentage-based) or implement a fee structure (a fixed amount per booking). Similarly, you can monetize the couple’s side by charging fees for booking services.
For a comprehensive breakdown of monetization strategies specifically designed for service marketplaces, check out our detailed guide on how to monetize a marketplace of services.
Congratulations! You’ve successfully learned how to create a fully functional wedding directory website using the RentalHive theme and the HivePress plugin. What once required thousands of dollars in development costs and technical expertise is now accessible to anyone with entrepreneurial ambition and a few hundred dollars for startup expenses. By creating a well-designed platform that genuinely helps couples find their perfect vendors, you’re not just building a website; you’re establishing a valuable resource that serves your local community while generating sustainable income.
To maximize your wedding directory’s visibility and attract more organic traffic, read our guide on improving SEO for WordPress-powered directory sites.
A quick guide on adding Google & Facebook login buttons to HivePress-built websites.

A short explanation on how to set up the HivePress Messages extension.

A quick guide on how to create a tour booking website using RentalHive theme.