
How to Create a WordPress Member Directory for Free
Build a searchable member directory website using WordPress.
Launch your own booking & rental platform similar to Airbnb using WordPress.
When Airbnb first arrived on the scene, it was a game-changer. Today it connects millions of people looking to rent out their properties with those trying to find a place to rent.
But sometimes, people prefer creating their own niche rental marketplaces instead of using Airbnb. The good news is that building your own property rental marketplace similar to Airbnb is no longer a tough deal, thanks to WordPress.
In this complete tutorial, we’ll show you how to create a website like Airbnb with WordPress, set it up, and successfully monetize!
Let’s get started!
A rental marketplace is a platform where people can rent real estate from each other. Probably, the most prominent example is Airbnb.
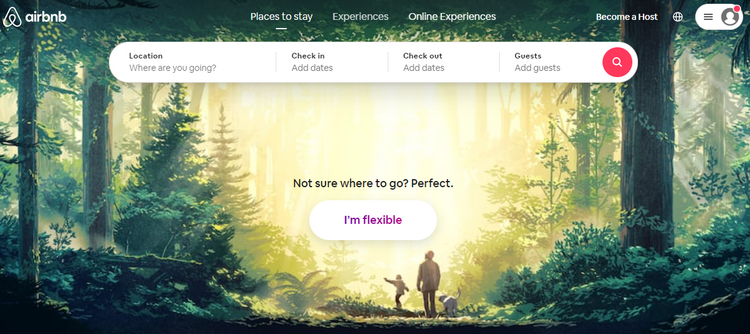
The creators’ idea behind Airbnb was as simple as ABC – connect people who want to rent out their accommodations with those who are looking for a place to stay.
This community-based online platform has changed the way we travel and has become a world-famous company without even having its own property. But let’s take a closer look at how it works and makes money.
One of the main secrets of Airbnb’s success is that it’s completely free to sign up on the platform, and it’s free for anybody to list their property. The marketplace charges users only when there’s a confirmed reservation.
Airbnb is a two-sided marketplace, and it receives commissions from two sources upon every booking, namely from the hosts and guests. Most guests pay a service fee under 14% of the booking subtotal, and at the same time, hosts are charged a 3% commission. For example, on a $100 booking per night set by a host, Airbnb might make about $15, split between the host and guest fees.
Additionally, the platform allows experienced hosts to offer different kinds of experiences (in-person or online activities). They can provide travelers with special knowledge, unique skills, and inside access to experiences, places, and communities, from Mezcal & Tequila cocktail masterclasses to overnight desert safaris. Needless to say that Airbnb charges hosts who offer experiences a service fee of 20%.
Okay, now you have a better understanding of rental marketplaces and how they work, but what about launching your own one. All you need to do is choose a more specific niche and put all your efforts into offering high-quality services to a target audience.
When you have an idea for your online business, the easiest way to test it is by building a website with WordPress. So, before starting your property rental platform, make sure that you have the following prerequisites:
Let’s briefly cover each of them.
The starting point is to select the right domain name for your future rental marketplace. Basically, it’s a web address of your website, like “example.com”. It’s crucial to pick a good domain name from the start since it can be a hassle to switch later on without hurting your brand and search rankings.
A general piece of advice is to use a domain name that will indicate what type of business you are running. Also, here are a few things to keep in mind when selecting your domain name:
Bear in mind that you cannot buy a domain name permanently and have to pay for the registration every year (usually, it costs $10-15 / year).
The next step is to get a hosting service for your rental marketplace. It’s necessary since you need a place to store your website’s database and files. There are many providers on the market, so you can choose one according to your preferences. However, if you are unsure which one to select, you can check our article about WordPress hosting providers.
On average, a hosting plan costs $10-30 per month.
Once you register a domain name for your rental marketplace and subscribe to a hosting plan, you can proceed with the WordPress installation. However, setting it up manually may be a bit time-consuming, and there’s no need to do it on your own since most web hosts have a one-click installer that will handle the whole process for you.
Nevertheless, if you want, you can follow this step-by-step guide to install WordPress manually.
Finally, if you want to create a website like Airbnb with WordPress, you need to choose a WordPress theme tailored to this use. There are dozens of options on the market, but when looking for a theme for your rental marketplace, you should keep your eyes peeled for themes with specific features.
Before choosing a WordPress theme for your rental marketplace, bear in mind that it should already include the following features:
As you can see, building a website like Airbnb with WordPress requires tons of features, and you need a powerful theme.
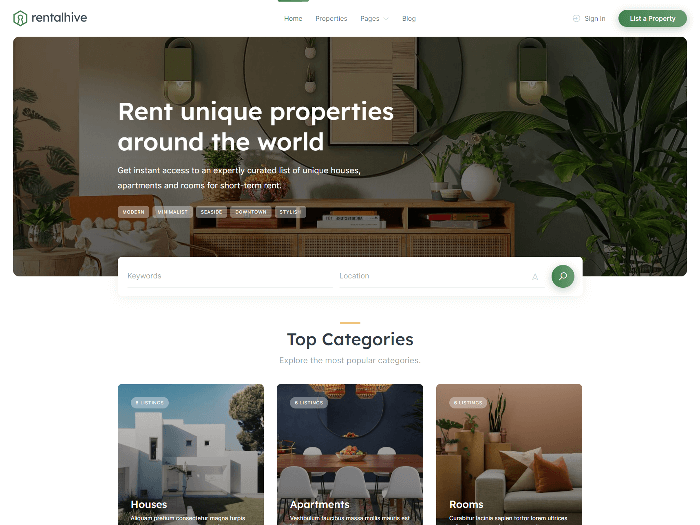
For the sake of this tutorial, we’ll use the RentalHive theme. It’s a modern multi-vendor booking WordPress theme crafted for building property rental marketplaces similar to Airbnb. It goes with all the required features right out of the box, so you can kick off your booking platform right away.
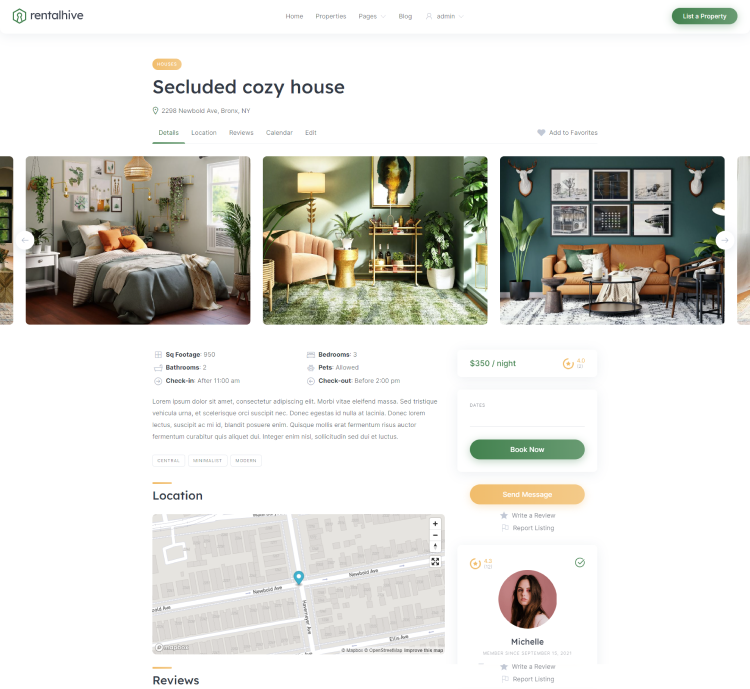
You can take a sneak peek at the website we are going to build.
In the following steps, we’ll explain to you more about the RentalHive theme and how to set it up. So, let’s dive in and create a website like Airbnb with WordPress!
Additionally, you can check out our list of the best Airbnb WordPress themes that allow you to create an Airbnb clone website hassle-free.
Your first step should be installing RentalHive. You can install it directly from your WordPress dashboard by going to Appearance > Themes > Add New > Upload Theme page. Then you need to upload the theme ZIP file, install and finally activate it.
Once you activate RentalHive, there will be a recommendation to install several plugins, including HivePress. It’s a multipurpose directory WordPress plugin that will power most of the marketplace and booking features on your booking platform. So it’s necessary to install and activate all the recommended plugins by following the suggested link.

To keep things simple, you can also import the RentalHive demo content to get a better idea of how everything works with pre-made listings. You can follow the step-by-step screencast below to import it properly.
Now let’s move to the next step and install some add-ons.
There are 15+ RentalHive add-ons that you can install to enhance your property rental marketplace. To check the whole list of HivePress add-ons, go to the WP Dashboard > HivePress > Extensions section.
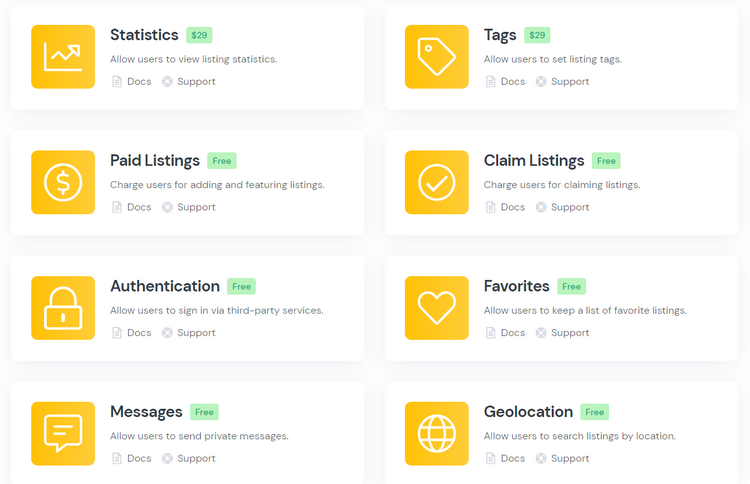
For example, you can install the free Geolocation extension to allow users to search properties by location. It’s a crucial feature for your Airbnb-clone website since location is the most important factor for travelers.
To install it, simply click on the Install button and activate the extension once it’s installed. Then you need to set your Google Maps or Mapbox API key (please follow this doc on how to set up Geolocation).
Similarly, you can install the other add-ons required for your Airbnb-like website. Once you finish, you can move to the next step.
Now, you have to define the structure of your booking platform by adding listing categories to make it easier for users to navigate.
Go to the Listings > Categories section.
Within this section, you can create listing categories and sub-categories. For example, you can create “Houses”, “Apartments” and “Rooms” categories.
When adding a new listing category, set a name for it, add a description and set a parent category if you want to turn it into a subcategory. This way, you can add multiple category levels.
Also, it’s better to upload a category image.
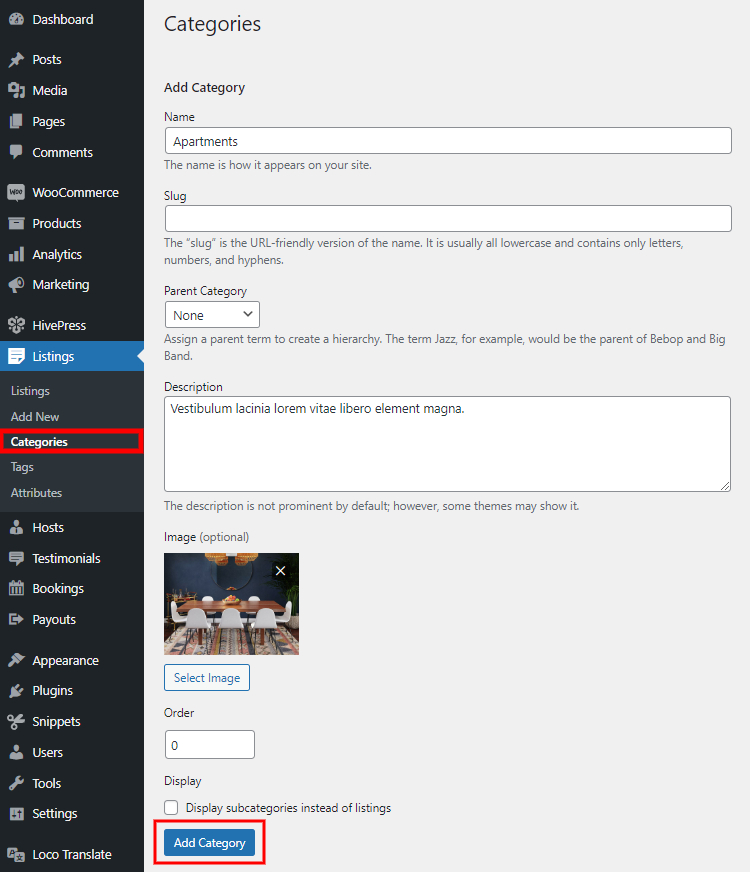
When finished, simply click on the Add Category button. In the same way, you can add as many listing categories as required for your booking marketplace.
In this section, we’ll show you how to add listing attributes (i.e., custom fields). By default, the listing form contains the basic fields like title and description. However, since each website is unique, it may require different booking details depending on the site niche and requirements. With HivePress, you can add your own fields and search filters specific to the website you’re building.
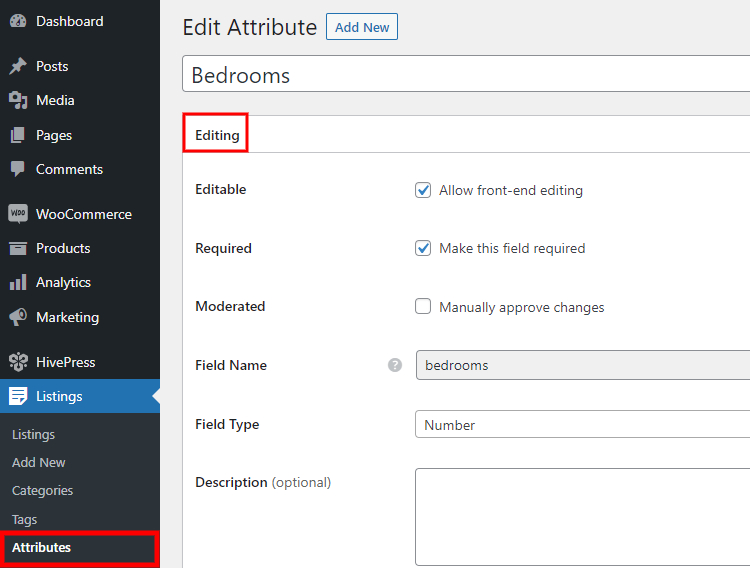
You can add custom fields in the Listings > Attributes section.
For example, you can add a “Bedrooms” attribute to allow users to filter properties by the number of bedrooms. To do that, simply set the attribute name, allow its front-end editing, and select the attribute type. For the “Bedrooms” field, it’s better to use the “Number” type.
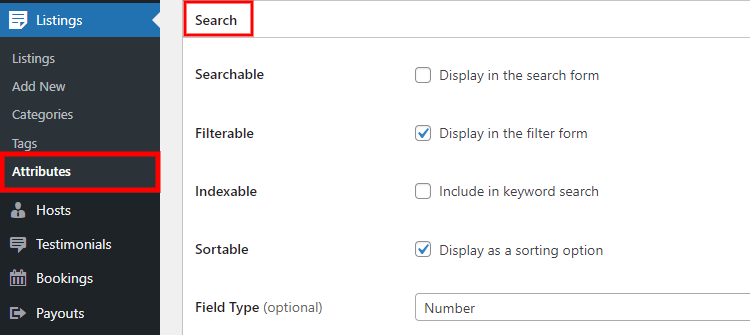
In the Search section, you can allow users to search and filter listings by attribute value. Let’s simply mark it as filterable, sortable and select the search field type. We recommend using the “Number Range” so users can filter listings by the number range instead of some specific value.
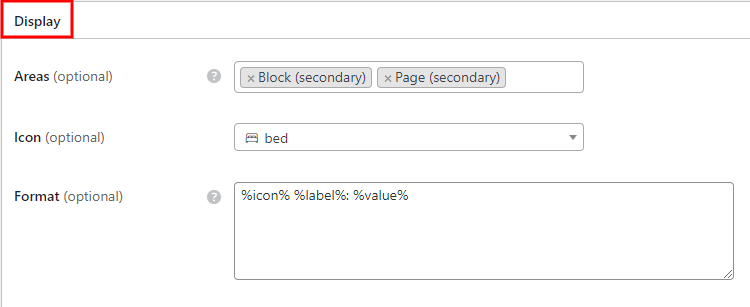
Finally, you can define how this custom field will appear on the listing page by assigning it to certain template areas and setting its display format.
You can use the replaceable tokens in the display format. Simply hover on the question icon to view the available tokens. We’ll use this display format %icon% %label%: %value% for this field.
Also, keep in mind that you can make any custom field category-specific. It’s useful when you have many different listing categories on your website and different details are required in each of them. When finished, click on the Publish button. By following the same steps, you can create more custom fields and search filters according to your website niche.
In this section, let’s go through the HivePress settings in the HivePress > Settings section to make sure that your booking website is set up and functions according to the requirements. Please note that we are not going to explain each setting since many of them are pretty obvious and don’t require additional explanation.
So, let’s start with the Listings tab.
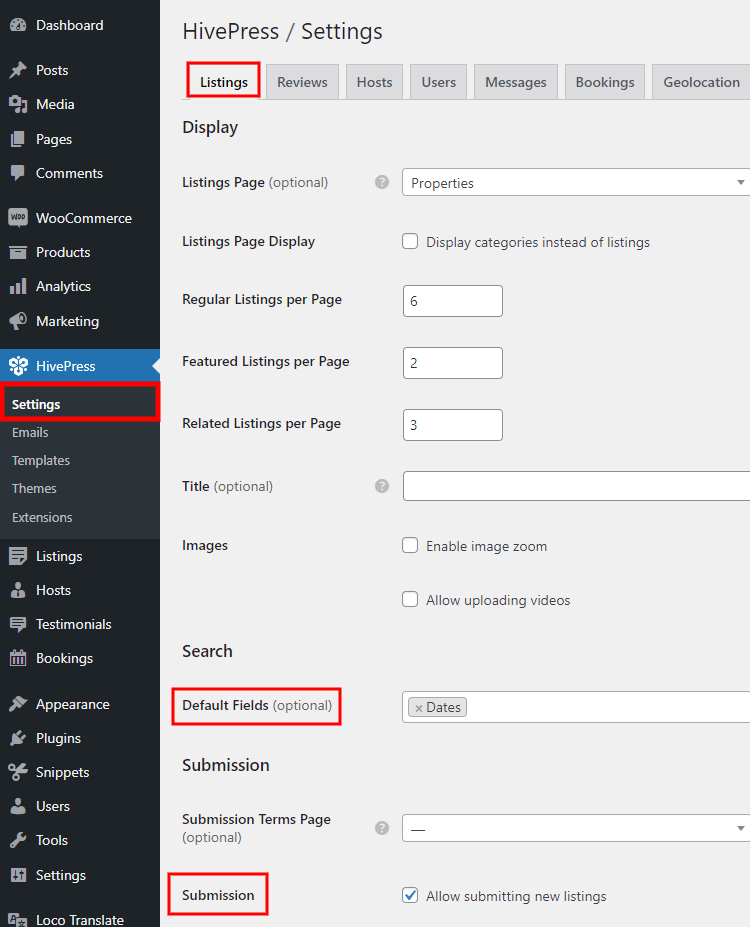
Most of the settings within this tab are easy to understand (by the way, if something is unclear, you can hover over the question icon for an extra description). But there are a few settings that we’d like to emphasize.
Let’s move to the Hosts tab.
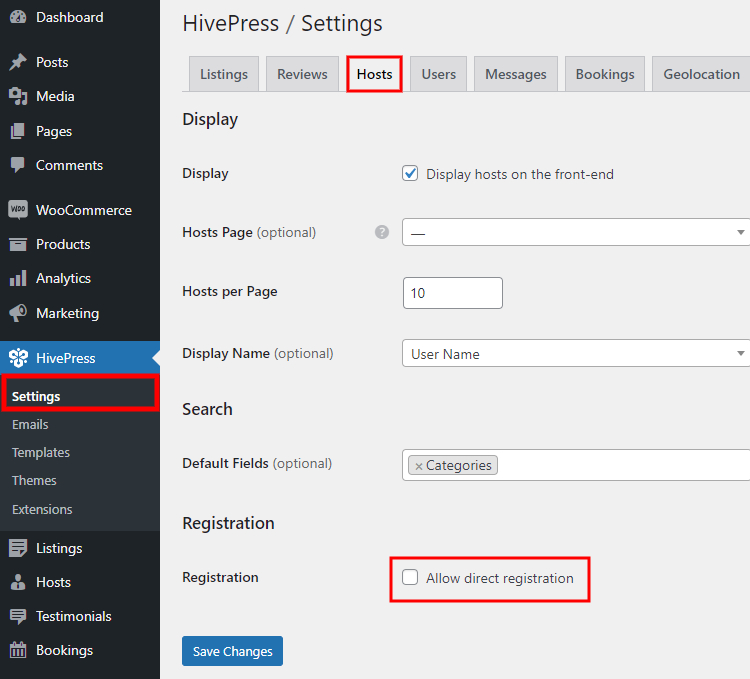
Within this tab, you should pay attention to the Registration section. By default, to become a host, a user has to add at least one listing. But if you enable the “Direct Registration” option, users will be able to register as hosts without submitting listings.
Now let’s jump into the Bookings tab.
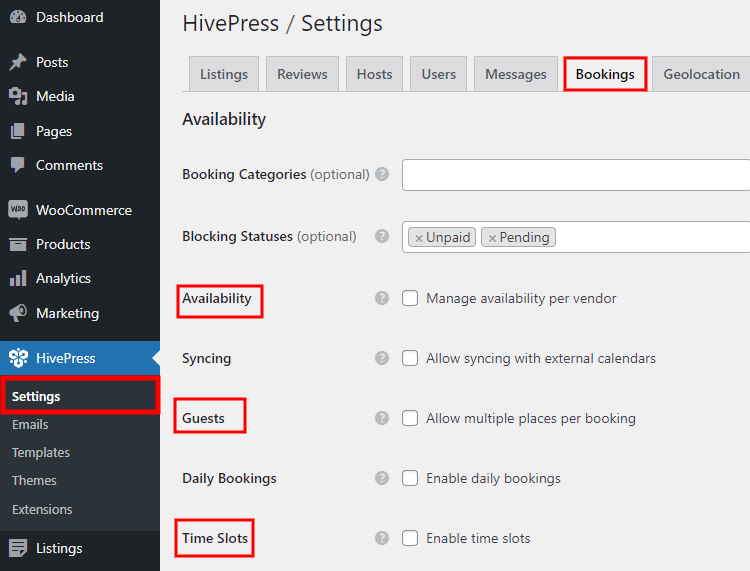
In this tab, you can set up the booking functionality on your Airbnb-like website. Among other settings, check out:
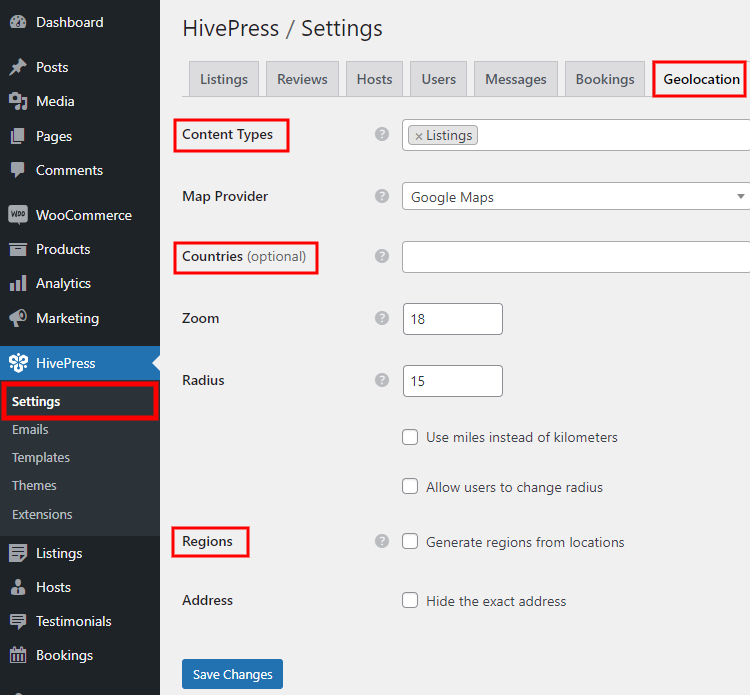
In the Geolocation tab, various settings allow you to set up the geolocation function on your website. For example, you can set up:
Check out these docs to set up geolocation on your booking website.
That’s it! We’ve just finished setting up HivePress. Now, let’s move to the next section and add the first listing.
As a website admin, you can add listings via the back-end by going to the Listings > Add New section or via the front-end listing form. Let’s try to add a new listing via the front end to check how it works for regular users.
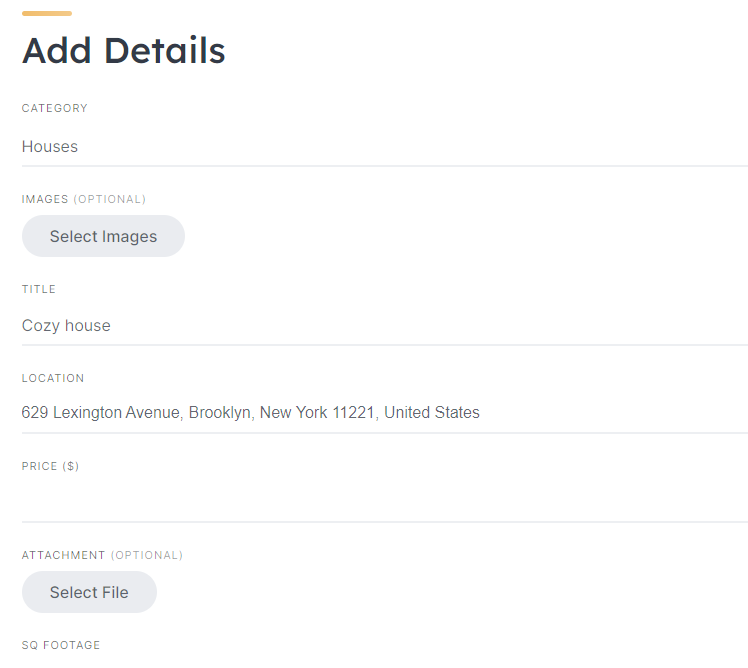
To add a new listing, go to the website’s front page and click on the List a Property button. First, you have to fill in all the necessary details about your listing, like title, description, upload images, set location (if you enabled Geolocation) and so on.
Next, you can customize the booking settings. You’ll notice that there are a few fields related to the booking restrictions. For example, you can set:

Finally, you can enable the “Booking requests” option to accept each booking request manually. When you complete the listing form, click on the Submit Listing button.
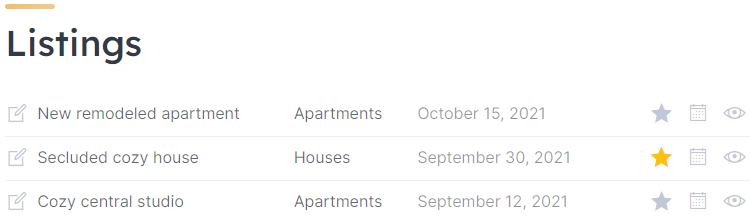
If moderation is enabled, the listing will be sent for review, and the website admin can approve or reject it in the WP Dashboard > Listings section by changing the listing status from pending to published.
Once the listing is approved, it should appear on the front end.
Now, we’d like to show you the booking process. For the sake of this tutorial, we’ll simply book a recently added listing. Let’s try!
If a host sets some booking restrictions, users will be limited to a certain extent. For example, in the case at hand, users cannot book this house for more than 14 days and cannot check in earlier than 5 days from today (see the screenshot below). That’s because we have set several booking restrictions in the previous step (while filling in the listing submission form).

In order to book a property, it’s necessary to pick the dates and click on the Request to Book button. There will be a redirect to the confirmation page, where users can verify all the details before sending a request and add some notes.
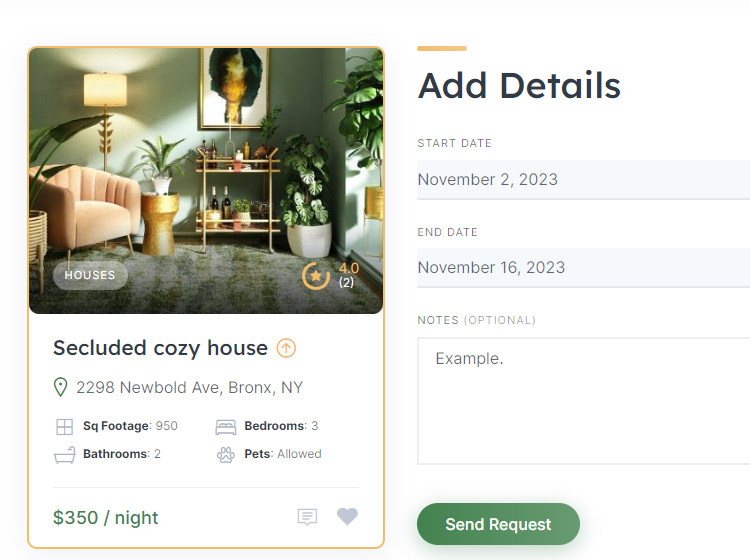
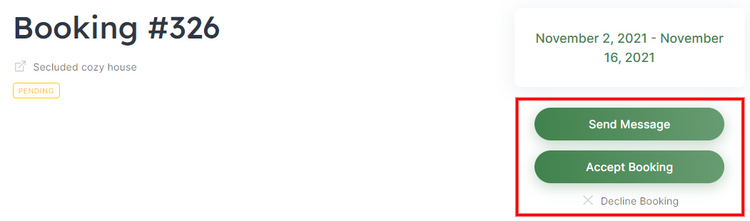
After checking all the details, users can finish booking by clicking on the Send Request button. Once a user books a property a host will see a pending request for booking in the My Account > Bookings section and can accept or decline it.
That’s it! Once the booking is accepted, users receive a booking confirmation via email so they can start packing their suitcases.
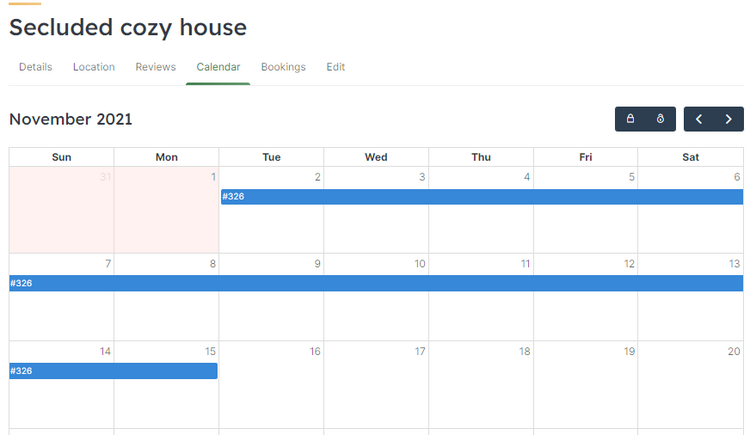
Also, keep in mind that there’s a calendar feature that allows hosts to block or unblock specific dates to make them available or unavailable for new bookings. Moreover, the booking calendar helps hosts to see the whole picture of the month, like upcoming bookings, available and unavailable dates, and so on.
In this section, we’ll show you how to add pages where listings or other website content will be displayed. To create a new page, navigate to the WP Dashboard > Pages > Add New section.
Please follow the screencast below to create new pages on your WordPress booking website.
In the previous section, we learned how to add new pages, and in this one, we’ll show you how to customize pages on your Airbnb-like website. Simply check out the screencast below to customize everything to your liking.
Finally, we want to show you how to monetize your WordPress booking website. We’ll show you two main business models:
The first monetization model we’ll show you is charging users for adding listings and making them featured (featured listings appear at the top of the search results).
First of all, you need to install the free HivePress Paid Listings extension. Simply go to the HivePress > Extensions section and proceed by installing and activating the mentioned add-on. Also, it’s crucial to install WooCommerce (in Plugins > Add New section), a free e-commerce plugin, since it will be used for accepting and processing payments on your rental website.
The next step is to create the WooCommerce products that will be used for payments. To do this, go to the WooCommerce > Products section.
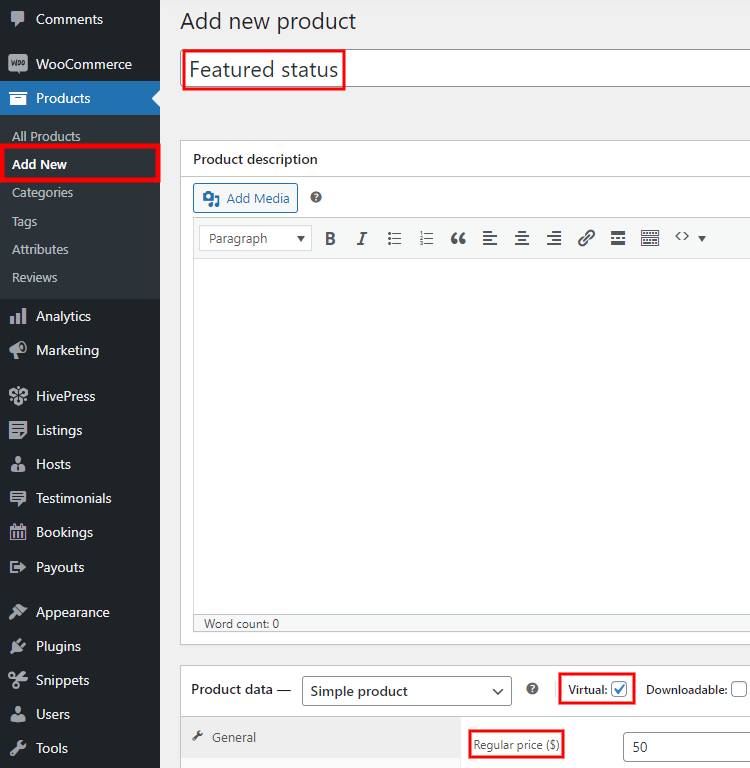
Here, you need to:
Then click on the Publish button. This product will be used for charging users for making listings featured. Also, by following the same steps, add one more product to link it with the premium listing package we’ll create later.
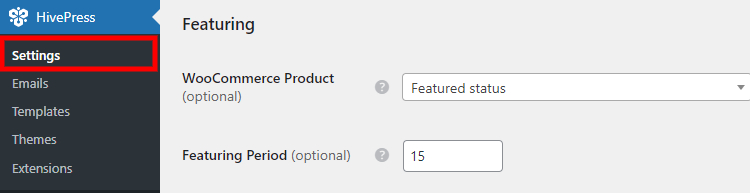
Now navigate to the HivePress > Settings > Listings section and select the product you’ve just created. Also, don’t forget to set the featured status duration in days.
After saving changes, you can check how everything works. To do this, you can open the website home page, then go to the user dashboard, pick any listing and click on the star icon.
There will be a redirect to the checkout page, where users have to fill in the form and proceed to payment. The selected listing will get the featured status once the payment is processed.
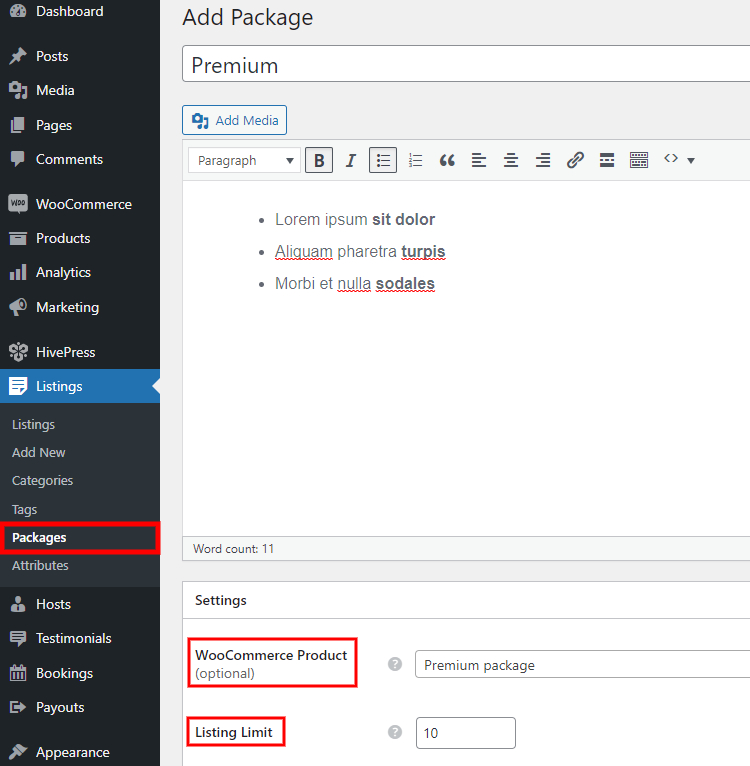
Alright, now let’s create some listing packages to charge users for adding new listings. Go to the Listings > Packages section and click Add New.
For example, you can create two packages: a free and a premium one. Let’s start with adding a premium package. Enter the package name, describe it, set the maximum number of listing submissions and select a WooCommerce product you created previously. Then click on the Publish button.
After adding a premium package, you can add a free one in the same way.
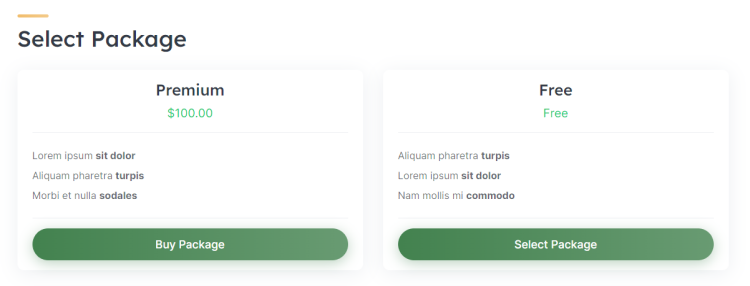
Now you can try adding a new listing to check how everything works. Simply go to the website homepage and click on the List a Property button. Once you fill in all the details and submit the listing, there will be a new page where you have to select one of the packages. If you choose a premium package, you’ll be redirected to the checkout page.
Now you’re familiar with the first monetization model, let’s set up the second one to charge commissions on bookings.
In this section, we’ll show you how to take a commission from each successful booking. We need to install the HivePress Marketplace extension to get the necessary functionality. Please note that this extension is already included with the RentalHive theme, and you don’t have to purchase it separately. It will be included in your purchase email as a separate file.
To install it, go to the Plugins > Add New section and click on the Upload Plugin button, select the ZIP file to upload and proceed by installing and activating it.
Once the Marketplace extension is installed, there are some new settings in the HivePress > Settings section. Let’s check them and start with the Listings tab.
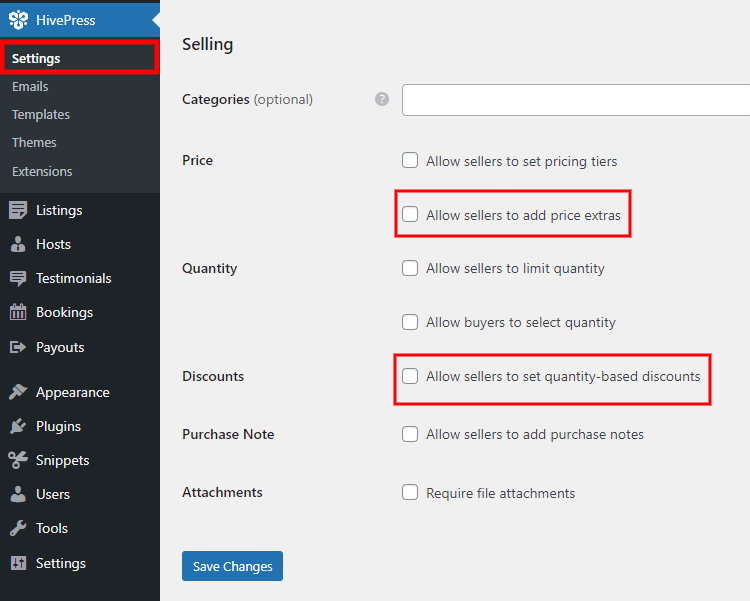
Here, the most important settings are:
Next, go to the Hosts tab.
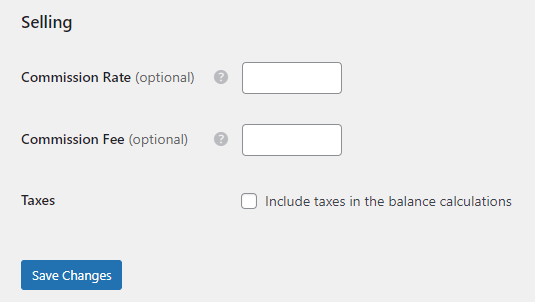
If you want to charge hosts for each successful booking, you can set:
Keep in mind that you can use either a commission or a fixed fee or even both at the same time.
Let’s move to the Users tab!
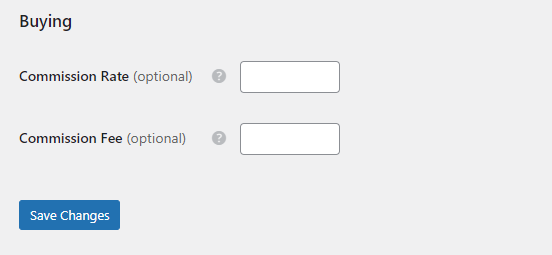
Here, everything is pretty similar to the Hosts tab, but we recommend checking out the Buying section. In this section, you can set a commission rate and fee for customers. It means you can charge either hosts or travelers on your booking website or both.
Finally, go to the Orders & Payouts tabs.
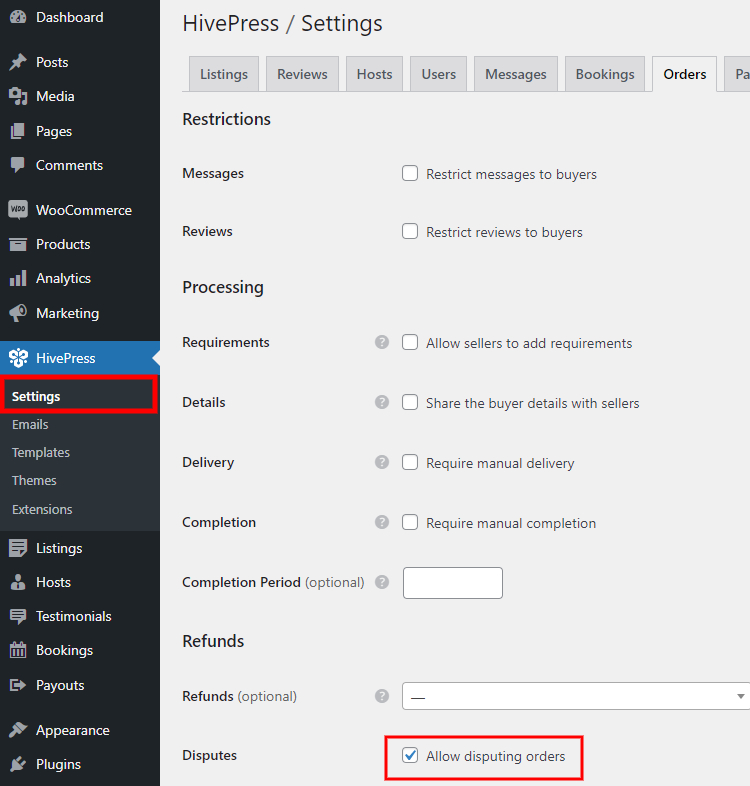
Any order is basically a payment receipt linked to each paid booking. Within this tab, I only recommend checking the disputes option. It allows users to notify the platform admins if there’s something wrong with the booking.
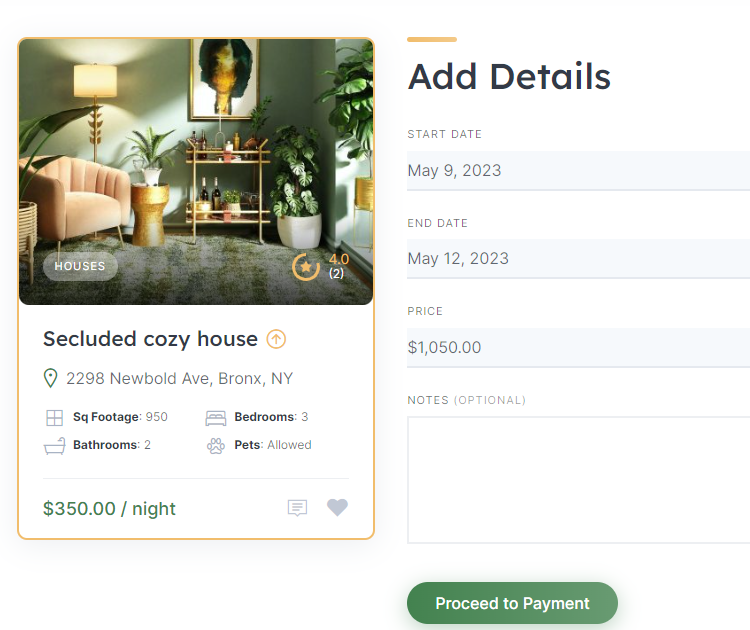
Alright, now it’s time to book a listing to check how everything works. To do that, simply go to your website and pick any of the previously added listings. After selecting some dates and clicking on the Book Now button, there will be a confirmation form.
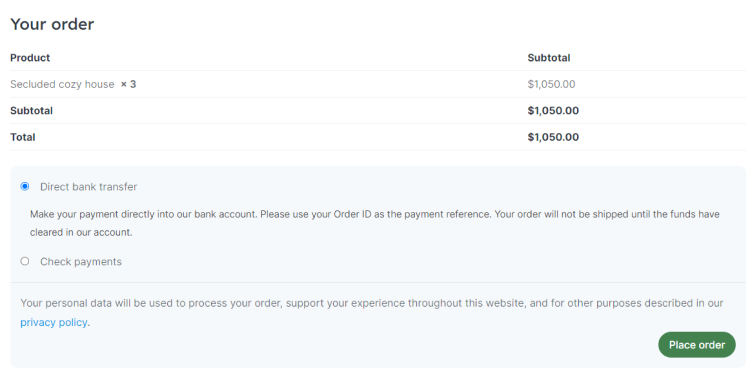
Once you click on the Proceed to Payment button, you’ll be redirected to the checkout page, where you can enter all the billing information and make a payment.
You can choose any of the above-mentioned monetization models or take advantage of both of them. Additionally, if you get decent traffic, you always have the option to place banners on your website or use Google AdSense in order to make an extra profit.
That’s all for today! We hope this article helped you and now you understand how to create a website like Airbnb with WordPress. Like any online platform, gaining the first users may take some time and marketing efforts, but once you get decent traffic, your website will become profitable.
By the way, don’t forget to check out RentalHive one more time if you want to build a website like Airbnb with WordPress. It already has all the necessary features, so you can just plug and play.
Build a searchable member directory website using WordPress.

A quick guide on how to build a WordPress lawyer directory website.

A complete tutorial on how to add location search in WordPress.