How to Create a Travel Directory Website like Tripadvisor with WordPress for Free
A step-by-step tutorial on how to build your own Tripadvisor using WordPress.
Build a searchable member directory website using WordPress.

Whether you have a small team of board members or have thousands of active members in your organization, a member directory is a hassle-free way to compile them. By using a member directory, your organization makes the essential contact information open and available so everyone can seamlessly contact one another.
In this tutorial, we’ll show you how to create a WordPress member directory for free. We’ll explain bit by bit how to launch your website, set up its functionality, customize it and finally, how to monetize your directory.
So, let’s dive in!
Simply saying, a member directory is a searchable database containing detailed profiles of your website users, with custom fields and search filters specific to your website niche.
For example, when you’re trying to connect with friends on social media, you simply type in their names and find them in seconds. A member directory works similarly – it’s a list of all the members of your organization or community.
Most member directories include details such as the member’s first name, last name, profile picture, phone number, email address, profession, etc.
Generally, there are member directories of two types:
Here are some use cases where you may need to create a member directory website:
We’ve mentioned only three examples of member directories. However, there may be dozens of other niches where it’s reasonable to launch a member directory website.
If you are doubting about launching a member directory website, take a look at some of the advantages:
Of course, the list may go on depending on your website niche and requirements but we mentioned some of the most crucial benefits.
Before moving to the tutorial part of this article, we’d like to briefly cover some prerequisites you’ll need to create a member directory website:
While it’s not rocket science to come up with a domain name, find a hosting provider and install WordPress, selecting a proper theme & plugin may be pretty challenging. So we prepared an overview of the most popular directory plugins and an article about the best free directory themes.
You can check both articles to get a better idea of the best options on the market and select a theme & plugin that works best for you.
For the sake of this tutorial, we’ll use the free ListingHive theme and the HivePress plugin since they are both free, easy to use and allow you to create any type of directory websites, including a member directory.
By following 6 steps below, you can create a WordPress member directory in next to no time and without any coding skills, so let’s move to the first step without wasting time.
Firstly, you need to install a member directory theme for your website. As far as ListingHive is a free theme, you can find it at the WordPress repository and install it for free. Simply navigate to the WP Dashboard > Appearance > Themes section and use the search bar to find it. Then proceed by installing and activating the theme.
When ListingHive is activated, there will be a suggestion to install HivePress, a plugin that will power directory features on your website. You need to install and activate it by clicking on the recommended plugin’s link.
If you have any issues with installing ListingHive, you can follow the screencast below in order to install it properly.
Once you installed ListingHive, it’s time to add some additional features to your WordPress member directory. You can add extra features for your website in the WP Dashboard > HivePress > Extensions section. There you’ll find a list of the available ListingHive add-ons that you can purchase or install for free.
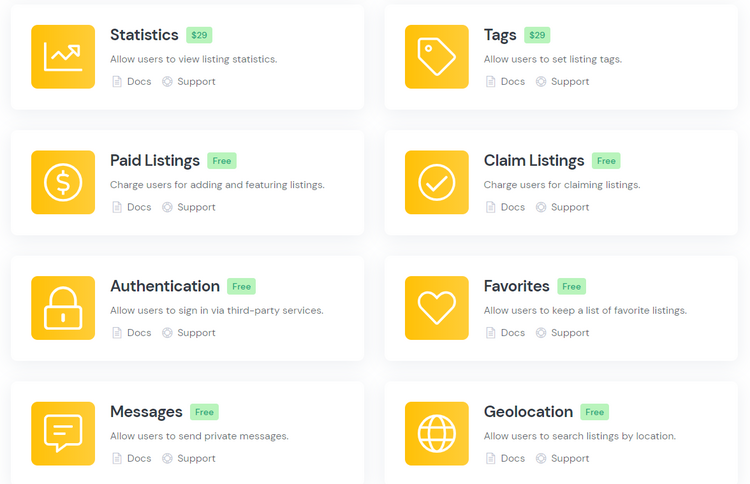
For example, you can install the Messages extension to allow users to communicate with each other via messages. It’s an essential feature for any member directory since it turns your website into a communications hub.
You can also install the Social Login add-on to allow your members to sign in via Google or Facebook. It’s a simple and handy option that positively affects the user experience on your website. Additionally, you may want to install the Social Links extension to allow members to add social links to their profile pages (like Twitter, LinkedIn, Pinterest, and so on).
In order to install the extension, simply click on the Install button and activate the extension once it’s installed. Bear in mind that you can build a directory website with unique functionality simply by mixing different add-ons.
Now we need to disable the listing submission on your directory and allow new members to register their profiles directly from the homepage. To do that, navigate to the WP Dashboard > HivePress > Settings > Listings section. There you need to uncheck the “Submission” option and save changes. Now go to the WP Dashboard > HivePress > Settings > Vendors section and allow direct registration. Then save changes.
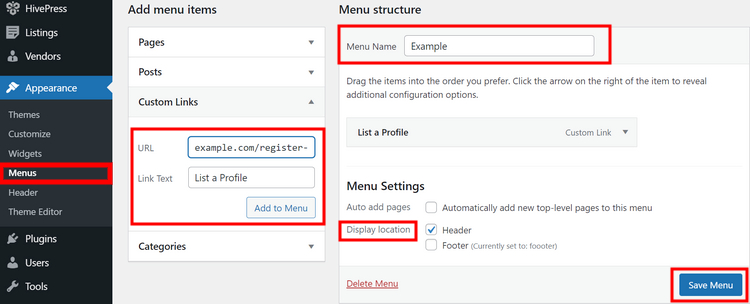
The next step is to add the registration link to the main menu so it appears on the homepage. In order to add a new menu item, navigate to the WP Dashboard > Appearance > Menus section. Firstly, you need to add a new menu if it’s not been created yet. Simply enter the menu name and select its display location, then click on the Create Menu button.
Then, let’s add a custom link item. Simply enter your website’s URL and add the “/register-vendor” path at the end. Then fill in the link text, let it be “List a Profile” and click on the Add to Menu button. Finally, save the menu.
Alright, once you are done with menus, it’s time to add some custom profile fields and search filters.
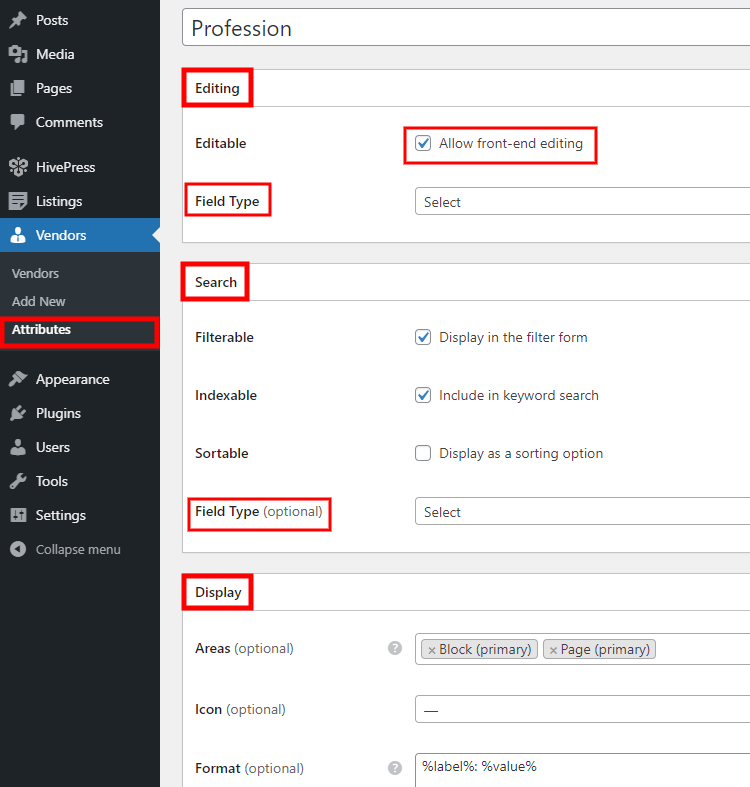
Custom fields help you store additional information about each individual member, which isn’t possible within standard WordPress fields. This probably includes things like job title, phone number, email, website, etc. You can add custom fields in the WP Dashboard > Vendors > Attributes section.
For example, let’s add a “Profession” attribute to allow users to specify their profession when filling out a registration form. You can customize your attribute within 3 different contexts, so let’s check each of them to get a better idea of the available settings:
Once you are done, click on the Publish button.
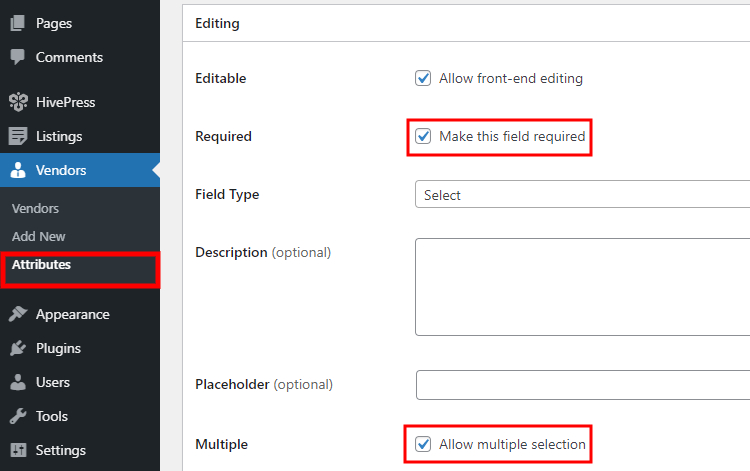
Now it’s better to make this field required. We also recommend enabling the multiple selection option, so members will be able to select several professions during registration, as well as search for multiple options at once. Once you are done, click on the Update button.
Your next step is to add the attribute options. Click on the Edit options button and add several professions, let it be “Lawyer,” “Engineer,” and “Electrician.” Similarly, you can add as many options as you need.
That’s it!
In the same way, you can add more custom attributes, like contact information, location, work experience, and so on, depending on your member directory niche and requirements.
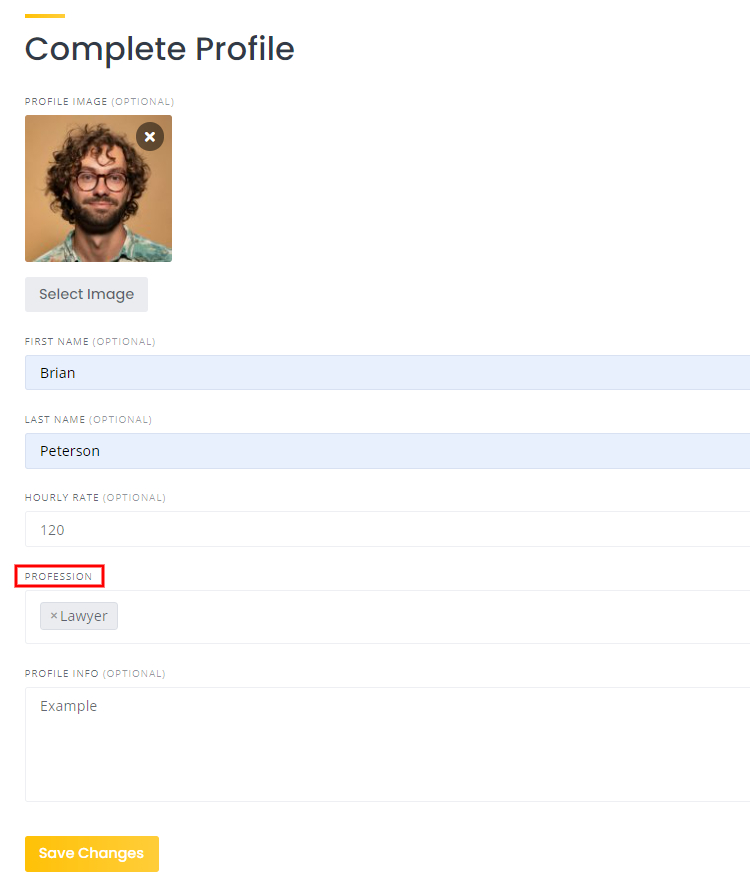
Okay, let’s try to register a new member profile and do it from the front-end to get a better idea of how it works for new members. To do this, go to your website and sign out from your admin account. Then, click on the List a Profile link (the link that we previously added) and provide the basic details required for user registration.
Next, fill in the profile fields, including the custom fields we previously added. Once you fill in all the details, save changes.
Bear in mind that as a website owner, you can add to the registration form as many custom fields as you want and make them required or optional, according to your needs.
Now let’s move to the next step and set up a front page for your WordPress member directory. Since HivePress is compatible with such popular block editors as Elementor and Gutenberg, it won’t be an issue for you to customize your page using blocks.
In order to add a new page, log out and sign in again as an admin, then go to the WP Dashboard > Pages section and click on the Add New button. Firstly enter the page title, let it be “Home.” Then you can add some layout blocks. For example, let’s add the member search form by clicking on the ➕ icon and selecting a block you want to add. Similarly, you can add a block that displays members. Once you are done with setting up blocks, you can publish the page.

To use this page as a front page, go to the WP Dashboard > Settings > Reading section and select your newly created page from the drop-down list, then save changes. That’s it! Now you can navigate to your website and check the new layout you’ve just designed.
As you can see, it’s a pretty straightforward process to create a WordPress member directory, and you can also easily monetize it. For example, you can turn your directory into a member-only website via the HivePress Memberships extension. With this extension, you can charge users for contacting members or viewing specific profile details.
Additionally, if you allow members to list their services, then you can also charge them for submitting and renewing listings or even turn your website into a service marketplace and charge a commission fee on every transaction.
So, there are many ways to monetize your directory website, and you are not limited to a particular monetization model.
That’s it! As you can see, no technical knowledge is required, and you only need a directory plugin and a theme to create a searchable member directory with WordPress. With these few simple pieces in place, you can make your website up and running in no time.
If you want to create a WordPress member directory, you need the right tools to do it. With the HivePress plugin and its ListingHive theme, you can easily create a customizable directory to showcase team members, clients, sponsors, or any other type of member. Moreover, you can do it even without a budget since they can be installed via the WP dashboard for free.
By the way, if you want to create a website solely for your colleagues, then you may want to check our tutorial on how to create a staff directory with WordPress.
A step-by-step tutorial on how to build your own Tripadvisor using WordPress.

A quick guide on building your own stock media marketplace with WordPress.

A complete tutorial on how to add location search in WordPress.