
How to Add Location Search to a WordPress Directory Website
A complete tutorial on how to add location search in WordPress.
Easily monetize your valuable content by creating a members-only directory.

Data is one of the most valuable resources, even more, they say that it is the new oil. So, if you have some valuable or unique information that is hard to find or collect elsewhere and people are willing to pay for it, then you can build a great niche directory that would be both useful and profitable.
In this article, we’ll show you how to create a membership website with WordPress, without writing a single line of code.
Are you ready? Let’s get started!
When people talk about WordPress membership websites, they mainly refer to websites where users have to purchase membership packages for getting access to content. For example, the “members-only” content may include different digital products, contact details, premium deals & promotions, etc.
Also, there may be some other features on your website you don’t want just anyone to be able to access, like adding listing reviews or sending messages. In such cases, charging a one-time fee or a subscription is a perfect way to ensure that only pre-approved members can use these features.
There are many reasons why you may want to create a membership website, and here are some of the main benefits:
These are some of the most common advantages of running a membership website. However, depending on your niche and a particular use case, there may be many other benefits for your business.
Also, while the primary business model for membership websites is to charge users for access to premium content, features, and access to a community, you are not limited to one monetization strategy. To get a better idea of the possible revenue models, feel free to check our article on how to monetize a WordPress listing website.
Today, it’s pretty easy to launch a new website even without code knowledge. With WordPress, you can make your membership website up and running in no time. You only need the following few things to get started:
Once you have all these things in place – you’re ready to create a membership directory with WordPress. Also, bear in mind that for the sake of this tutorial, we are going to use:
Alright, now let’s move to the first step!
In this walkthrough, we’ll show you step-by-step how to install the required WordPress plugins and add-ons, set membership restrictions, add membership plans and so on.
Firstly, you need to install the ListingHive theme. It can be installed in the same way as any other free theme – you just need to go to your WordPress dashboard and navigate to the Appearance > Themes section, proceed by selecting Add New and find it with the search bar.
Please follow the screencast below to install ListingHive directly from the WordPress dashboard.
It’s not enough to create a membership website with some restricted content. Also, it should be simple for users to make payments for their memberships, and that’s why we need WooCommerce.
To install Woocommerce from your WordPress dashboard, navigate to the Plugins section, and click Add New. Now, search for WooCommerce with the search bar and install it. After its installation, activate it. That’s it, now you are one step closer to your membership website, so let’s move on.
The next step is to install the Memberships extension which allows you to charge users for viewing listings. It is an essential extension if you want to create a membership website. With Memberships, you can restrict access to all listing pages (including search and category pages), single listing pages, or certain listing attributes.
First of all, you need to download the Memberships extension. Once downloaded, you can install it directly from your WordPress dashboard by clicking on the Add New link in the plugins menu. Then click the Upload Plugin button, select the downloaded Memberships extension ZIP file, and install it. Now, you need to click on the Activate link to start using the extension.
If you find it difficult to install the extension, you can check the screencast and follow it step by step.
Now let’s add several listing categories. In the next steps, we’ll restrict access to that content so you can understand how everything works.
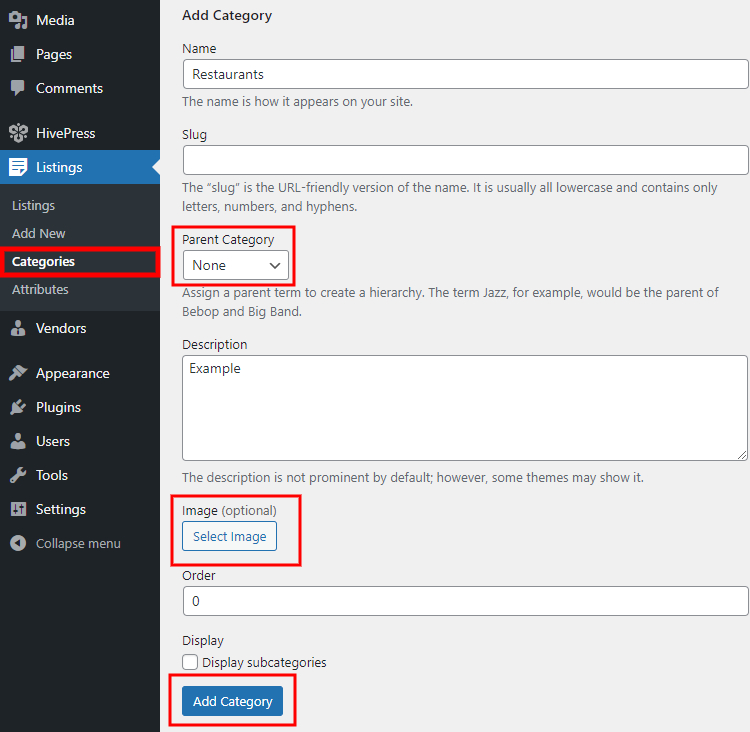
To add a new category, navigate to the WP Dashboard > Listings > Categories section. Within this page, you can enter a category name, describe it, add a category image and create a hierarchy of categories. Simply fill in all the necessary fields and click on the Add Category button.
Next, for the sake of this tutorial, let’s add a new listing to one of the categories. To add a new listing, go to the WP Dashboard > Listings > Add New section. Here you can indicate some basic details, like title, description, add listing images., etc.
Please note that you can customize the listing submission form in the way you like by adding or removing any fields in the WP Dashboard > Listings > Attributes section. Also, you can install different extensions, for example, HivePress Geolocation, and users will be able to specify the location when adding new listings.
Once you fill in the listing submission form, click on the Submit Listing button.

Since you have already installed the Memberships extension, you need to set membership restrictions in the HivePress > Settings > Memberships > Restrictions section. The following options are available:
It’s also possible to restrict access to certain features, such as sending messages or submitting reviews by selecting the “All Users” option.
Now, let’s start setting up the membership plans. To do so, find the Memberships section in your WordPress dashboard, hover over it and click the Plans link. Here you can add and set up your membership plans.
Please follow a short step-by-step screencast to add membership plans. This video shows how to restrict access to the Listings page but you can also restrict access to other pages, categories or listings on your website, by following the same steps (e.g., you can restrict access to the category or listing that you added in the previous steps).
That’s all! Now you’ve learned how to create a membership website with WordPress, so you can start adding more listings and monetizing your valuable and unique content.
If you are looking to create a fully functional WordPress membership website in next to no time, then the HivePress plugin may be a solution for you since it’s suitable for building directory websites of any type.
Additionally, you may want to check some other WordPress resources suggested by our partner.
A complete tutorial on how to add location search in WordPress.

Launch a product catalog website for your business in 6 steps.

A quick guide on how to build a WordPress lawyer directory website.