How to Create a Restaurant Directory Website with WordPress
Build & monetize your own restaurant listing website with WordPress for free.
Launch a rental marketplace for any niche using WordPress.

A sharing economy is gaining traction, and every year more businesses are getting involved. Booking platforms and rental marketplaces are not an exception. Renting is gradually replacing ownership, so launching your own rental platform may be a great idea for your next online business.
In this guide, we’ll show you how to create a rental marketplace for any niche with WordPress. We’ll explain step-by-step how to install and set up all the necessary plugins, extend your marketplace functionality and customize it to your liking.
Let’s get started!
A rental marketplace is a p2p platform where individuals or companies can rent different types of goods from one another. People are free to rent all kinds of goods from cars and homes to equipment and clothes.
Such platforms are becoming popular because renting infrequently used or expensive things instead of buying them is a lot cheaper and much more convenient. Moreover, since sharing economy is a huge trend now, with enormous business potential.
There are dozens of niche rental marketplaces, but we’d like to show some of the most notable ones:
Besides the mentioned ones, there are many other niches for p2p rental platforms like equipment, clothes, sporting goods, technology, etc.
Before you start creating your rental marketplace, think about the monetization strategy that you are going to use. In general, there are 3 the most popular business models for peer-to-peer rental platforms:
To get a better understanding of the possible monetization models, check out our article on how to monetize a peer-to-peer marketplace.
If you have an idea for a rental marketplace, you also likely have thought about things you need to create such a platform. Here are some prerequisites you’ll need if you want to build a rental marketplace with WordPress:
Once you come up with a domain name and choose a WordPress hosting provider, you’ll need to select a theme and plugin for your marketplace. For the sake of this tutorial, we’ll use RentalHive, an all-in-one rental marketplace WordPress theme and HivePress, a free multipurpose WordPress plugin that has all the necessary features for building a rental platform.
Sometimes costs may be one of the biggest challenges for early-stage rental platform founders. However, the good news is that you don’t need an enormous budget to create a peer-to-peer rental platform with WordPress.
The cost may vary depending on the hosting provider you choose and the WordPress theme you are going to use. However, in this tutorial, we’ll show you how to launch your own rental marketplace for less than $100 – $150.
So let’s move to the tutorial part of this article without wasting time!
Now we’d like to show you 6 steps you need to follow if you are about to create a rental marketplace using WordPress. Keep in mind that you can launch a rental marketplace for any niche by following the same steps.
Let’s move to the theme installation!
Firstly, you need to install the RentalHive theme. You can install it directly from your WP dashboard by going to Appearance > Themes > Add New > Upload Theme page. Next, upload the theme ZIP file and proceed with the installation.
Upon activation, there will be a suggestion to install the HivePress plugin. It’s crucial to install and activate it since most of the marketplace features on your website will be powered by this plugin. Simply hit the recommended link and complete the installation.
If you have any issues with installing RentalHive, please check out the screencast below.
Once you install and activate the HivePress plugin, you can add more useful features to your rental marketplace by installing different HivePress extensions. Simply navigate to the WP Dashboard > HivePress > Extensions section to check the whole list of available add-ons. Let’s add some of them to extend your website functionality.
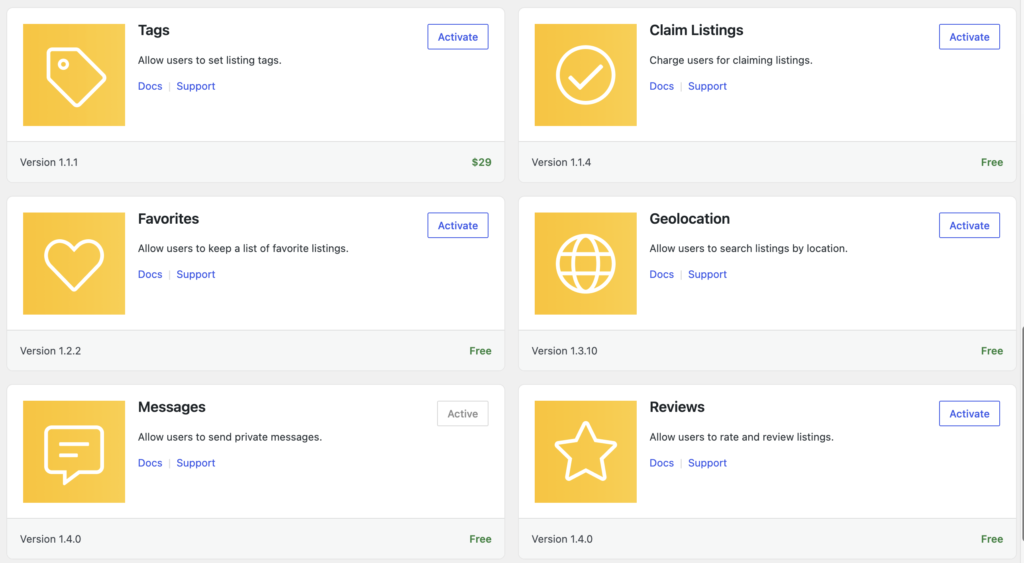
For example, you can install the Geolocation extension to enable the location-based search. Also, if you want to improve the user experience on your website, you can install the Social Login add-on, so any user will have an option to sign in via third-party services like Google and Facebook.
Please note that all the HivePress add-ons are intended to work hand in hand with each other, so you can install them without the risk of any compatibility issues. Also, bear in mind that you can build a niche WordPress website with unique functionality by simply combining different add-ons.
Okay, now you have all the necessary features and can start setting up your booking website. Let’s begin with adding some listing categories depending on the type of goods that users may rent.
In order to split your marketplace into categories, navigate to the WP Dashboard > Listings > Categories section. For example, let’s add “Equipment,” “Clothes,” and “Instruments” categories so users can easily find these types of goods within some of the categories.
To add a new category, you need to enter its name (e.g., “Equipment”), then you can briefly describe it, and if necessary, you may upload a category image. Also, there’s an option to create subcategories by setting parent categories if you’d like to separate your website’s content more precisely. It may be a useful option if, for example, you want to create several specific sub-categories in the “Equipment” category depending on the type of tools, etc.
When finished, click on the Add Category button.
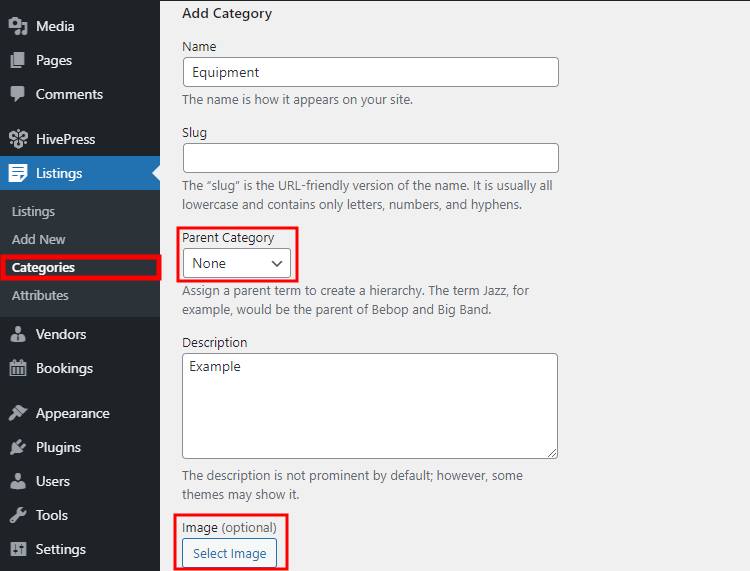
Keep in mind that there are no limits on the number of categories, so you are free to add as many of them as you need for your WordPress rental marketplace.
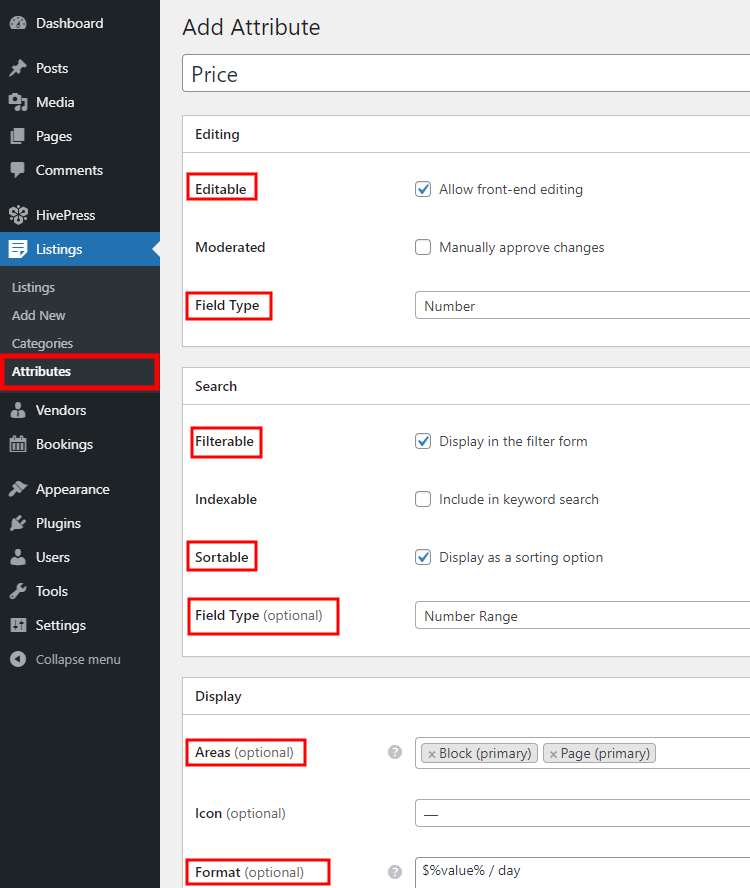
Once you are done with categories, let’s add some custom listing fields. Since every marketplace is unique and varies on its niche, different listing details and search filters may be required. In the case at hand, we are building a common rental marketplace, so let’s add a custom field that is necessary for rental listings of any niche. Let’s add the “Price” field to allow users to set the price when they list some goods for rent.
Go to the WP Dashboard > Listings > Attributes section and click on the Add New button. Now you need to fill out the title, enable the front-end editing option and select the attribute field type (we recommend using the Number field type).
Next, mark it as filterable, sortable and select the search field type if you want to allow users to use this custom field as a search filter for listings. It’s better to use the Number Range type because customers will be able to search for products by the price range instead of some specific price.
Finally, set up the attribute display format and assign it to some of the listing template areas. When finished, click on the Publish button.
In the same way, you can create more custom fields and search filters. Also, there’s an option to add category-specific attributes. It’s a helpful feature for rental websites since each category of goods has unique details, so different search filters may be required.
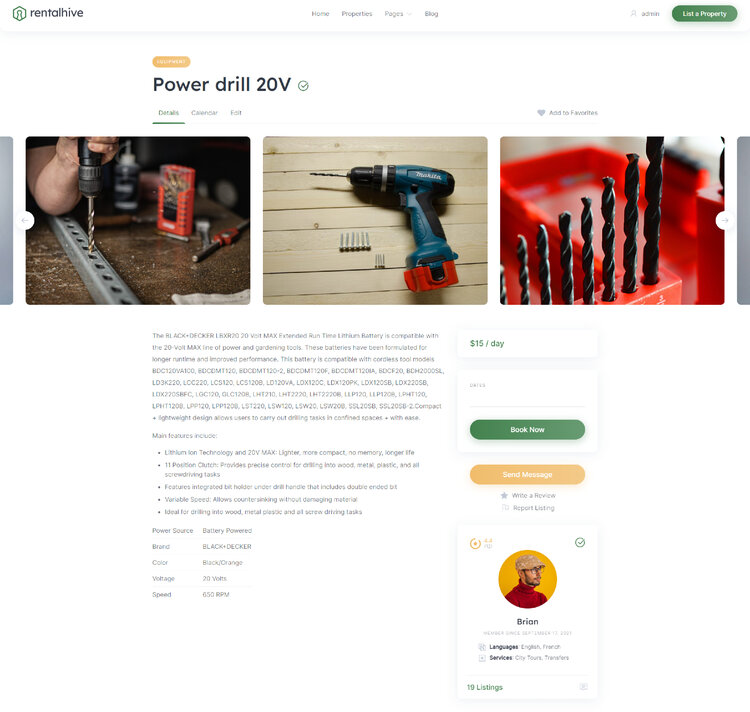
Now it’s time to check how your rental platform works for users, so let’s try to add a new rental listing. For example, let’s add a new listing to the “Equipment” category. To do that, go to your website, click on the Add Listing button and select the category.
You’ll be taken to the listing submission page, where you need to fill in all the necessary details about your rental listing. Firstly, you have to name it, let it be “Power drill 20V”, then upload images of your equipment, describe it and set the rental price (the custom field we’ve created earlier).
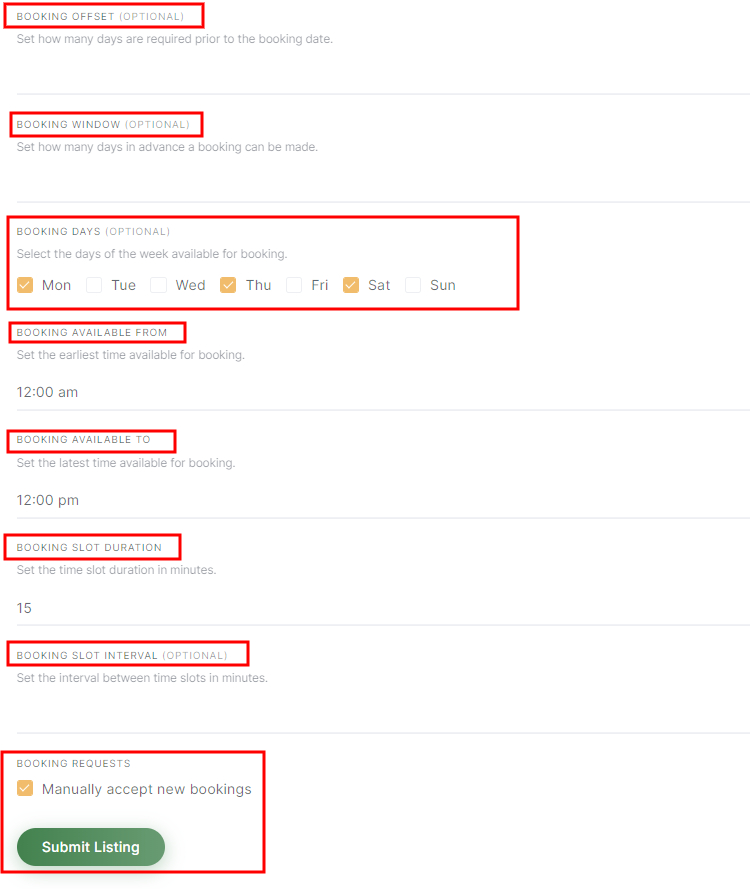
When you fill out all the required information, you can tweak the bookings settings. For example, you can set the minimum and the maximum rental duration to avoid single-day or long-term rental periods. Then, you may define the number of days required before the rent date and specify how many days in advance customers can rent. Additionally, you can enable Time Slots in the WP Dashboard > HivePress > Settings > Bookings section to accept time-based bookings.
Before submitting the listing, don’t forget to enable moderation to accept each booking request manually.
Once you are done, click on the Submit Listing button. Keep in mind that you, as a marketplace owner, can customize the listing submission form in the way you like by adding or removing different fields.
If moderation is enabled, the listing will appear on the front-end once the admin approves it. If you want to disable manual approval of each listing submission, go to the WP Dashboard > HivePress > Settings > Listings section and uncheck the corresponding option.
That’s how it works! However, let’s move to the next step and try to rent your recently added equipment to get a better sense of the marketplace functionality.
In order to check the whole workflow of renting goods, let’s register a new user account and try to rent something on your booking platform. To do that, simply log out from the admin account and click on the Sign-in button. Then click on the Register button and complete the registration.
Once you are done with the registration, go to the “Equipment” category, locate your previously added listing and try to rent it. For example, let’s rent this equipment for 5 days. When you pick the dates, click on the Request to Book button. There will be a redirect to the confirmation page where you can verify the details and make some notes if necessary.
Finally, if everything is correct, simply click on the Send Request button.
That’s it! Once you rent some goods, you can manage your rental request in the My Account > Bookings section.
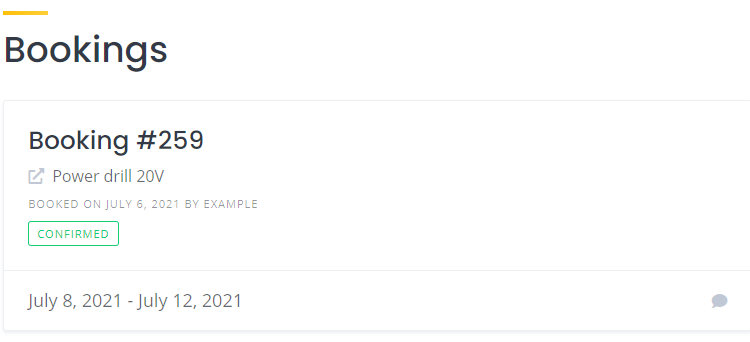
Now, let’s switch back to the admin account and try to accept this rental request. To do that, navigate to the My Account > Bookings section, and you’ll see a pending request for rent. You may accept it or decline if there are some issues with the booking availability or details. Simply click on the Accept button to confirm the request.
That’s how it works! Once the rental request is accepted, customers receive a confirmation via email, and, of course, both parties can be in touch via messages in case there are some issues with the booking.
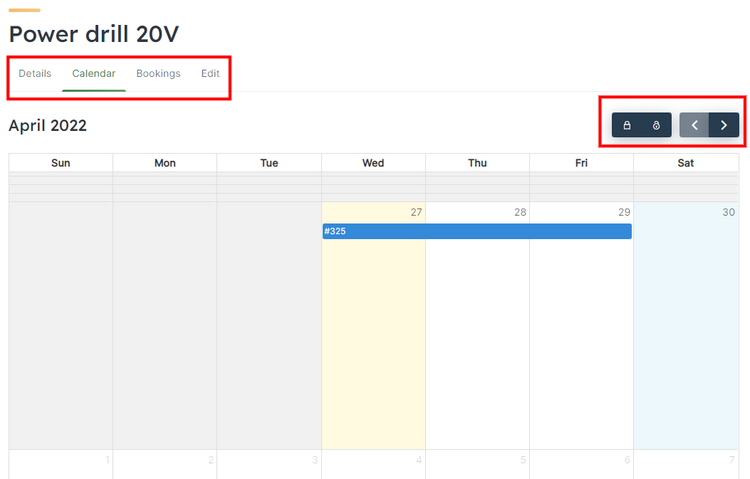
Also, bear in mind that there’s a calendar feature that allows you to make certain dates available or unavailable for new rental requests. Moreover, with the calendar, you can always check upcoming rental dates, available and unavailable dates, and so on.
There you have it! Now you know what steps you need to take in order to create a rental marketplace with WordPress in next to no time. We tried to keep this tutorial simple so that you can launch your website hassle-free and without any coding knowledge.
If you decided to build a rental marketplace using WordPress, keep in mind that you can do it with the HivePress plugin and the RentalHive theme. They are both easy to use, lightweight and go with all the necessary features for getting your website off the ground. Feel free to check the RentalHive overview.
Additionally, you can check our tutorial on how to launch a website like Vrbo overview of the most popular WordPress themes for vacation rental.
Build & monetize your own restaurant listing website with WordPress for free.

Launch your own сar listing website in a few simple steps.

A short explanation on how to set up the HivePress Messages extension.