
How to Create an Event Directory Website like Eventbrite with WordPress
Just a few simple steps to create your own event directory website.
A complete walkthrough on launching a property rental website like Vrbo.

If you have a country cottage, a beach house, or a gorgeous mountain cabin that you want to rent out without any third-party platforms, then building a vacation rental website may be an excellent option for you.
Moreover, even if you don’t have any property to rent out, you can still build a niche property rental marketplace to list properties of other owners and make money through commissions.
In this step-by-step tutorial, we’ll show you how to create a vacation rental website with WordPress, which you can use to list your own properties or turn into a property rental marketplace.
So, let’s get started!
Many of us love staying in hotels where everything is made for our comfort, starting from large beds with those “special” bedsheets & bedspreads and ending up with great rooftop restaurants.
However, renting a property for a vacation also has tons of benefits. For example:
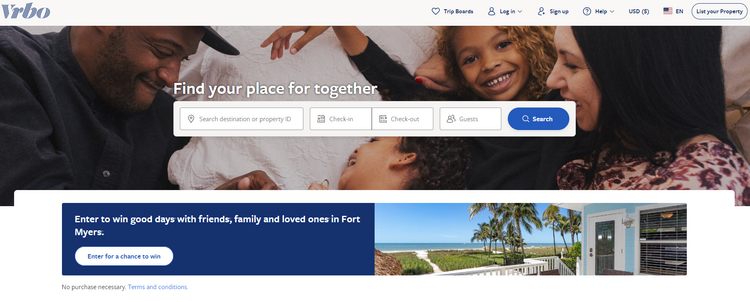
You can check the most popular vacation rental website Vrbo (known initially as Vacation Rentals by Owner), to get a better idea of how it works.
If you are thinking about launching your own vacation rental website, you should understand what types of property rental websites exist and the difference between them. Then it will be easier to decide which type is more suitable for you.
To keep things simple, we can split all property rental websites into two categories: single-vendor sites and marketplaces. Let’s take a closer look at each of them.
As the name suggests, on such websites, only admins can list properties. In most cases, such single-vendor rental websites are devoted to one extraordinary or luxury property like a villa or chalet.
So, building this type of rental website may be an excellent option if you have one vacation property to rent out (e.g., a lovely beach house) or several related properties (e.g., a few forest houses).
The opposite of single-vendor websites is property rental marketplaces where users can find and rent various properties offered by different hosts. The best example of a property rental marketplace is Airbnb.
Also, the great news about marketplaces is that you can launch one even if you don’t have any property to rent out. For example, you can create a niche rental marketplace of fisherman’s houses or forest cabins in your region and list properties of other owners for a fee.
The easiest way to create a property rental website is by using WordPress. It’s a free, user-friendly and easy-to-use CMS that even a rookie can use for building their website.
However, to create a vacation rental website, it’s not enough to have only WordPress installed, and you’ll also need the following things:
While it’s not rocket science to come up with a domain name and find a reliable hosting provider, it may be challenging to choose a good WordPress theme and a feature-rich WordPress plugin.
So, to make things easier for your, we have already hand-picked some of the best vacation rental WordPress themes in our overview, so feel free to check it and choose a theme that works best for you.
For the sake of this tutorial, we’ll use the RentalHive vacation rental WordPress theme. It’s a clean and lightweight theme that is suitable for building rental websites of any type. We’ll also use HivePress, a free multipurpose plugin that is jam-packed with all the necessary features for launching rental websites.
Alright, let’s move to the tutorial part of this article!
In the next few steps, we’ll show you how to get your vacation rental website up and running without any coding knowledge. So, let’s start with the theme installation!
The starting point is to install the RentalHive theme. To do that, navigate to the WP Dashboard > Appearance > Themes > Add New > Upload Theme section and select the theme ZIP file to upload.
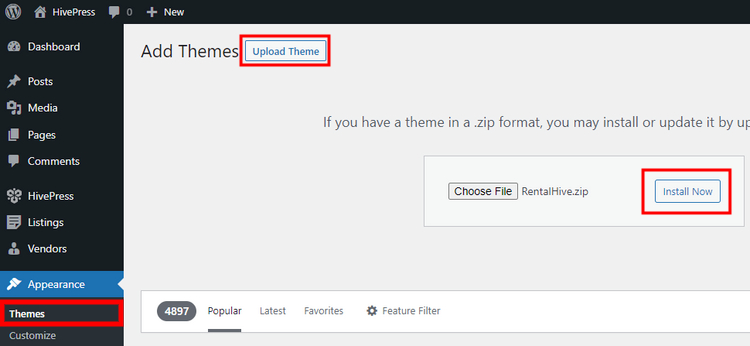
Once the theme is installed, you’ll get a suggestion to install the HivePress plugin and some other add-ons that are included with RentalHive. It’s crucial to install all of them to create a vacation rental website with all the necessary features. So, simply click on the recommended link and proceed by installing plugins.

Now you have all the necessary plugins installed and activated, so we can move to the next step and add listing categories.
It’s better to split your vacation rental website into listing categories to make it easier to navigate. Depending on your website niche, there may be different categories. For the sake of this tutorial, let’s imagine that you want to build a vacation rental platform like Vrbo, where everyone can register and list their property. So let’s add the following categories “Houses”, “Cabins” and “Bungalows”.
Go to the WP Dashboard > Listings > Categories section to add a new listing category. Here you can name a category, add a short description, upload an image and create a hierarchy of categories if necessary (by adding a parent category). When finished, simply click on the Add Category button.
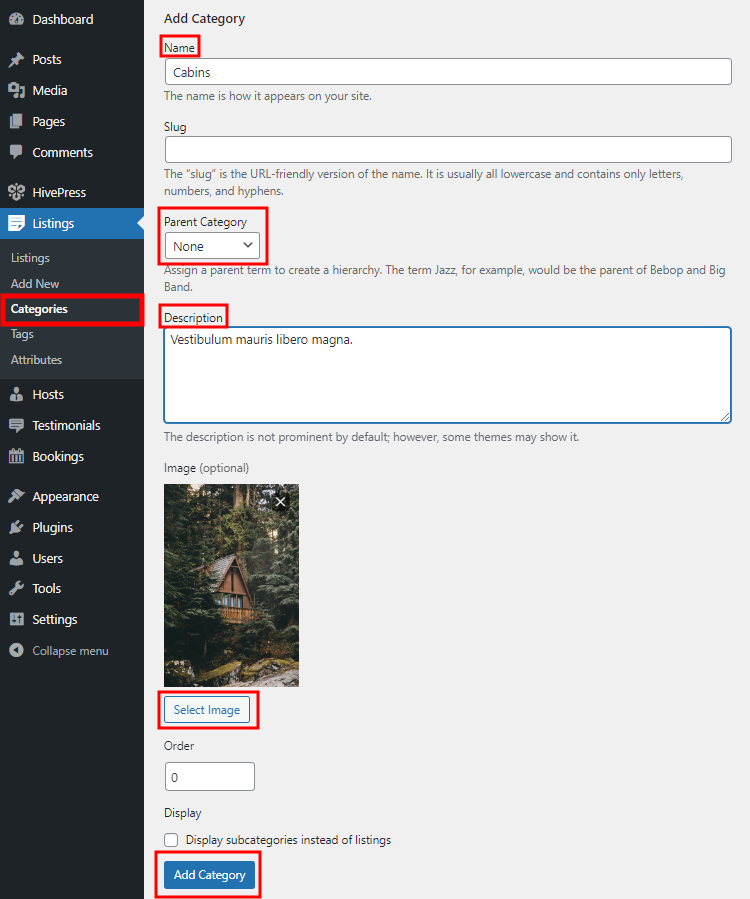
By following the same steps, you can add as many listing categories as required for your vacation rental website.
RentalHive allows you to create your own listing fields and search filters so you can easily tailor everything to your niche. To create a custom listing field, navigate to the WP Dashboard > Listings > Attributes section and click Add New.
There are many different types of custom fields that you can create, like checkboxes, radio buttons, texts, attachments and more. For example, let’s add a “Price” field so hosts can set the price per booking.
Once you name your custom field, you can customize it in three different contexts, so let’s briefly cover each of them:
$%value% / night for the “Price” field).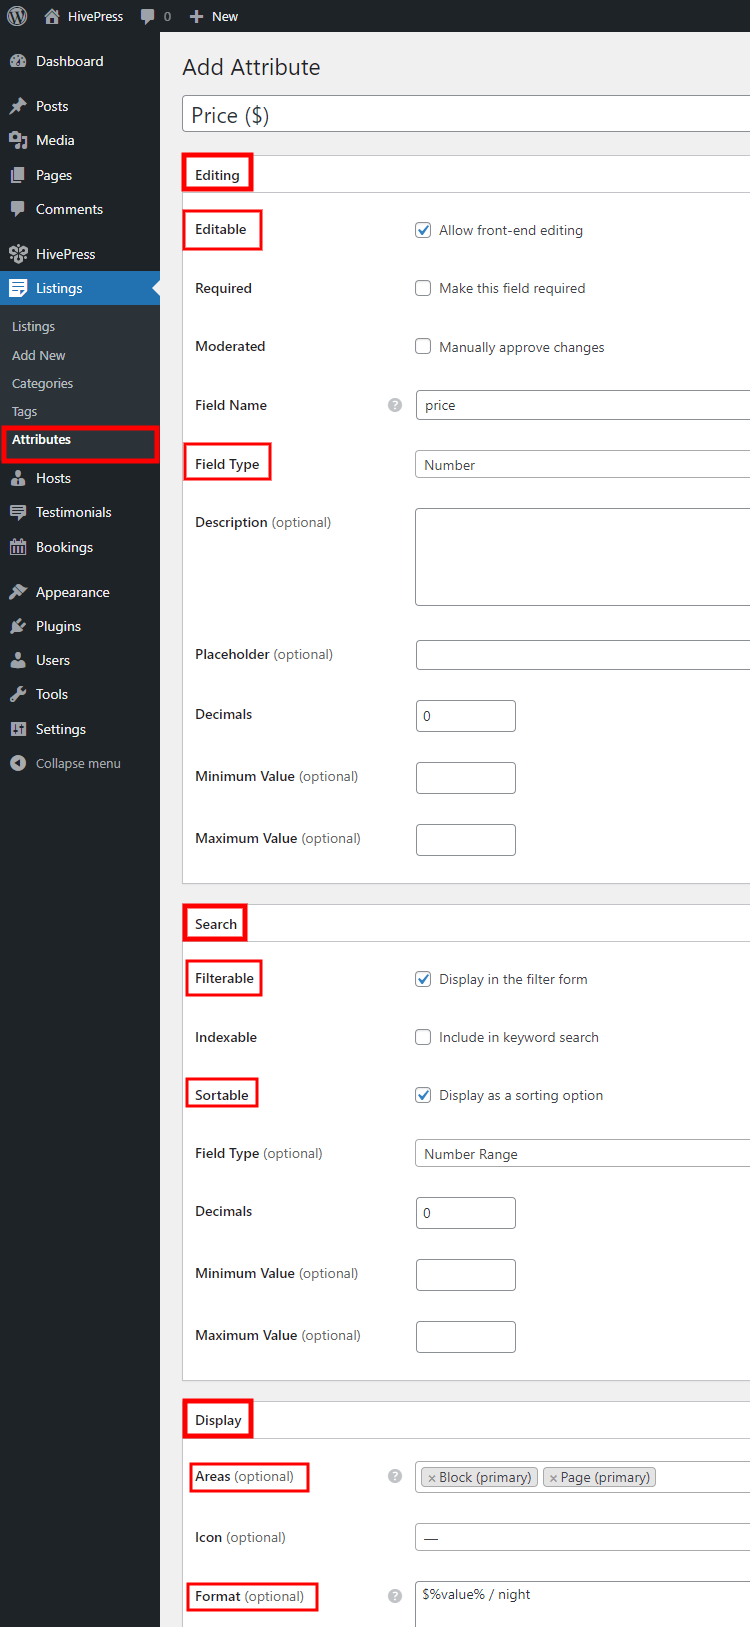
When you finish customizing your custom listing field, simply click on the Publish button. Also, keep in mind that in the same way, you can add tons of different fields without any limits (e.g., you can add the “Sq Footage”, “Bedrooms”, “Check-in” attributes, etc.).
Since RentalHive is powered by HivePress, it’s fully compatible with all HivePress add-ons. It means that you are not limited to the RentalHive core functionality and can easily add various extra features.
For example, you can install the free Geolocation extension to integrate your website with Google Maps or Mapbox and enable the location-based search on your vacation rental website (check out how to set up the Geolocation extension). Also, you can add the Social Login add-on, which allows users to register on your platform via various platforms like Google, Facebook, LinkedIn and so on.
To check the whole list of the available free and premium add-ons, go to the WP Dashboard > HivePress > Extensions section.
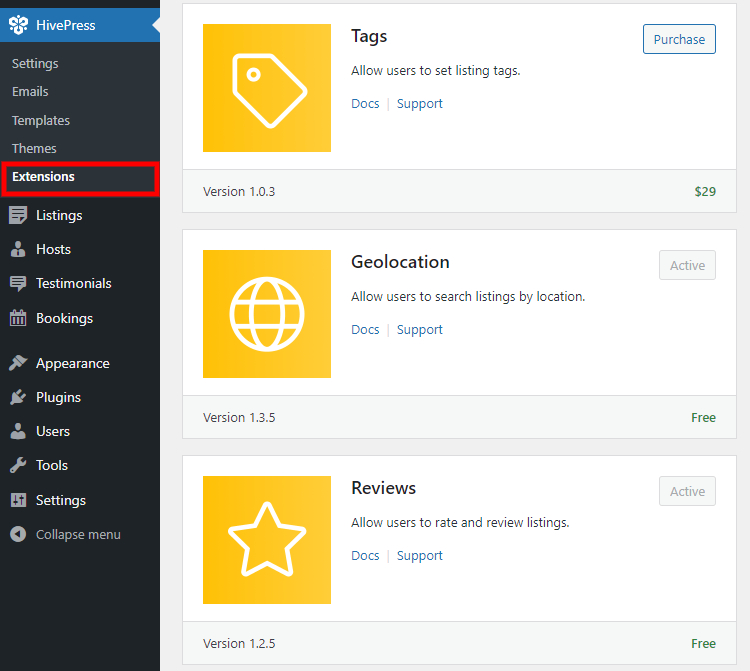
All the HivePress extensions are intended to work hand in hand with RentalHive, so you can rest assured that no compatibility issues occur.
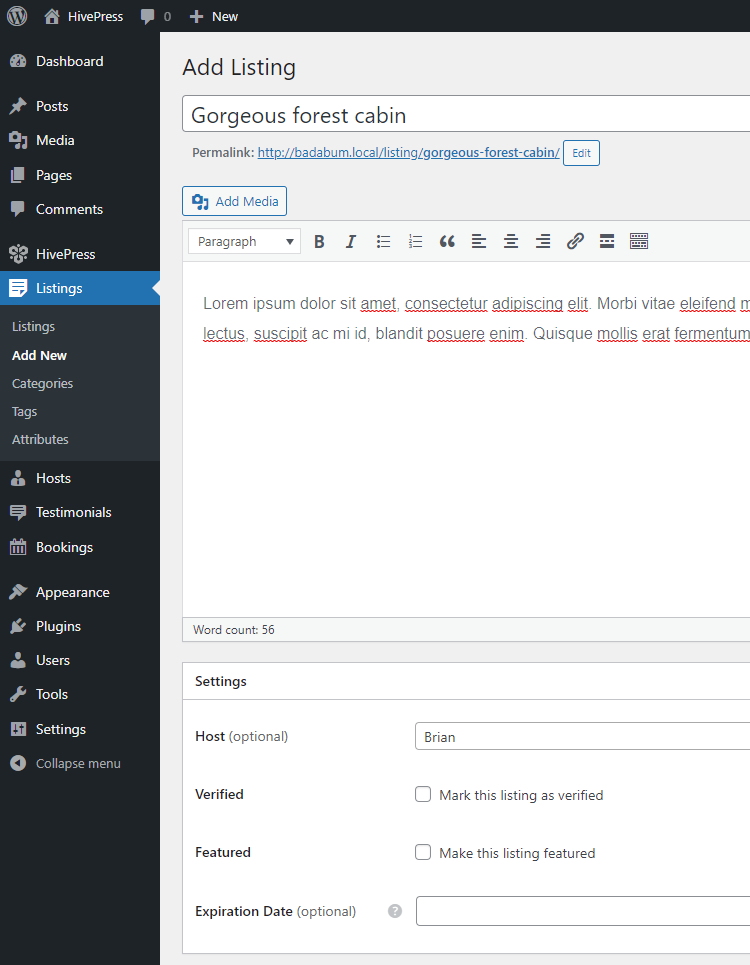
Now it’s time to add the first listing to your vacation rental platform. It’s possible to add new listings via the front end and back end of your website, and we’ll show you how to do it in both ways.
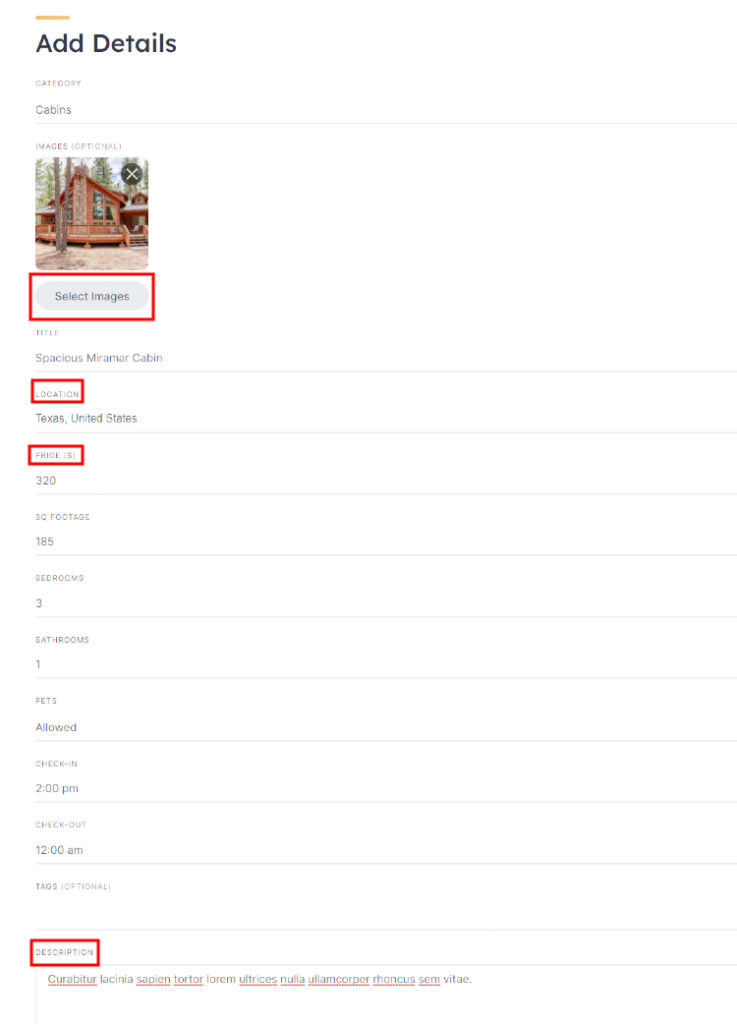
It’s as simple as pie to list a new property via the front end. Simply navigate to your website and click on the List a Property button. You’ll be taken to the listing submission page, where you should select a listing category, add a title, upload images and describe your property.
Also, on this page, you have to fill in all the fields that you have added in Step 3 and set the location (this field is available if you installed the free HivePress Geolocation add-on).
Finally, you can set different booking restrictions, like booking offset, booking window, minimum & maximum stay duration, etc.
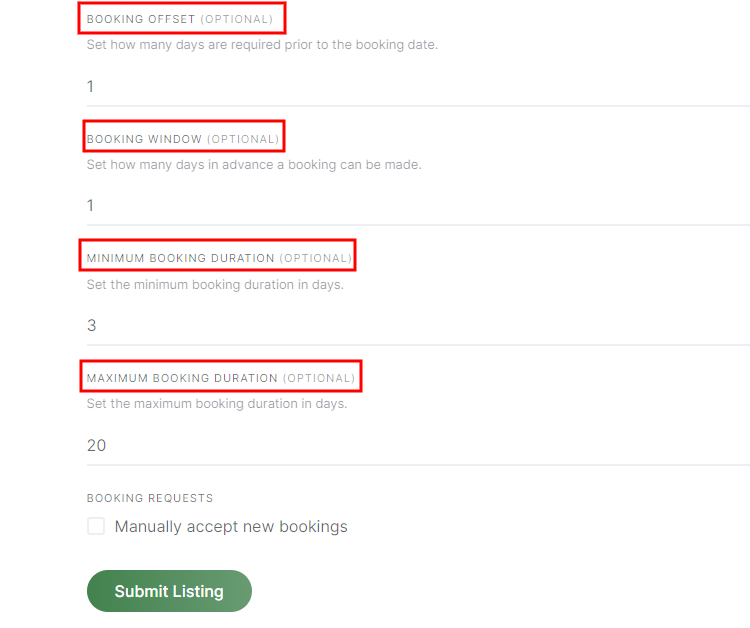
Once you fill in all the necessary fields, click on the Submit Listing button. Then a website admin (i.e., you) should approve the new listing in the WP Dashboard > Listings section.
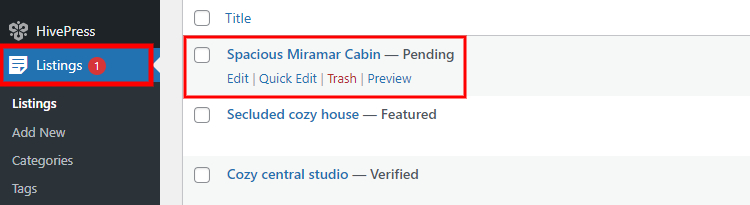
When the listing is approved, it should appear on the website. Also, if you don’t want to approve each listing manually, you can disable this feature in the WP Dashboard > HivePress > Settings > Listings > Moderation section.
Now let’s add one more listing, but from the WordPress Dashboard, so you have a better idea of how it works. Simply navigate to the WP Dashboard > Listings section and click Add New. Here you’ll see the same fields as on the front end listing submission page, so you can fill in them in the same way.
When finished, click on the Publish button.
The next step is to play around with the settings to ensure that your vacation rental website works in the way you want. We recommend going to the WP Dashboard > HivePress > Settings section and checking all the sub-sections.
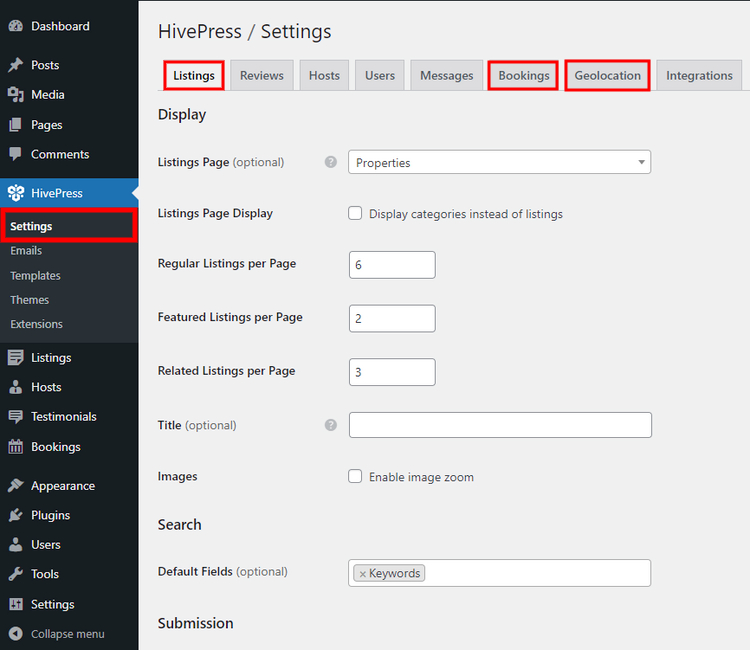
Pay close attention to the following sub-sections:
Once you set everything up, you can move to the next step.
Now it’s necessary to create a front page and add other useful pages to your vacation rental website. Since RentalHive is integrated with Gutenberg, you can customize your website layout hassle-free using blocks. Simply go to the WP Dashboard > Pages section and click the Add New button.
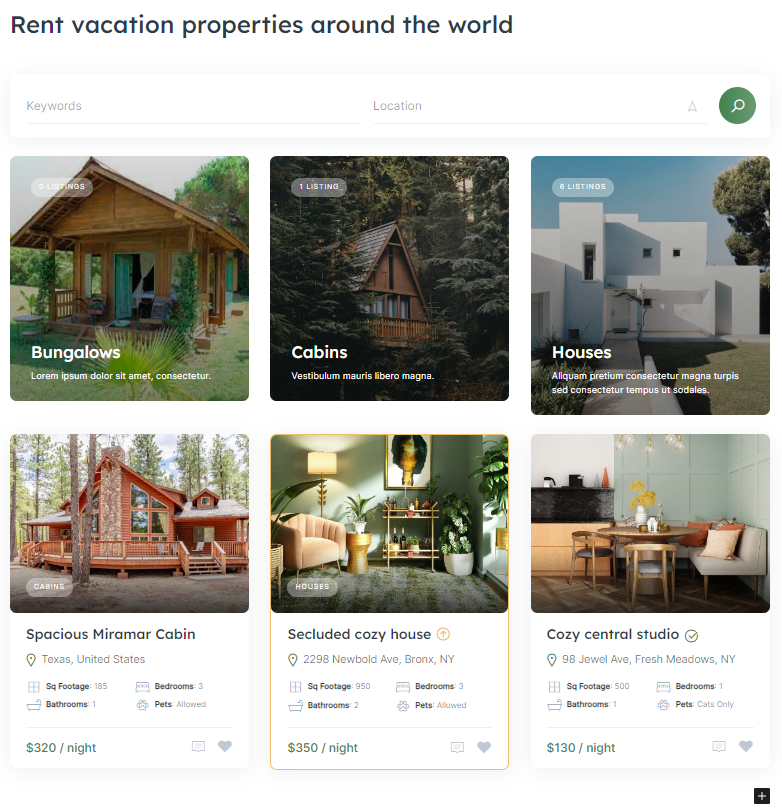
First of all, you have to add a title (let it be “Home”) and a heading (e.g., “Rent vacation properties around the world”). Then, you can start adding blocks by clicking on the ➕ icon. We recommend typing “HivePress” in the block search field to have all the HivePress blocks at your fingertips.
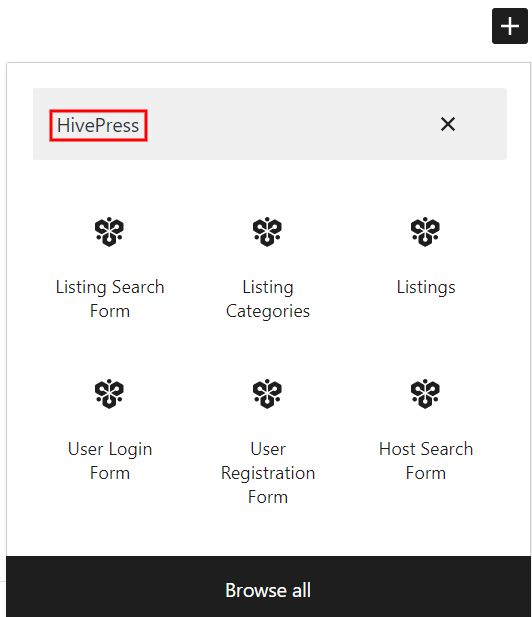
For example, you can add the listing search form, the categories block and then the listings block to display some listings on the front page.
Once you are done, click on the Publish button. Now, you have to go to the WP Dashboard > Settings > Reading section, set your new page as a homepage and Save Changes.
That’s how it works! Now your website has a new front page, and similarly, you can add other pages like “Properties”, where all the listings will be displayed, a “Blog” page if you want to blog on your vacation rental website and so on.
Okay, at this point, you should already have a fully functioning vacation rental website, and the final touch is to customize its look and feel. RentalHive is integrated with WordPress Customizer, so you can easily change fonts, primary and secondary colors, set a custom header image, etc.
We recommend playing around with all the customization options, as shown in the video below, to build a website with a unique style that matches your brand.
Finally, we’d like to briefly cover some of the most popular monetization models for property rental marketplaces:
Keep in mind that you can apply these business models only if you are running a multi-vendor rental website.
It wraps up our tutorial on how to create a vacation rental website with WordPress. We hope this article was helpful, and now you have a clear understanding of how to launch your own property rental platform.
Keep in mind that you can use the RentalHive theme if you are about to create a rental website with WordPress since it’s already packed with all the necessary features for building rental platforms right out of the box.
Additionally, you may be interested in checking out our other posts, like:
Just a few simple steps to create your own event directory website.

A short guide on how to build an appointment booking platform for lawyers.

A complete tutorial on how to add location search in WordPress.