How to Create an Online Tutoring Website with WordPress
A short tutorial on how to create tutor booking platform with WordPress.
Build your own job portal website without any coding skills, using WordPress.

The widespread use of the internet has changed many things. The workplaces and job market are no exception.
Today people turn to the web to find their next full-time employment or remote one with the help of online job portals, mutually beneficial places where both applicants and employers can help each other. However, setting up a platform where both job seekers and employers can find each other has the potential to benefit you as well.
Launching a job portal may be a decent business idea, and in this tutorial, we’ll show you how to create a job board with WordPress without any coding skills and an enormous budget.
So, let’s dive in!
Simply saying, an online job portal is a platform where employers can post job offers, and applicants can respond to them. Vice-versa, candidates can post their CVs, and interested companies may contact them.
At first glance, there’s no huge difference between old-school classifieds in newspapers and modern online job boards. However, let’s take a closer look at the whole workflow of matching employers with job seekers.
For example, once the employers are registered on a job board website, they get tons of features that facilitate the process of searching for the best candidate. Among others, there is a comprehensive database of CVs, various search filters to narrow down the search, a messaging system, some platforms are even integrated with video communication tools like Zoom, Skype, Microsoft Teams, etc.
At the same time, job seekers can search for different employers and their job openings as well as check the reviews and companies’ ratings.
All these features are just the tip of the iceberg since modern job portal websites offer many other handy tools and features like email databases, promotions, personal dashboards, newsletters, reminders etc.
Next, we’d like to briefly explain how job board platforms like Glassdoor or Indeed make money.
Have you ever wondered about the revenue of the most popular job board websites? To get a better idea of the revenue of the leading online job advertising firms worldwide in 2018, just take a look at the chart below:

(Source – Statista)
As you can see from the stats, there are no limits on revenue, so let’s briefly cover some monetization models that most job portals use:
Bear in mind that an online job board website is not limited to one or two business models as most websites. Instead, it successfully combines several revenue streams at once.
Did you know that almost 7 million people are unemployed in the US solely, and at the moment, there are more than 10 million job openings? Meaning that millions of people are looking for a job every day.
With the growing popularity of freelancing, there are rumors that job portals are doomed, and their days are gone. However, if you take a look at search traffic of the most popular job boards, it becomes clear that job portals are still very popular with candidates and remain the most widely-used method of looking for a job.
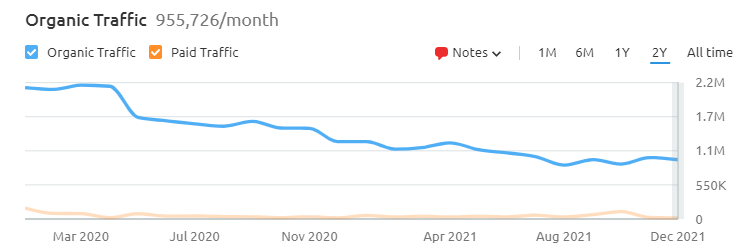
(CareerBuilder monthly search traffic)
So, even with the rapid growth of the sharing economy and freelance work, many people are still looking for a steady job, and job portals remain the best place to find it. But now, let’s figure out whether it is still worth creating a job portal or it’s a hopeless idea to compete with market giants?
If you are thinking about launching your own job board website but haven’t come up with a decision yet, here are some benefits of creating a job board:
At first glance, it may look like the whole market is occupied by market giants like Glassdoor, Careerbuilder, Indeed, Job2Careers and so on. However, all these websites are pretty general and not focused on a specific niche. Thus that’s exactly where your job board may burst onto the scene by operating in some particular niche.
If you pick your niche wisely, you can compete even with such well-established platforms for several reasons:
As you already know, the unemployment rate is still very high, and people are constantly looking for a job while employers are searching for the best candidates. By creating your own job portal, you can make a bridge between companies and job seekers and make money by charging both sides with a small service fee.
Gone are the days when you had to hire a developer every time you needed a website. Instead, today many people around the globe are already using content management systems like WordPress every time they need to create a website. With WordPress creating a job board is a lot easier than you might expect, and most importantly, you can get your website up and running at a small price.
To start your own job board with WordPress, you need to have the following things prepared:
For the sake of this tutorial, we are going to use JobHive, a modern, lightweight and easy-to-use job portal WordPress theme, along with HivePress, an open-source WordPress directory plugin.
JobHive is a killer option if you are about to create a job board with WordPress. It has all the necessary features right out of the box. For example, it includes location-based search, custom search filters, monetization features (paid listings and memberships), messages, a reviews system, and so on.
Most importantly, no coding knowledge is required to set up JobHive. So let’s start with the theme installation!
To install JobHive, you can simply navigate to the WP Dashboard > Appearance > Themes section of your WordPress dashboard, then proceed by selecting Add New and Upload Theme options, and finally, select the theme ZIP file. Wait for the installation to complete, then click Activate. Once activated there will be a suggestion to install the recommended plugins. We advise you to install and activate all of them in order to enable the full functionality of your job board.
After you finish the installation, please add your license key in the WP Dashboard > HivePress > Settings > Integrations > HivePress Store section to enable automatic updates.
This step is optional. If you are an experienced WordPress user you can skip this step, but if you want to get a better understanding of how everything works you can import the JobHive demo content to start with existing layouts.
Please follow the screencast to import the demo content.
If you haven’t imported JobHive demo content in the previous step, you need to create some listing categories to make it easier for job seekers and companies to navigate your job board. To add a new listing category go to the WP Dashboard > Jobs > Categories section. On this page, you can name a category (e.g., “Design & Graphics”), describe a category and upload a category image. Additionally, you can set a parent category if you want to create a hierarchy of listing categories.
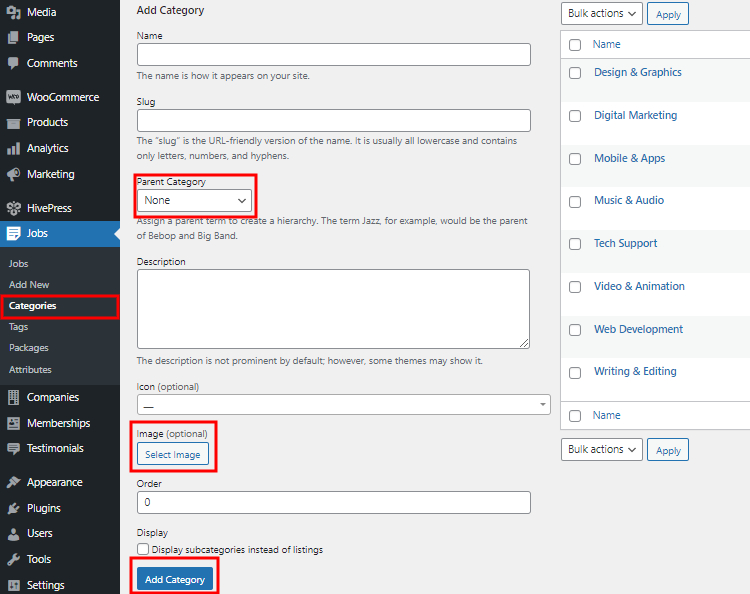
Finally, click on the Add Category button. Similarly, you can add as many listing categories as you need for your job board website.
Once you are done with categories, you need to create different listing fields and search filters for your WordPress job board. With JobHive, you can create various custom listing fields without any limits. To add a new field, navigate to the WP Dashboard > Jobs > Attributes section and click Add New. For example, you can add a “Salary” field to allow companies to indicate the approximate salary for job seekers. At the same time, candidates will be able to narrow down their search to job openings with a specific salary.
Any listing field may be set up in the following contexts:
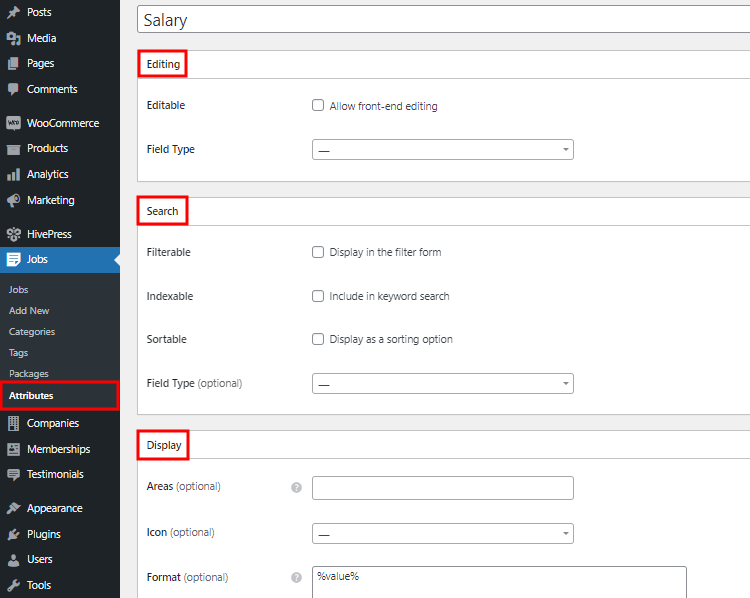
Finally, click on the Publish button. Keep in mind that there are no limits so you can create as many listing fields and search filters as required for your job board website.
Your next step is to stand out your job board from the crowd. In order to give your site a unique look and feel – navigate to the WP Dashboard > Appearance > Customize section and go through the appearance settings, such as primary and secondary colors, heading and body fonts, logo, and background images, etc.
If you find it difficult, you can check the following screencast.
Next, if you imported the demo content, you can edit any page from your WP dashboard. You simply can go to the Pages section and select All Pages. Then you need to choose the page you want to edit and click the Edit button. Also, it is possible to do it directly from the page you want to modify – you just need to click the Edit page button at the top of the page as shown in the screenshot below:
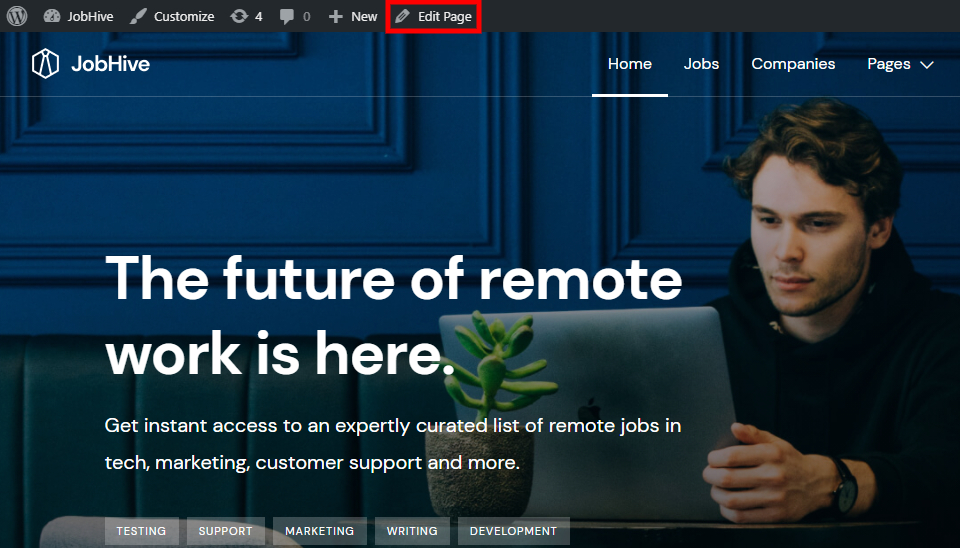
There are two different ways to edit pages, depending on the version of your WordPress. If you have WordPress version 5.0 or later you can do it with “Blocks” that are available in the default WP editor.
Please check the following screencast that shows how to add and customize layout blocks.
Also, you might need to use shortcodes instead of blocks if you have an old version of WordPress, still use the Classic Editor or some third-party page builder.
You may have a look at the screencast below if you want to add shortcodes.
The next step is to get familiar with the general settings of HivePress to set up your job board. Please head over to the WP Dashboard > HivePress > Settings section.
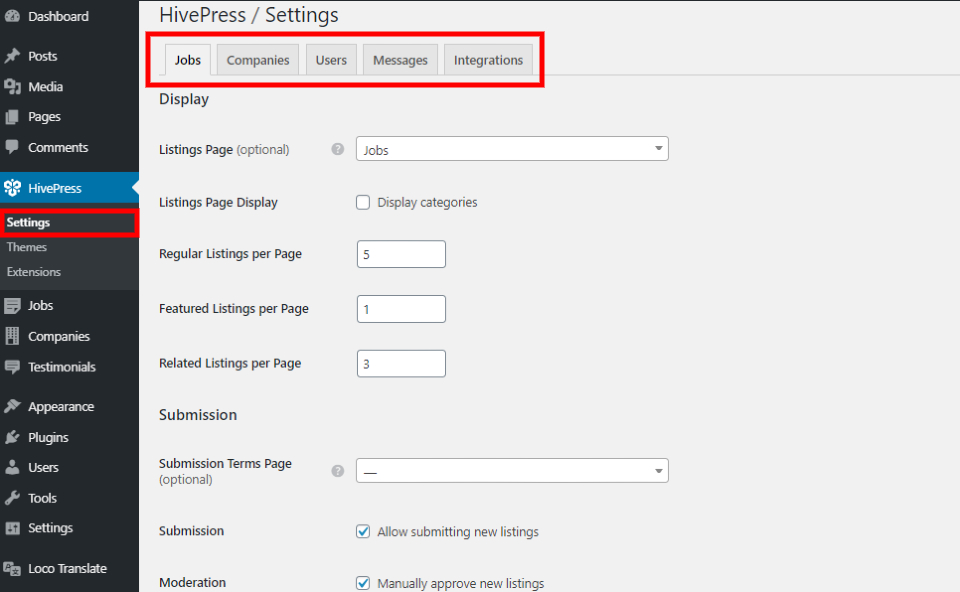
We recommend you go through all sections so you can understand how everything works. In each section there are many different options, for example, you can:
So, you can explore this section and find more useful functions available. But you don’t have to limit yourself to the default functionality. You can easily add some additional features to your website. Let’s proceed to the next step to find out how.
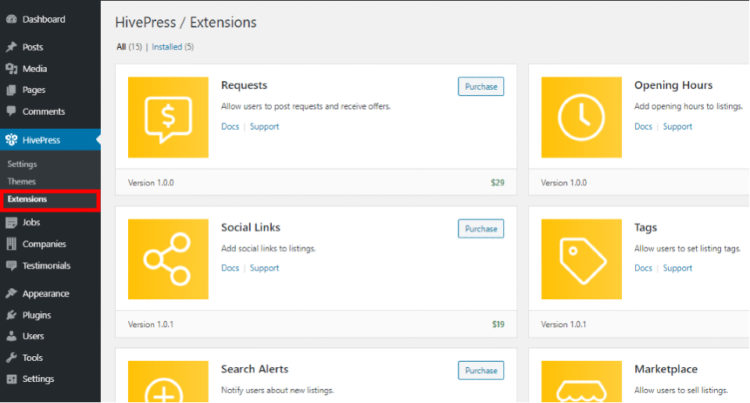
At this stage, when you have a functional job board website, it’s time to improve it and make it great instead of just good. There is a bunch of free and premium extensions that you can use for your WordPress job board. For example, you can install the Favorites extension to allow users to keep a list of favorite listings or Geolocation to let users search for job listings by location, and so on. Also, there are Memberships and Paid Listings extensions that are essential if you want to monetize your job board website. To check all of them, go to the WP Dashboard > HivePress > Extensions section.
Once you set up your job board, you can post a new job listing. With JobHive, you can add job listings either via the front-end or via the back-end.
To add a new job listing, simply navigate to your homepage, click on the Post a Job button and select a category. You’ll be taken to the job listing submission form where you need to fill in all the required fields, add images if necessary and click on the Submit Listing button.
If the moderation is enabled in the WP Dashboard > HivePress > Settings > Jobs section, a job board admin will have to approve a new job listing in the WP Dashboard > Jobs section before it appears on the front-end.
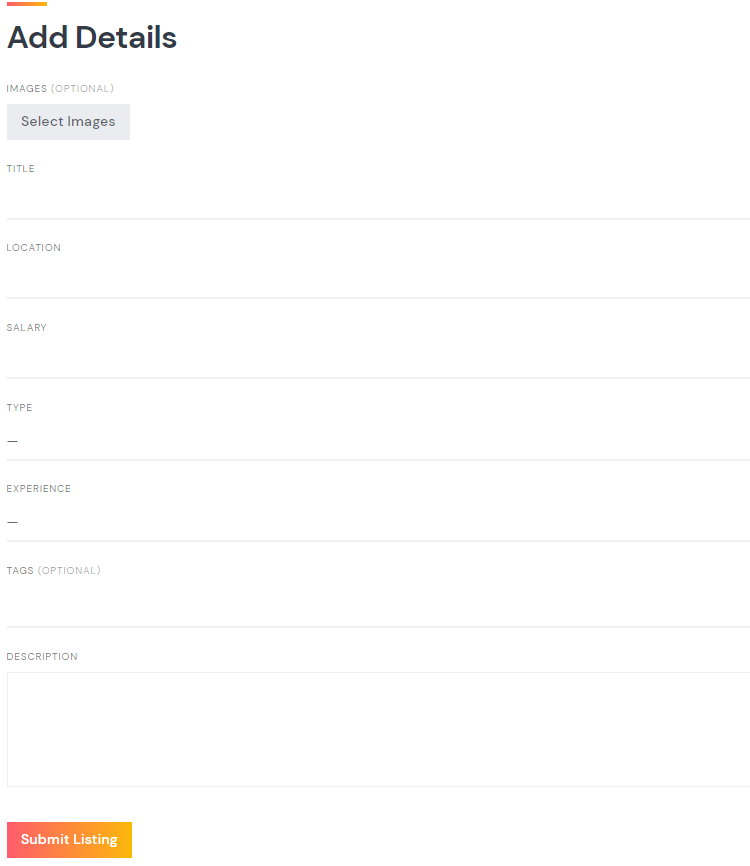
Keep in mind that the listing submission form is fully customizable and you can add, remove or change any fields in the WP Dashboard > Jobs > Attributes section.
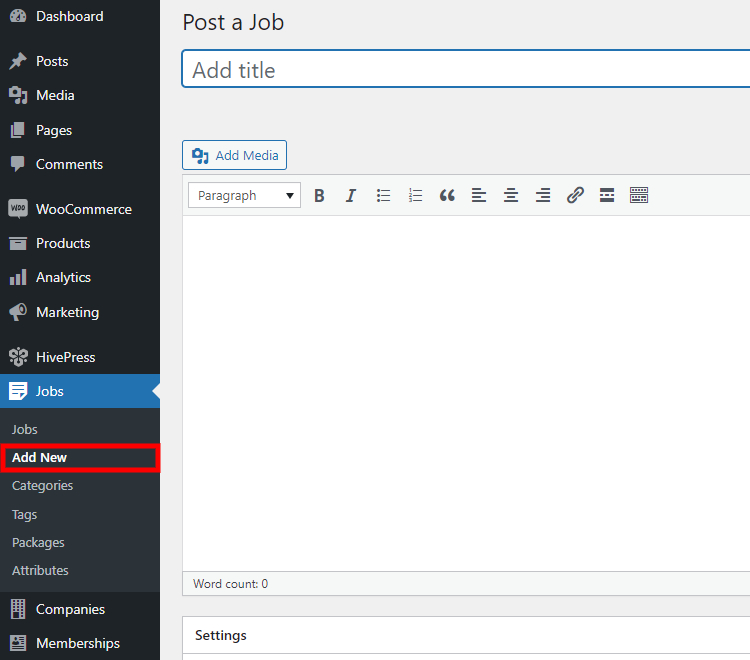
Additionally, as a job board admin, you can post new job listings directly from your WP dashboard by going to the WP Dashboard > Jobs > Add New section. Within this page, you need to fill in all the necessary fields and click on the Publish button.
That’s it. You’ve just learned how to create a job board with WordPress without coding skills.
Once you launch your job portal, you can start promoting and monetizing it to turn your website into a profitable business. On your website, you can charge companies for adding job listings or charge users for viewing the company details, and so on. Also, in order to get a better understanding of how you can make money from your job portal, you can take a look at our article on how to monetize a job board website.
So, if you are about to create a job board with WordPress without spending thousands on custom development, JobHive is a killer option for you since it includes all the necessary fields for launching a job portal right out of the box. To get a better idea of the JobHive features, you can check the detailed JobHive overview.
A short tutorial on how to create tutor booking platform with WordPress.
The complete guide to building a wedding marketplace with WordPress — no coding required.
Build a searchable member directory website using WordPress.