
How to Create a Lawyer Directory Website with WordPress
A quick guide on how to build a WordPress lawyer directory website.
Launch your own influencer marketplace in 5 steps with WordPress.

Nowadays, digital marketing is essential for any business because it allows them to maintain long-lasting and ever-present relationships with their audience. Furthermore, with the increasing popularity of social media platforms, many companies invest in influencer marketing. It can be an extremely effective strategy for building brand awareness, generating sales, and even promoting consumer trust.
That’s why many brands are looking for popular influencers to promote and represent their products. The good news is that the companies don’t have to look for influencer contacts on the whole internet. Instead, they can simply search and contact influencers via influencer marketing platforms.
Within this article, we’ll show you how to create an influencer marketing platform using WordPress. We’ll explain to you step-by-step how to launch your website, set it up and easily monetize it later.
So, let’s start without wasting time!
First of all, let’s define what an influence marketing platform is. In a nutshell, it’s an online service platform that bridges the gap between brands and content creators from different social media.
A good example is the GRIN online platform. It’s an influencer marketing software built for e-commerce that includes about 100 million influencers that you can search and contact. Many brands worldwide trust GRIN as their influencer marketing platform for rapid growth & scale.

Usually, such platforms are set up as two-sided marketplaces, where on one side, influencers can register and list their advertising offers along with all the metrics. On the other side, businesses or marketers can register their companies’ profiles, search for influencers, pay for the existing advertising services or post a custom advertisement request.
For example, if you are a fashion designer and need to reach an audience, you can use the influencer marketing platform to find a person who can promote your brand on social media. Moreover, you can check all the metrics, such as the number of followers, level of engagement, audience, location, etc. Once you find an appropriate influencer, you can also contact them to check if they’re open to some long-term partnership in addition to the fixed-price ad listings they offer.
Then, if the brand finds a perfect influencer, it can order some services, e.g., Instagram story or post, YouTube or TikTok video, etc. Also, customers can list custom advertising requests with all the details of their projects, so interested influencers can easily contact them and offer promotional services.
But you may ask questions like, “Are influencer marketplaces really popular? Why not contact influencers directly via social media?”. So, let’s move to the next section and find out why influencer marketing platforms are gaining traction.
There are several reasons why influencer marketplaces are becoming popular:
Nowadays, almost everyone uses one or more social media platforms, such as Instagram, Facebook or TikTok. Some of us use them solely for work or communication, but most use them for entertainment. So let’s just admit that even a person, who is always a busy bee, has a favorite YouTube channel or subreddit to check before going to bed.
To get a better idea of social media popularity, take a look at the chart below, which shows the number of social network users worldwide and its potential growth.

(Source – Statista)
Due to such widespread usage, most companies use social media to promote their products and services. Keep in mind that social media marketing isn’t free, but it is significantly cheaper than traditional advertising channels and often more effective.
More than 60 percent of marketers admit that finding the right influencers for a campaign is a tough deal.
Indeed, it may be really hard to find the right influencer for a brand promotion campaign because of two reasons. On the one hand, there may be hundreds of influencers in a chosen industry, and it’s challenging to pick the best one. On the other hand, there may be a small number of influencers in a particular niche, and it’s difficult to find them.
Moreover, it becomes even more difficult to select an influencer for a promotion campaign when it comes to checking the audience stats and metrics.
That’s exactly where influencer marketing platforms come in handy. They allow marketers and business owners to search only for reliable influencers, filter them by different niches, check all the metrics and reviews, etc. An influencer marketplace is an essential tool for any modern marketer who wants to reach new audiences.
Finally, considering that the global influencer marketing market size has more than doubled since 2019, it’s clear that there’s a great demand for influencers. For example, in 2021, this market was valued at a record 13.8 billion U.S. dollars.
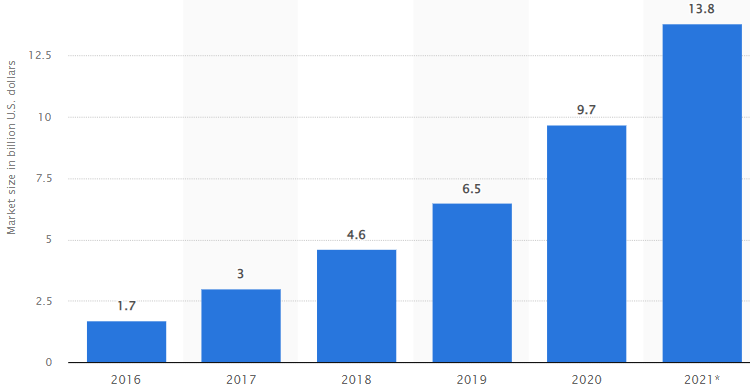
(Source – Statista)
Because of such growing demand for influencers, running an influencer marketplace that matches business owners with influencers from various niches may become a highly profitable business nowadays.
But how exactly do influencer marketplaces make money? Let’s move to the next step and find it out!
Keep in mind that any influencer marketing platform is a service marketplace, and there are several common monetization models for such websites. Let’s briefly cover some of them:
The most popular way to make money with an influencer marketplace is by taking a commission from each transaction between an influencer and a business owner. For example, if a customer buys a particular service (e.g., “Instagram story”) for $1000, a platform may charge 5-10% from that purchase (i.e., $50-100).
The commission amount may vary depending on the influencer niche and the average cost of advertising, but as a rule of thumb, the commission percentage is about 5-10%.
The websites that use this monetization model charge influencers for listing their services on the platform. For example, there may be several listing packages (free/standard/premium), and if influencers want to use the marketplace, they have to purchase one of the available packages.
One more lucrative business model is charging business owners membership fees. For example, if a pool of reliable influencers is registered on the platform, a website owner may charge a monthly fee for accessing the influencer’s contact details.
We’ve mentioned the three most popular monetization models for influencer marketing platforms. However, there are many other ways of making extra profit like promotions, ads, etc.
Okay, now we can move to the tutorial part of this article, where we’ll show you step by step how to launch your own influencer marketing platform. So, let’s get started!
The easiest way to start your own influencer marketing website is by using WordPress. It’s the most widely used content management system that allows you to create various websites without coding knowledge. Keep in mind that 41% of websites worldwide are already based on WordPress, and you can also create your own site with this free CMS.
Before we move on to the next steps, make sure that you have the following things ready:
For the sake of this tutorial, we’ll use the ExpertHive theme. It’s a highly customizable service marketplace WordPress theme that is suitable for building an influencer marketing platform. It already includes all the essential marketplace features like:
While you can choose any influencer marketing WordPress theme for your project, we recommend ExpertHive since it’s a lightweight, versatile and highly customizable theme that comes with all the required service marketplace features right out of the box.
Once you have all the necessary prerequisites, let’s move to the theme installation!
First of all, you need to install the ExpertHive theme by going to the WP Dashboard > Appearance > Themes page and clicking Add new. Then click on the Upload Theme button, select the theme ZIP file to upload and proceed by installing and activating ExpertHive.
Once you activate the theme, you’ll get a recommendation to install several plugins, including HivePress, a plugin that powers core marketplace features for ExpertHive. You need to follow the suggested link and install plugins. When they are installed, don’t forget to activate them.
If you face any issues during ExpertHive installation, please follow the step-by-step screencast below.
Your next step is to install the WooCommerce plugin to enable payments on your influencer marketing platform. It’s the most widely used e-commerce plugin that turns any WordPress-built website into a fully functional e-commerce platform with just a few clicks. WooCommerce goes with hundreds of payment gateways trusted by millions of website owners around the globe, so you can rest assured that payments on your website will be accepted and processed in the best way possible.
In order to install WooCommerce, navigate to the WP Dashboard > Plugins > Add New section and find it via the search bar. Then install the plugin and proceed by activating it.
Immediately after activating the plugin, you’ll be redirected to the Setup Wizard. There you’ll be able to provide the most important details about your platform, like where it is based, its industry of operation, what kind of products you’ll sell, etc. You should go through all the steps to configure payments for your influencer directory, and if you find it difficult, you can follow the official WooCommerce instructions.
Once you are done with setting up payments on your website, it’s time to start adding some content, and we recommend adding categories first.
Let’s add several categories to your website depending on the niche and content that influencers create to make it easier for brands to navigate your platform and find content creators that fit their marketing strategies. For example, let’s create “Beauty,” “Travel,” and “Fitness” categories.
In order to add a new category, go to the WP Dashboard > Listings > Categories section. Firstly, name the category, let it be “Beauty,” then fill in the description if you want to give a few words about each category. Also, if you want to create a hierarchy, you can turn any category into a subcategory by setting a parent category for it. Finally, you can select the category icon from the drop-down list.
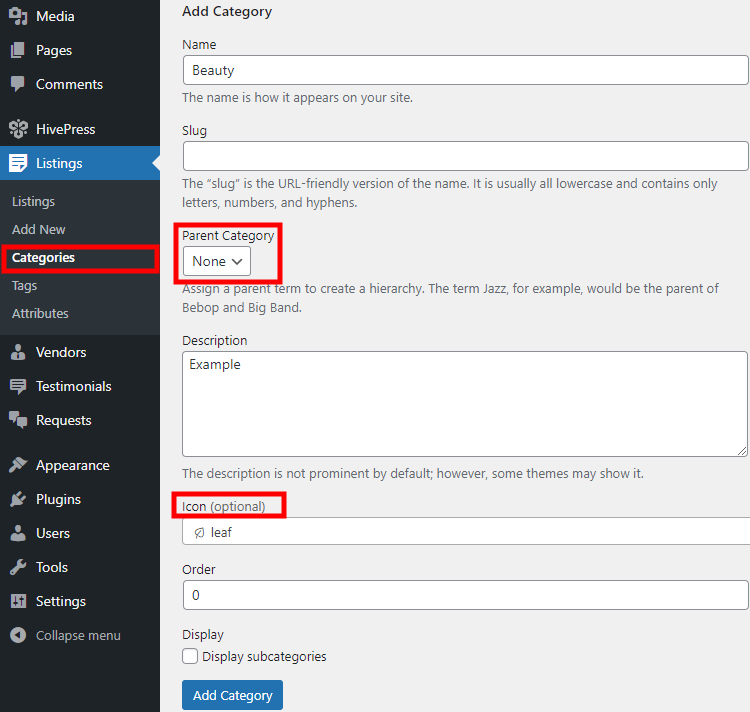
Bear in mind that similarly, you can add as many categories as needed for your influencer marketing platform.
Once you are finished with categories, it’s time to add some fields specific to the services offered on such platforms. You can add custom listing fields and search filters in the WP Dashboard > Listings > Attributes section. For example, let’s add the “Followers” attribute so users will be able to filter influencers and their services by the number of followers.
You can set up your attribute in 3 different contexts, so let’s go through each of them to get a better understanding of those settings:
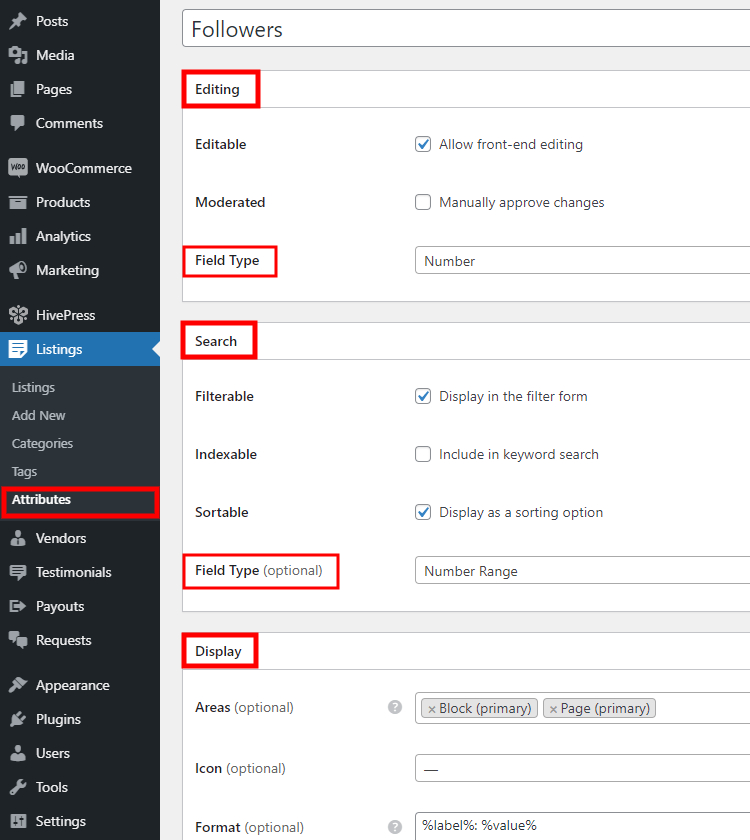
When finished customizing the attribute, simply click on the Publish button. Keep in mind that you can create an unlimited number of different custom fields and search filters required for your website. For example, you can also add a “Platform” attribute so influencers can indicate what social media platform they want to monetize.
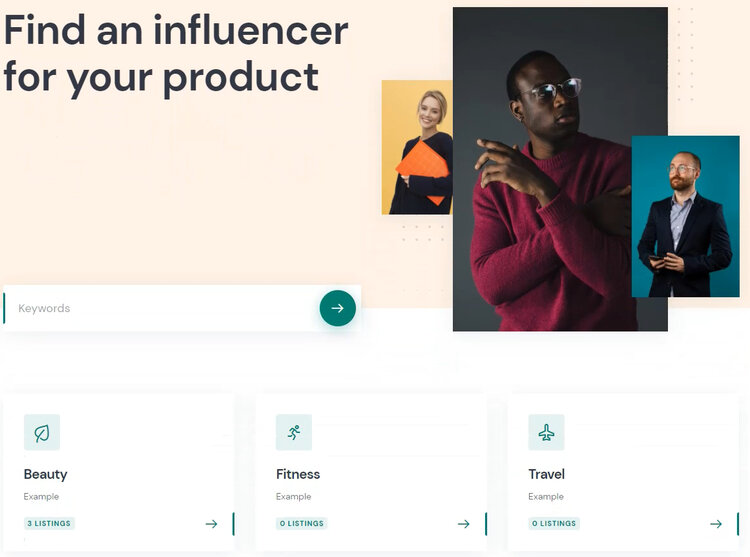
Now it’s time to set up the front page for your influencer marketing platform. It’s not rocket science to customize new layouts with ExpertHive, since it’s integrated with the Gutenberg block editor, so you don’t have to mess with shortcodes.
To add a new page, go to the WP Dashboard > Pages section and click on the Add New button. Firstly, fill in the page title, then let’s try adding some layout blocks. For example, let’s start with the listing search form. Simply click on the ➕ icon and select a block you want to add. Let’s also add the “Categories” block to display the previously added categories on your front page.
Once you finish setting up the page content, simply click on the Publish button.
The next step is to set this page as a front page for your influencer directory. To do that, navigate to the WP Dashboard > Settings > Reading section and select this page from the drop-down list, then save changes. Additionally, we recommend checking all the customization options in the WP Dashboard > Appearance > Customize section in order to set up your website look and feel in the way you like.
Now, let’s move to the next step and try to list a service as an influencer.
It’s time to test how your influencer marketing marketplace is going to work for users. Firstly, let’s try to register as an influencer and list a service. To do this, go to your website and sign out of the admin account. Then click on the Sign in button and register an influencer account by filling in the required details.
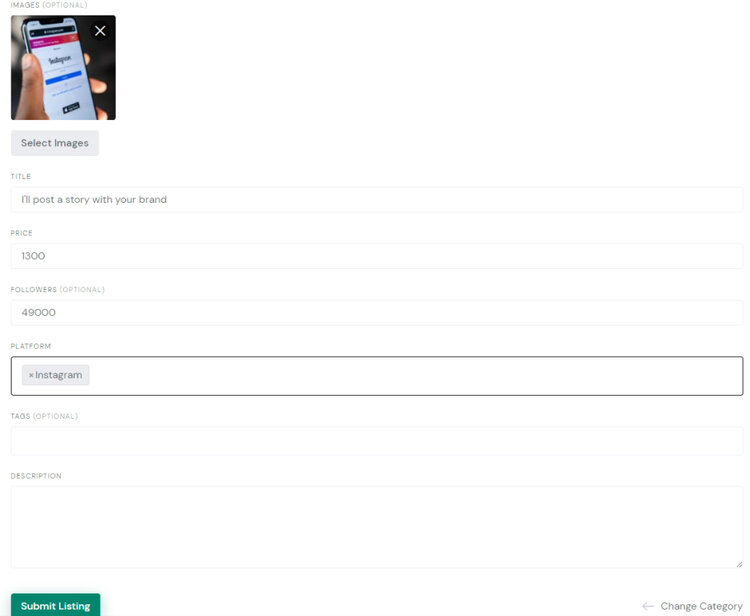
Next, let’s try to add a new service by clicking on the List a Service button and selecting one of the categories. For example, let’s add a new service to the “Beauty” category. In order to list a new service, you need to complete the submission form. Simply fill in all the required fields (including our recently added attribute) and click on the Submit Listing button.
After listing a service as an influencer, let’s switch back to the admin account and try to buy a service to check how it’s gonna work for brands.
Once you signed in as an admin, navigate to the “Beauty” category, choose the service we previously added, and click on the Buy Now button. There will be a redirect to the checkout page where you can provide the billing details and make a payment.
That’s how it works! Once the payment is completed, brands and influencers can communicate via the order page or private messages, and once the order is delivered, brands can mark it as completed. Also, if there’s something wrong with the order, brands can raise a dispute to notify the platform administrators about any issues.

Also, since it’s a two-way marketplace, brands can also post custom requests, and interested influencers can signal a wish to participate in the brand’s marketing campaigns. Potential influencers can make offers by placing a bid and describing why they believe they are a good fit for the brand marketing strategy.
Finally, let’s briefly cover some monetization models available for ExpertHive:
The first monetization model is to charge influencers for listing their services on your platform. You can charge creators every time they list a new service, or you can create and sell several listing packages with different options. It’s a common monetization model for many service marketplaces, and an influencer marketing directory is not an exception.
Another way of making money with your influencer marketing platform is by charging a commission for each transaction made between brands and influencers. For example, you can set a percentage fee and take a share of the revenue from each sale made through your platform. It’s the most popular monetization model for service marketplaces, like Fiverr, Thumbtack, etc., and you can apply it to your platform as well.
You are not limited to the mentioned monetization models. For example, you can also turn your platform into a members-only website and charge brands for viewing certain creators’ details (e.g., influencers’ contact information). Additionally, there’s always an option to sell advertising space on your website or integrate it with Google AdSense if you get decent traffic.
That’s it! By following the steps included here, you can easily build an influencer marketing platform using WordPress. Once you launch your website, you have to work on promoting it to get some influencers involved. It’s not an easy task and requires a lot of time and effort, but when your platform becomes popular among brands and creators, you can monetize it and start reaping the benefits.
If you are thinking about building your own influencer marketing platform using WordPress, you can do it in no time with ExpertHive. It’s not just a theme but a bundle of premium extensions that has the essential features for building an influencer marketing platform right out of the box, such as influencer profiles, private messages, commissions and payouts, etc. So you can create a website with the necessary functionality without any tech knowledge.
To get a better idea of its features, feel free to check ExpertHive overview. Additionally, you may want to check the following posts:
A quick guide on how to build a WordPress lawyer directory website.

A quick guide on how to launch an employee directory website.

A short tutorial on how to create tutor booking platform with WordPress.