
How to Create a Salon Directory with WordPress?
An easy guide on how to start a WordPress salon directory website.
A short tutorial on how to create tutor booking platform with WordPress.

Tutoring platforms have really taken off, especially during and after the Covid era. In fact, it’s pretty convenient to find a tutor with just a few clicks. Whether you’re an educator looking to expand your online reach or an entrepreneur planning to create a well-designed tutor booking marketplace, we’ve got you covered.
In this guide, we’ll walk you through the entire process of building an online tutoring website using WordPress, starting from installation and customization and ending up with monetization.
So, let’s dive in!
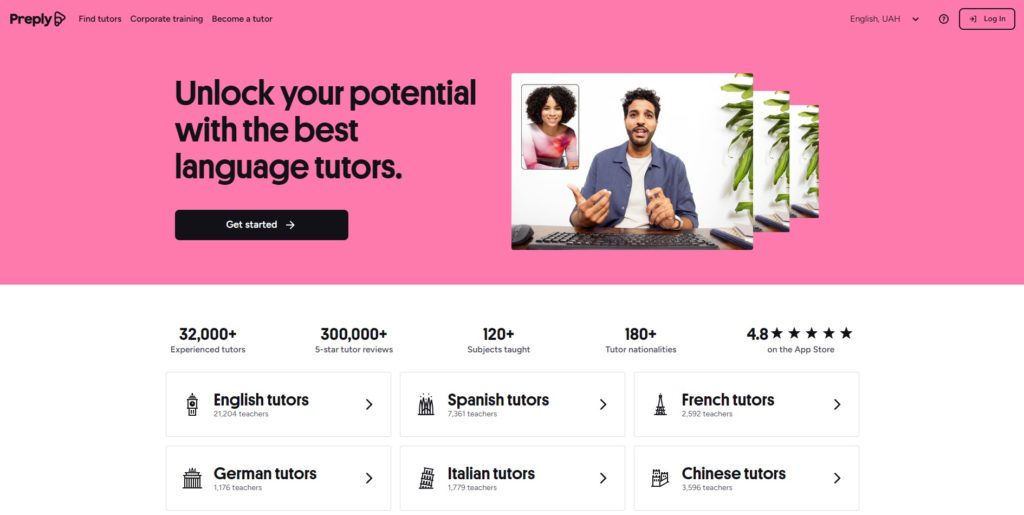
A tutor booking platform is a handy way for students to connect with the right tutors for their learning needs. Tutors list their services, and students can search for them, choose the right one, and schedule a session – all in one place. Preply is a great example of this concept working perfectly.
Before you start building your tutor booking platform, make sure you have all the right nuts and bolts in place:
For this tutorial, we’ll be using MeetingHive, a clean appointment-booking WordPress theme, and HivePress, a multi-purpose WordPress directory plugin that will take care of all the booking and marketplace functions.
So, let’s get started on building a tutoring website with WordPress!
First, we need to install the theme. Go to the WP Dashboard > Appearance > Themes > Add New Theme page, and click on the Upload Theme button. Select the MeetingHive ZIP file, then install and activate the theme.
Once MeetingHive is installed, you’ll be prompted to install recommended plugins, including HivePress. These plugins are essential for getting all the features on your site up and running, so just click on the link to install and activate them.
If you want to get the full lowdown on how to install MeetingHive and the necessary plugins, check out the video below:
Additionally, if you first want to see how everything works behind the curtains, you can import the MeetingHive demo content, making your site look just like the MeetingHive demo one in a few clicks. Take a look at this screencast to learn how you can quickly import the pre-made content:
The next thing to do is add different listing categories to your tutor booking platform. This will make it easier for users to browse through dozens of tutors and eventually find the right one. For example, we’ll add “Math Tutors,” “Science Tutors,” “Language Tutors,” and “History Tutors” as listing categories.
To add a new category, go to the WP Dashboard > Listings > Categories section. Here, you can name your category, describe it, and choose a category icon. You can also create a hierarchy of categories by selecting the parent one.
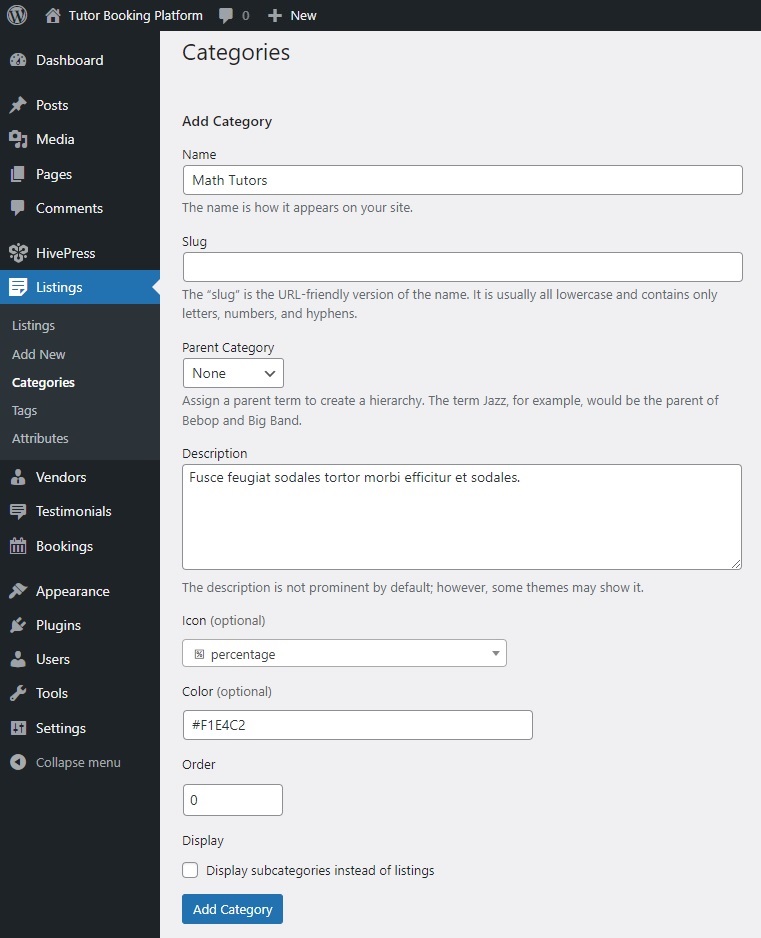
Once you have finished setting up the category, click on the Add Category button. Remember, by following these steps, you can add as many categories as you need for your tutor booking website.
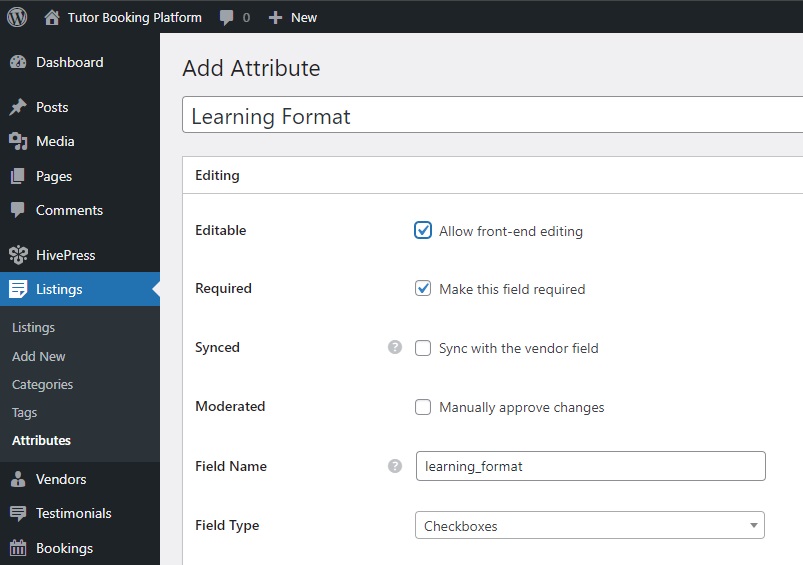
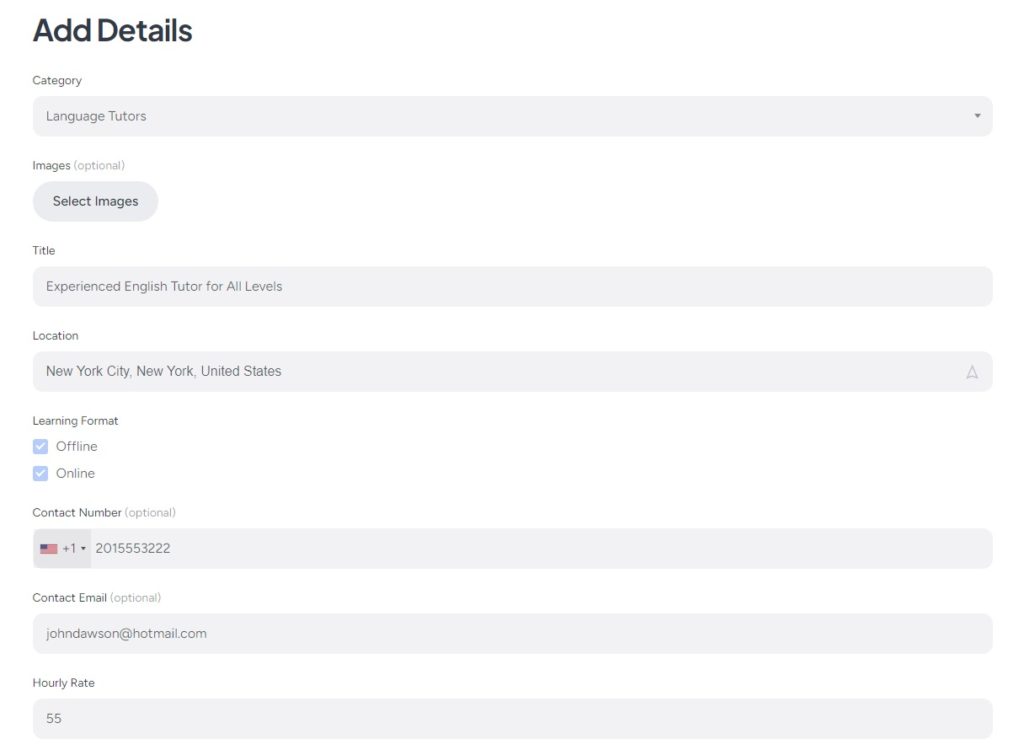
Now, we need to create some custom fields so you can collect and display specific information about each tutor, allowing students to find the right match almost instantly.
Essentially, you should add different custom listing fields such as “Hourly Rate,” “Contact Info,” or “Subjects Taught.” For instance, let’s create a “Learning Format” field so tutors can indicate whether they offer their services online, in person, or both.
To create a new listing field, go to the WP Dashboard > Listings > Attributes section and click Add New. First, write its name. In the Editing section, mark your field as editable to allow tutors to fill it up when they list their service. Then, decide if it should be a required field and set your moderation preferences. Finally, choose the field type. We’ll use the “Checkboxes” field type since there can be several options.
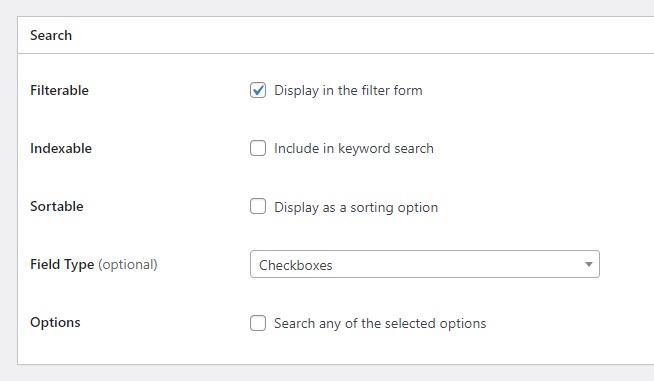
In the Search section, you can turn your field into a search filter so users can filter tutor listings. Let’s flag this attribute as filterable so it shows up in the listing filter form. As for the field type, it would also be “Checkboxes.”
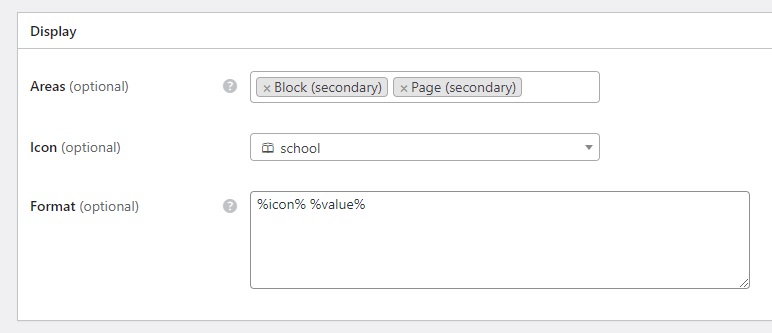
Finally, in the Display section, you can select the template areas where this attribute will be displayed. You can also set its display format using available tokens and choose a suitable icon for it (check this doc to better understand how to set up attributes). For example, let’s set Block (secondary) and Page (secondary) as display areas and %icon% %value% as display format.
Once you’re done, press Publish. After this, an Edit Options button will appear. We’ll follow it to add two learning formats: “Online” and “Offline.” That’s it! This field will now show up in the listing submission form. Meanwhile, you can add more fields using this example as a reference.
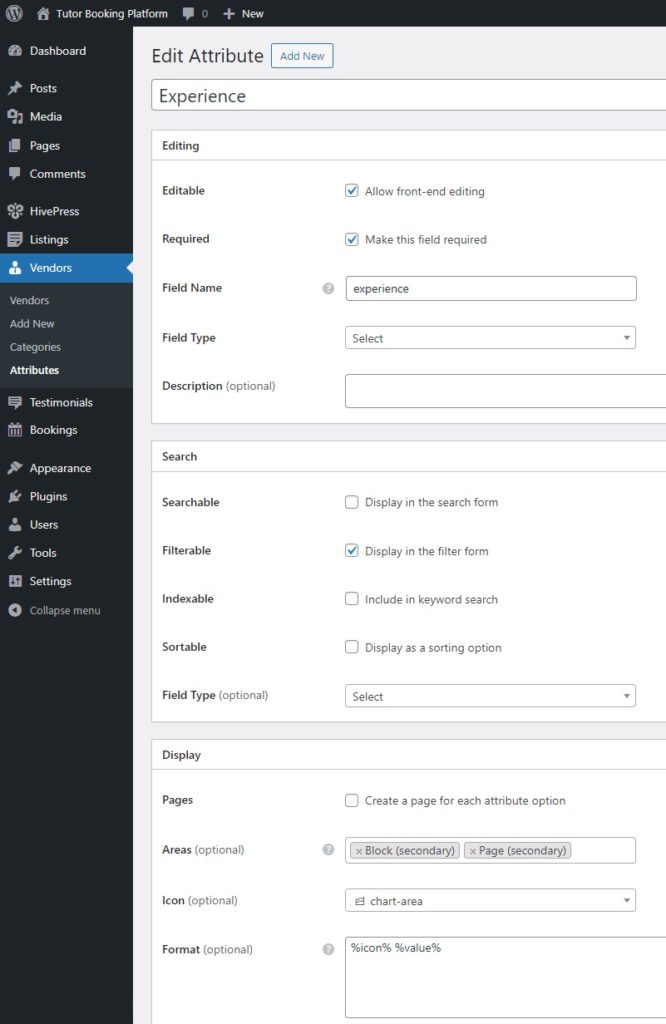
It would be a good bonus if users could see some personal info about the tutor. So, you’ll want to create custom fields for tutor profiles, too, such as “Experience” or “Education.” The process is the same as for the listing fields.
Let’s go to the WP Dashboard > Vendors > Attributes > Add New page and create the “Experience” field. Just a quick note: in this case, we set the “Select” field type because tutors have to choose only one option.
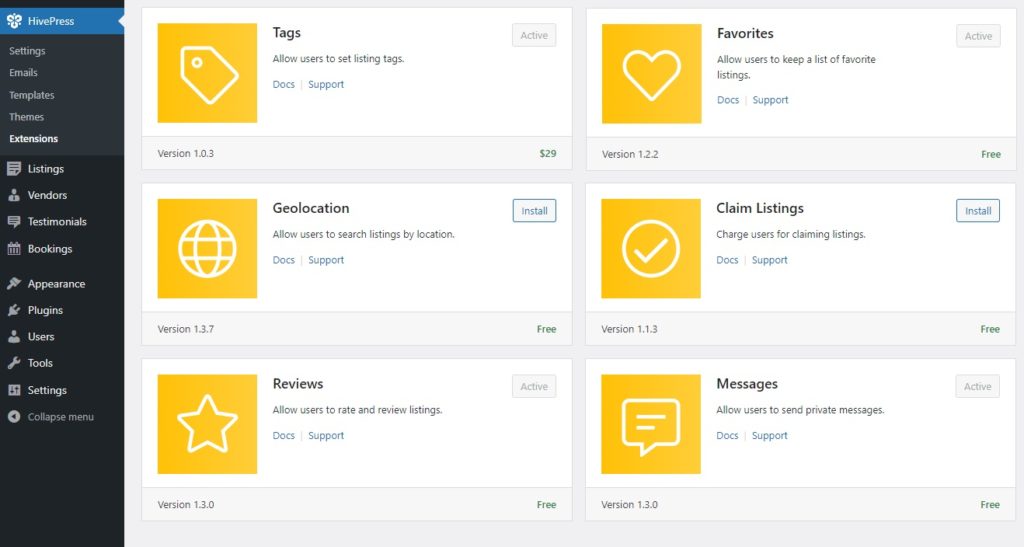
MeetingHive is integrated with HivePress, so you can easily add more features to your tutoring website by installing different HivePress extensions.
For a tutor booking platform, you might want to install extensions like Geolocation, which lets users search tutors based on their location, or Social Login, which allows users to log in via third-party platforms. To install an add-on, simply click on the Install button and then activate the extension.
Next, it’s important to visit the WP Dashboard > HivePress > Settings section to set everything up exactly as you need it. For instance, in the Listings tab, you can decide whether you want your tutoring website to be single-vendor (only the admin can add listings) or multi-vendor (tutors can sign up and submit service listings) by checking or unchecking the listing submission option.
Then, in the Vendors tab, you can enable direct vendor registration, which allows tutors to sign up as vendors right away. It may be useful if you’re aiming for a multi-vendor tutor booking platform since, by default, HivePress requires you to add at least one listing to become a vendor.
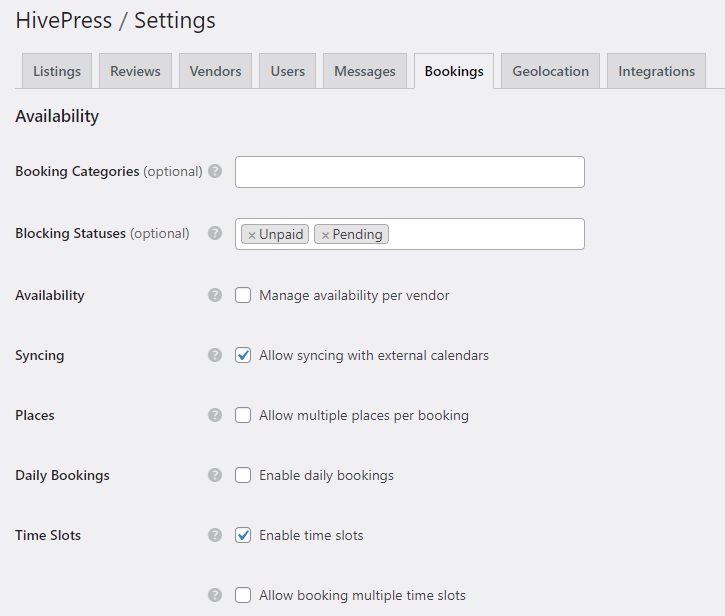
Furthermore, you should pay attention to the Bookings tab, where you can set up the booking functionality. Options include allowing syncing with external calendars or enabling time-based bookings. For detailed instructions, please refer to these docs.
Also, note that the number of settings increases with the addition of new extensions. So, for example, if you installed the Geolocation extension, a new tab with the same name will appear where you need to set it up.
Overall, be sure to review all the settings and set everything up according to your needs.
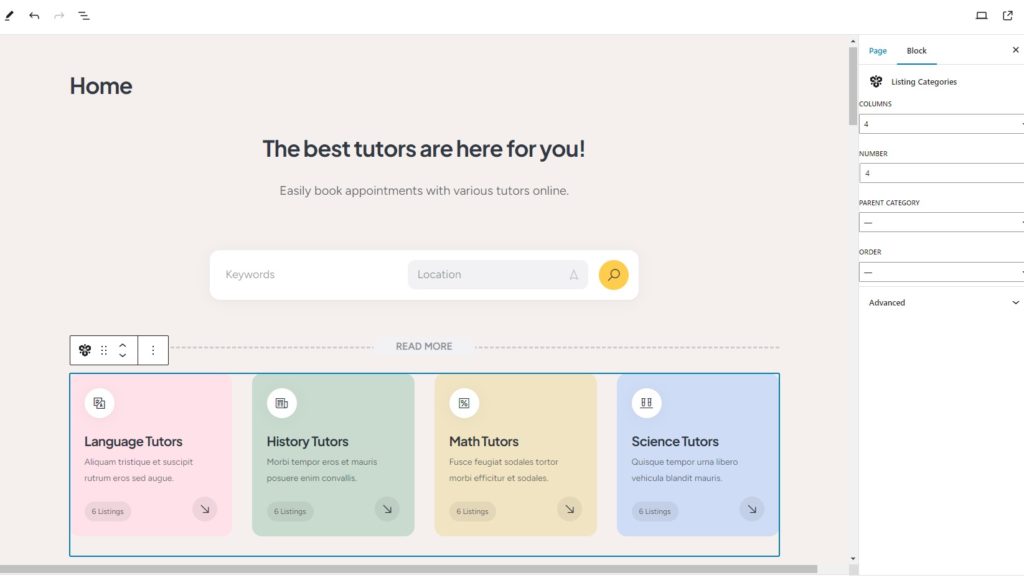
Now, it’s time to create a homepage for your tutoring website. MeetingHive is seamlessly integrated with Gutenberg, so we can avoid coding and use blocks to do this. To create a new page, go to WP Dashboard > Pages > Add New Page.
Start by naming the page “Home” and adding a header text. Then, click the Plus icon and type “HivePress” in the search bar to see all the available HivePress blocks. For instance, let’s add the “Listing Search Form” and “Listing Categories” blocks. Also, you can tweak these blocks using the settings column on the right. Once you’re done, just click Publish.
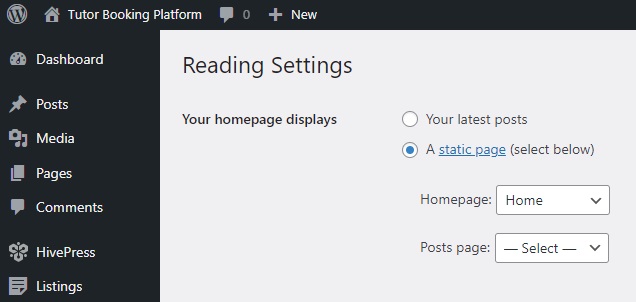
Next, go to WP Dashboard > Settings > Reading and choose this page as your homepage from the dropdown list. You can also assign the blog page here when you create it.
What’s more, you can always make further changes to your site’s pages if you need to. Check out this video to see how you can customize your tutoring website.
Next, let’s create a detailed tutor profile to add a service listing later, just to show you how everything works.
But before that, you need to add a link to the tutor registration form (e.g., “Create a Tutor Profile”) to your site if you’ve enabled direct vendor registration in HivePress > Settings. Here, you can learn how to do it.
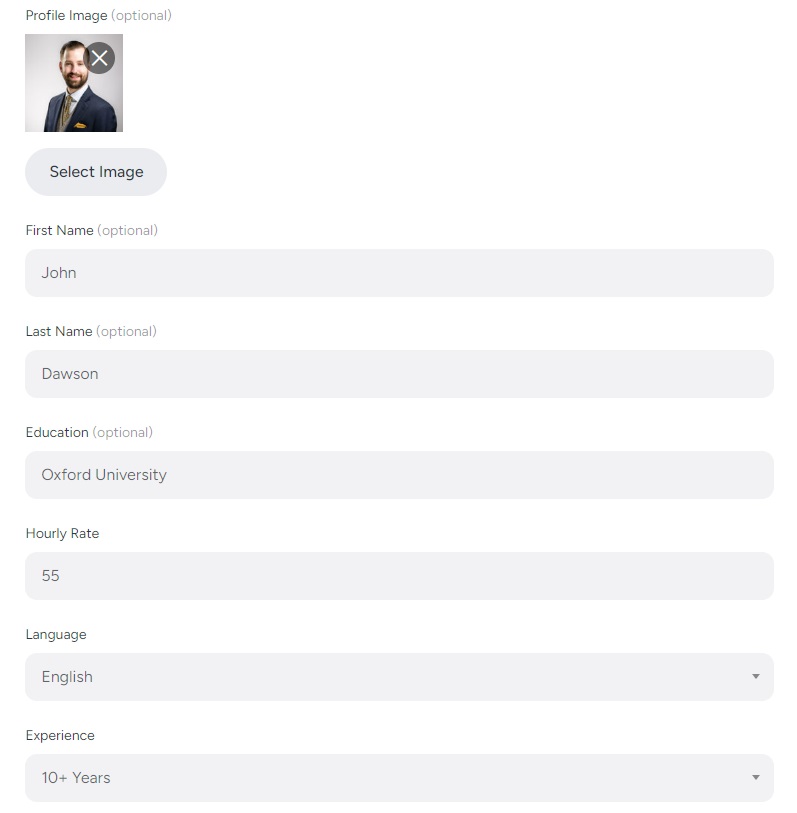
Once it’s done, visit your site, follow the link you’ve created, and create a tutor profile. You’ll see that the registration form includes the previously created custom vendor fields.
When everything’s filled in, click Save Changes. The profile is published, so visit it and check if the fields are displayed correctly. If all the required information is present, the tutor can finally add the first listing.
To add a listing, click the List a Service button in the right corner. This will take you to the listing submission page, where you’ll see default fields like title and description, as well as the custom fields you added earlier. Additionally, some fields, such as booking options, are added by HivePress add-ons. Remember, you can always customize this submission form to suit your needs.
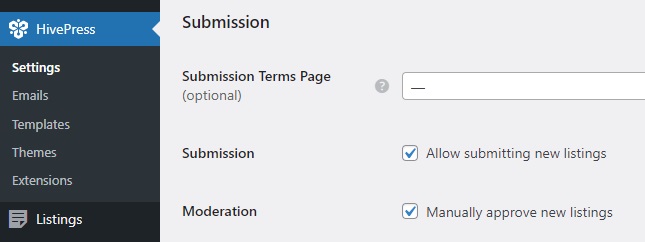
Simply fill out all the required fields, then click Submit Listing, and the listing will then be submitted for review. An admin can review and approve it in the WP Dashboard > Listings section. If you prefer not to manually approve listings, you can disable moderation in the WP Dashboard > HivePress > Settings > Listings section.
Once approved, the listing will appear on the front end.
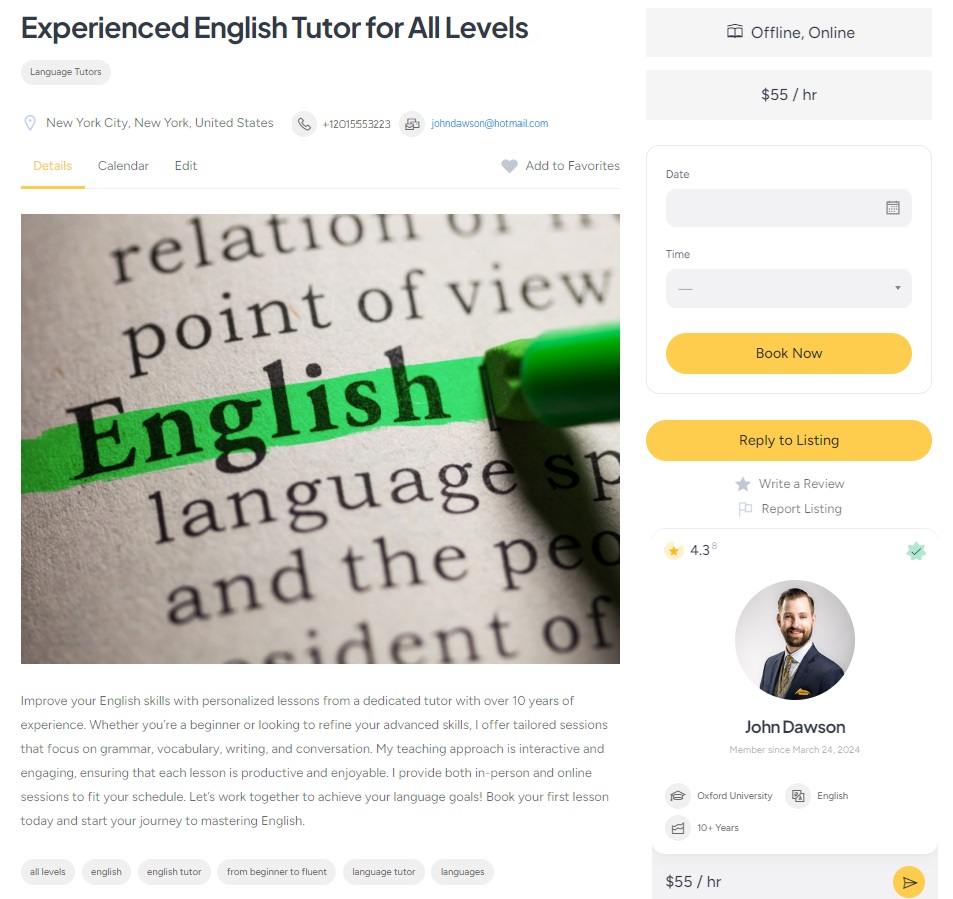
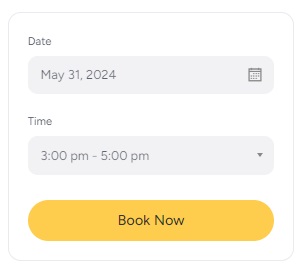
Good news! Your online tutoring platform is up and running. So, lastly, let’s take a look at how the booking process works and make sure it’s as easy as possible for users. On the listing page, simply choose the date and time you want and click Book Now.
You’ll see the confirmation page, where you can review your booking and leave any extra notes you might have. If everything looks good, just click the Confirm Booking button.
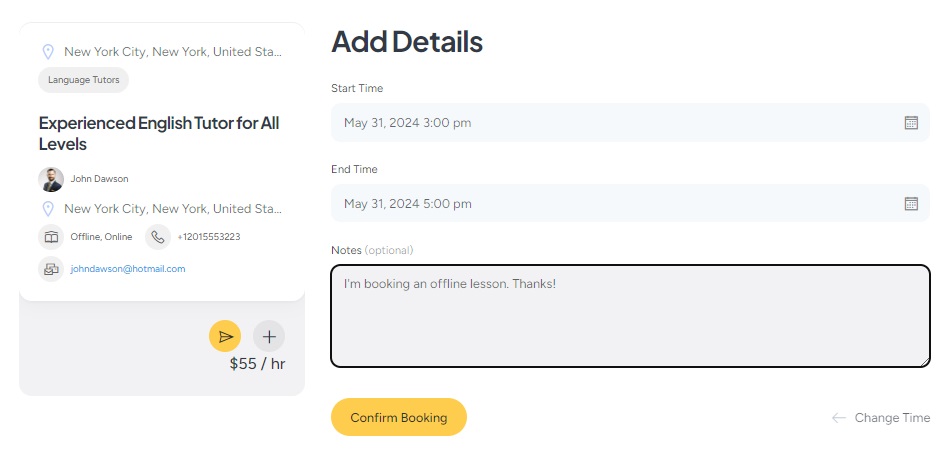
That’s it! A tutor will see this booking, and then you can get in touch. Additionally, service providers can use the handy calendar feature to keep track of their availability. They can block or unblock specific dates and times to let users know when they’re free.

That was the last piece of the tutorial part. However, we would also like to briefly explain how to monetize your tutoring website and what business models are the best. Please note that they require installing WooCommerce to make payments on your website possible, and some of the HivePress extensions. Additionally, we have a full article on how to monetize a service marketplace, so feel free to check it out.
In general, there are two main ways to make money from your tutor booking platform – commissions and paid listings. Let’s cover each of them.
The most straightforward monetization model is to charge a percentage of each successful booking made on your tutoring website. You’ll need to install the HivePress Marketplace extension, which comes with the MeetingHive theme. Just download it from your purchase email and install it in the WP Dashboard > Plugins > Add New > Upload Plugin section.
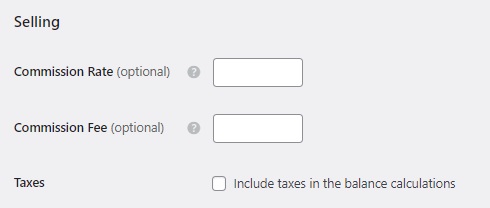
Then, visit the HivePress > Settings > Vendors section, where you can set two types of commissions: Commission Rate (e.g., 10%) and Commission Fee (e.g., 10$). You can also apply commissions to users in the Users tab.
To have a better idea of how everything works, please check the screenscast below where we’re explaining how the commissions work and how to set them up properly.
With the free HivePress Paid Listings extension, you can create different listing packages and sell them at different prices. For example, you can offer a free package that lets tutors add only one listing and a premium package for those who want to list more. This way, you can charge service providers for adding new listings to your tutoring website. Moreover, this add-on allows you to charge tutors for making listings featured (featured listings will show up at the top of the search results, which means more chances of getting clients).
Please check the short video below, which shows how to create listings packages to charge users for adding new listings.
That wraps up our tutorial on how to create a tutoring website with WordPress. We hope it was helpful to you and now you know how to start your own appointment booking platform for tutors.
If you are still doubting which theme to choose, you can give MeetingHive a shot. It’s a feature-packed appointment booking WordPress theme that has all the necessary feature right out of the box, so feel free to check it out one more time.
Additionally, you may want to check our article on how to launch a lawyer booking marketplace with WordPress.
An easy guide on how to start a WordPress salon directory website.

A quick guide on how to build a WordPress lawyer directory website.

Launch a rental marketplace for any niche using WordPress.