
How to Create a Doctor Directory with WordPress
Launch your own appointment booking platform using WordPress.
Build your own business directory website with WordPress in a blink of an eye.

Launching a directory website may be a great business idea since it allows you to make money with user-generated content. There are many types of directory websites, and a business directory is probably one of the most popular.
In this short walkthrough, we’ll show you how to create a business directory website with WordPress without any coding skills.
But before moving to the tutorial, make sure that you picked the right niche for your business directory website.
So, let’s get started!
Simply saying, a business directory website is an online catalog of businesses. There are many different types of business directories. Some of them are solely dedicated to a specific niche like lawyers, plumbers, car repair shops, etc., while others may cover a wide range of industries within a specific geographic location.
The main idea behind any business directory is to help business owners to promote their services while customers can easily find and contact them. To get a better understanding of what is a business directory website, you may check out the Yellow Pages website. It’s one of the most popular business directories in the world.
You don’t have to code or hire a pricey developer if you want to create a business directory website with WordPress. Instead, you only need these few prerequisites:
That’s it! If you have all these things ready, you can easily create a business directory website using WordPress. Now, let’s find out how much it costs to launch your own website.
Often, when thinking about starting a new business, it all boils down to the cost and launching a business directory website is not an exception. That’s why in this section, we’ll briefly answer the “cost” question so you have a better idea of what to expect.
So let’s make a rough calculation:
So, if you are going to use a premium business directory theme, the cost of starting a website will be about $150 – $250 (if you are setting up everything by yourself). However, in this article, we’ll show you how to start a business directory with the free ListingHive theme, so you can save a little bit.
Finally, we’d like to explain how to monetize your WordPress business directory website. There are 3 the most common monetization models for such types of websites:
These are the most popular monetization strategies for directory websites, and you can use any of them or all at once. Everything depends on the type of business directory you are building and the amount of traffic on your website.
Okay, now let’s move to the tutorial part of this article!
Here’s a quick walkthrough on how to create a business directory website with WordPress. So let’s dive in without wasting time!
Your starting point is to install the ListingHive theme. Since it’s a free business directory theme, you can install it from the WordPress theme repository by going to the Appearance > Themes page. Then find it via the search bar and proceed by installing and activating ListingHive.
You can follow the screencast below if you have any issues with installing ListingHive.
Upon the theme installation, it will notify you that it requires installing the HivePress plugin to function properly. It’s crucial to install HivePress since it will power most of the directory features on your website. So, simply click on the suggested link to install and activate the plugin.
Now, you can add some extra features to your business directory in order to extend its core functionality. To do this, navigate to the HivePress > Extensions section. Within this section, you’ll see a list of the available HivePress add-ons that you can purchase or install for free.
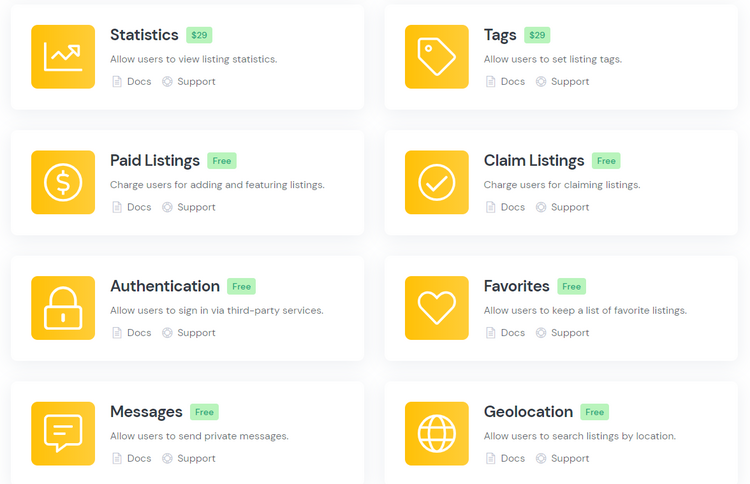
For example, you can install the Messages extension to allow users to send private messages and exchange attachments. Also, you can add the Favorites add-on to let registered users keep a list of favorite listings and the Reviews extension to enable reviews and ratings on your business directory website. Finally, we recommend installing the Geolocation extension to allow website visitors to search businesses by location.
To install any extension, simply click on the Install button and proceed by activating it once it’s installed.
Now, it’s better to split your business directory into categories, depending on business niches, to make it easier for website visitors to navigate it. To add a new category, go to the Listings > Categories section and click Add New.
Within this page, you can enter the category name (e.g., “Restaurants”), fill out the description if needed, upload the category image and create a hierarchy of categories (by setting a parent category). Once you are done, click on the Add Category button.
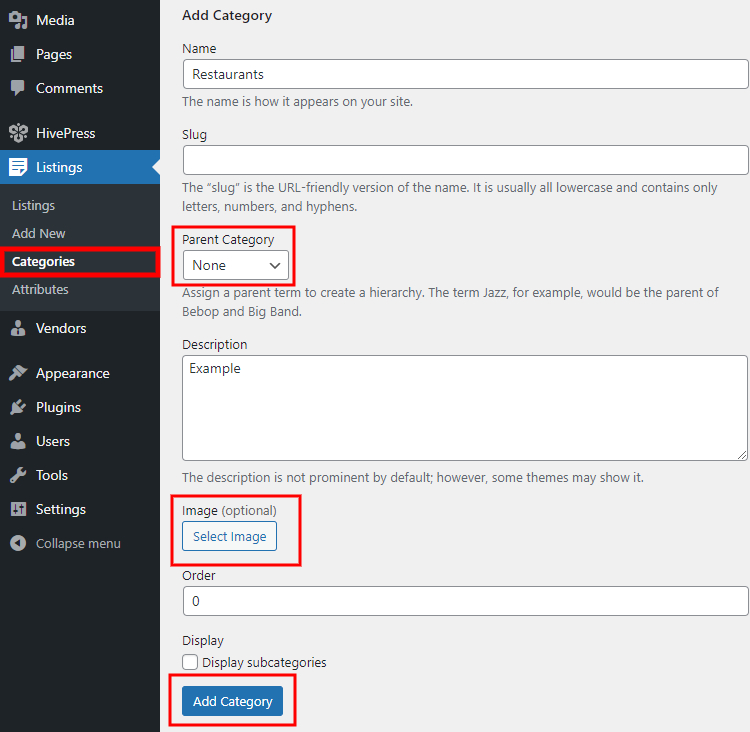
Similarly, you can add more listing categories. For example, “Clubs,” “Hotels,” etc. There are no limits on the number of categories, so feel free to add as many as needed.
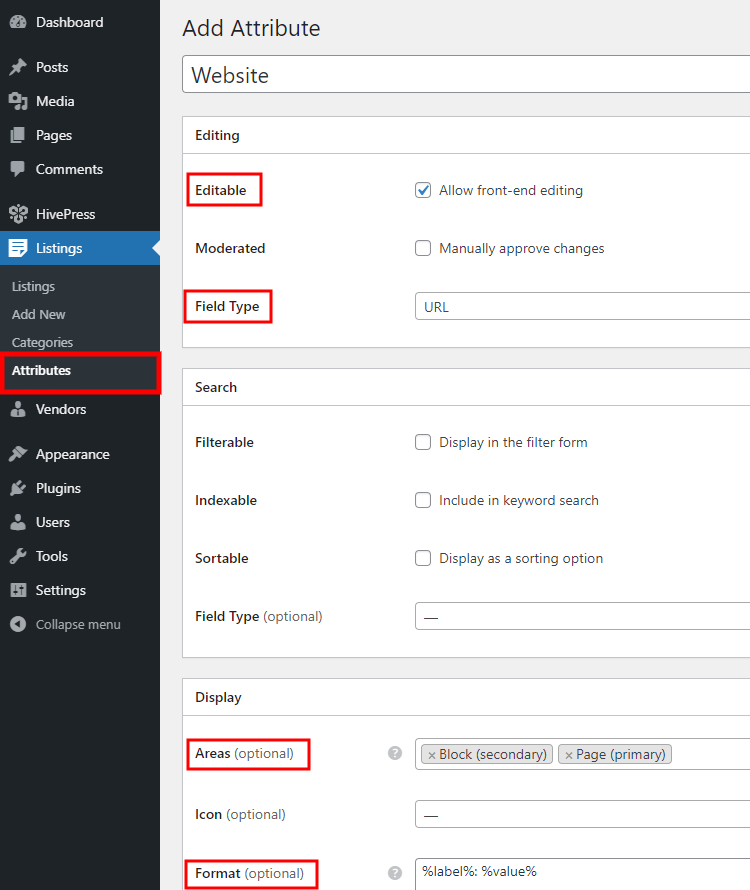
Once you add categories, it’s time to create some fields specific to business listings. To add custom listing fields and search filters, navigate to the Listings > Attributes section. For example, let’s create a “Website” attribute to allow users to indicate their business websites.
In the “Editing” section, you need to set the custom field name and allow its front-end editing to let users fill in this field when adding new listings. Then select the attribute type (we’ll select the “URL” type for this one).
Within the “Search” section, you can allow users to search, sort and filter listings by the custom field value. However, for the “Website” attribute, it doesn’t make much sense, so you may skip this section.
Finally, define how the attribute will appear on the listing pages by assigning it to certain template areas and setting its display format (we’ll use this display format %label%: %value% here). Then click on the Publish button.
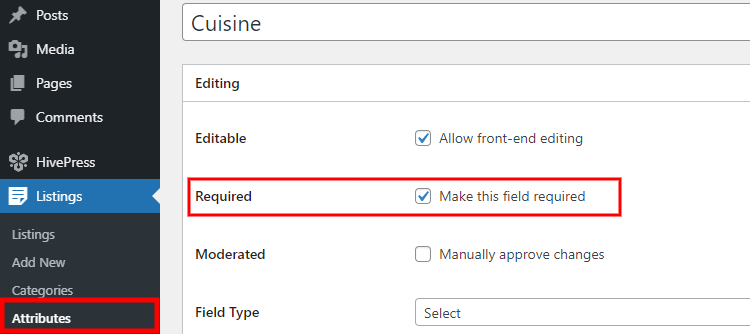
That’s it! We’ve just added the first custom listing field. But let’s add one more and make it category-specific. For example, let’s add a “Cuisine” attribute to the “Restaurants” category to allow website visitors to filter restaurants by the type of cuisine.
To do that, click on the Add New button, set the attribute name, allow its front-end editing and set the field type. For this attribute, we recommend using the “Select” field type. Then you need to set up this custom field as a search filter by marking it as filterable and setting the search field type. It’s better to use the “Select” type as well.
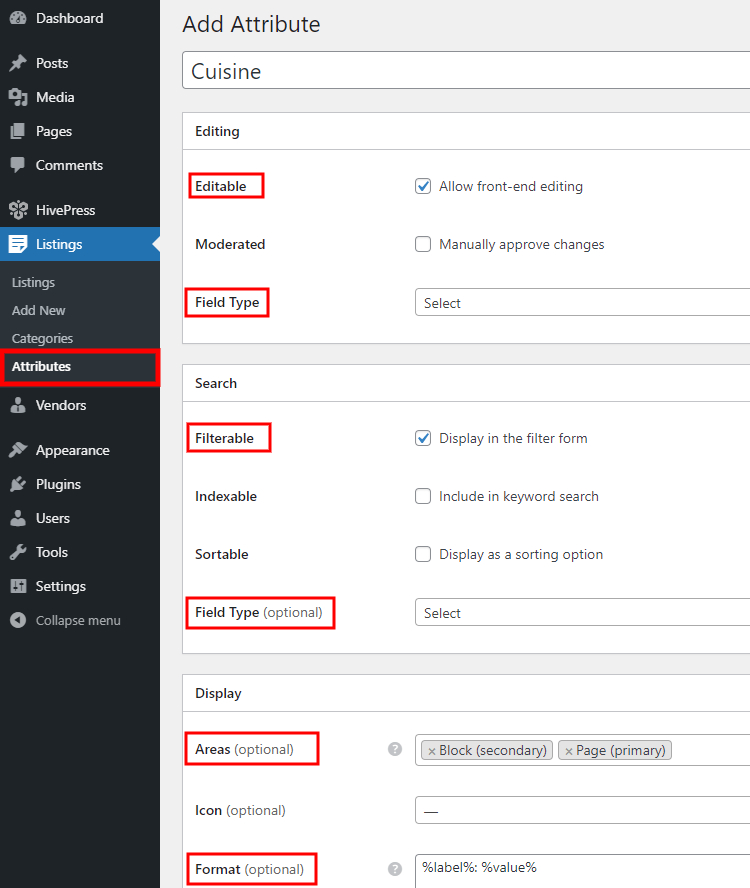
Finally, set the attribute display format and assign it to the “Restaurants” category. When finished, click on the Publish button.

Now, if you want to require users to select a cuisine type when they add a new listing to the “Restaurants” category, you need to mark this field required and save changes.
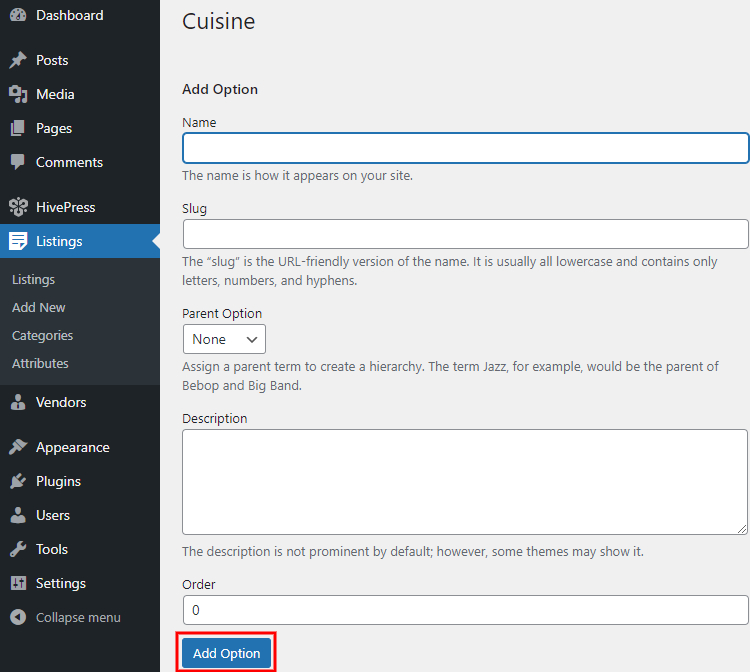
Next, it’s necessary to add the attribute options. Click on the Edit options button and add several options for users to choose from. For example, “Chinese,” “Italian,” and “French” cuisines.
That’s it! You can add more custom fields and search filters by following the same steps.
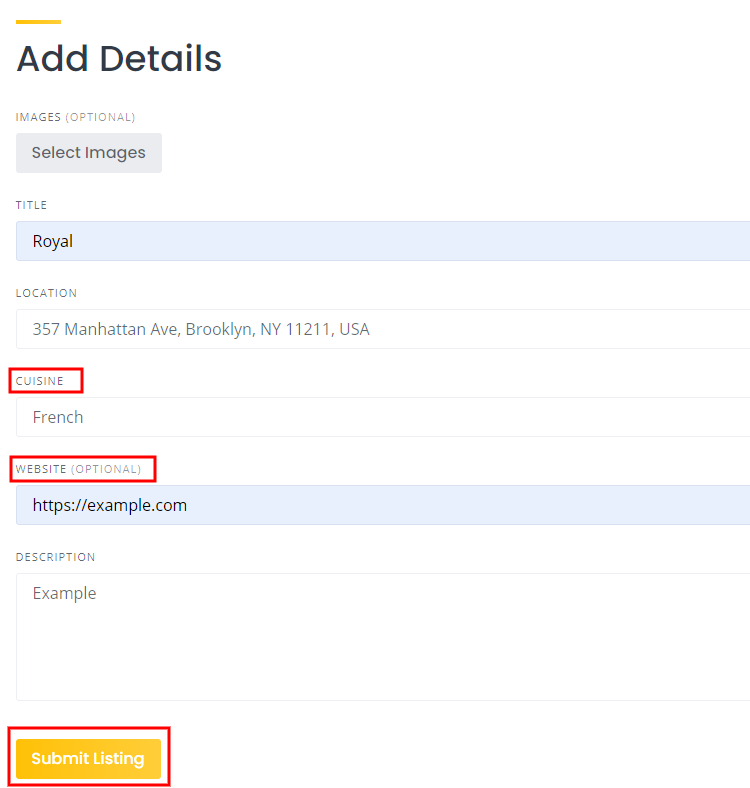
Now it’s time to add a new business listing. For example, let’s add the first listing to the “Restaurants” category. However, to check how it’s going to work for business owners, let’s do it from the front-end. To do this, we’ll navigate to our website, click on the Add Listing button, and select the “Restaurants” category.
Once on the listing submission page, we can upload the listing image, enter the listing title (e.g., “Royal”) and set the location. Then we need to add the website URL and select the type of cuisine (the custom fields that we’ve added previously). Finally, it’s necessary to fill in the description and click on the Submit Listing button.
If moderation is enabled, new listings should be approved by the admin before they appear on the front-end. You can disable moderation in the WP Dashboard > HivePress > Settings > Listings section.
Finally, let’s move to the next step, and we’ll briefly explain how to set up a front page for your business directory website.
Since HivePress is integrated with the WordPress block editor, it won’t be an issue for you to add and customize new layouts using blocks. To add a new page, go to the WP Dashboard > Pages > Add New section.
Next, you need to enter the page title (e.g., “Home”), and then you can start adding layout blocks by clicking on the ➕ icon and selecting blocks you need. For example, you can add a listing search form, a listing categories block, and one that displays recent business listings.
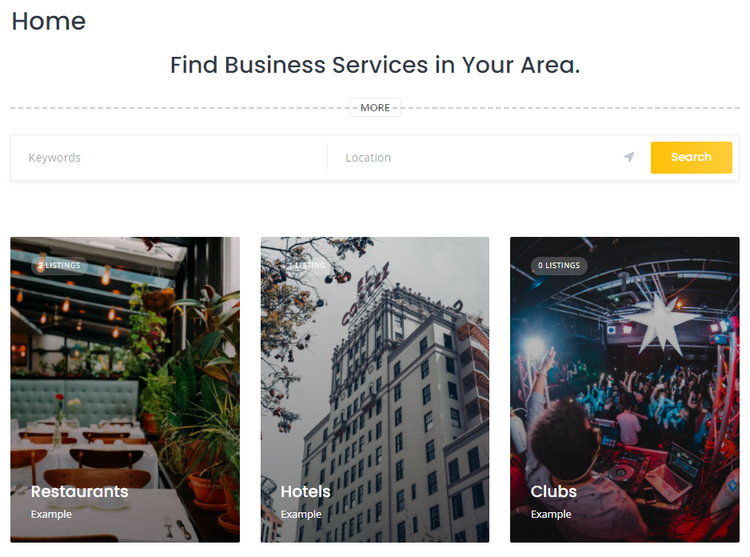
Once you finish customizing your front page, click on the Publish button. Then you need to go to the WP Dashboard > Settings > Reading section and set this page as the homepage of your business directory website.
That’s it! Now you can launch and run your own business directory website even without a huge budget. Then, once you’ve grown significant traffic, you can start making money with your business directory site.
Bear in mind that if you want to build a business directory website with WordPress for free and without any coding knowledge, you can do it hassle-free with HivePress and its ListingHive theme. They are lightweight, easy-to-use and packed with all the necessary features for getting your website off the ground. To get a better idea of all the ListingHive features, check out its overview.
Additionally, we recommend checking out our list of 5 tips on managing a business directory website.
Launch your own appointment booking platform using WordPress.

Increase user engagement on your website with search alerts.

Launch a rental marketplace for any niche using WordPress.