
Create a Product Catalog with WordPress for Free
Launch a product catalog website for your business in 6 steps.
Launch your own appointment booking platform using WordPress.

Online booking appointments have already become a groundbreaking feature for many industries like medical care, fitness, law services and so on. Offering online bookings has dozens of advantages for any business, such as round-the-clock availability, saving staff time, no overbookings, no queues, etc.
However, many private clinics, gyms, and service companies still schedule meetings over the phone, manually adding new bookings to their calendars. Moreover, thousands of specialists don’t have their own websites where potential customers can contact them and schedule a meeting. That’s why creating a niche appointment booking platform, and connecting service providers with customers can be a tempting idea for an online business.
In this article, we’ll explain how to create an appointment booking website using WordPress. Feel free to take a look at the table of contents and jump directly to the part that interests you most.
Let’s get started!
In a nutshell, such platforms allow customers to schedule appointments or book services offered by some experts or companies. In their turn, experts can set up availability days and hours as well as run a calendar with all the upcoming bookings.
A great example of an appointment booking website is Zocdoc. It’s a platform that allows people to find local doctors and book in-person or online appointments for medical or dental care.
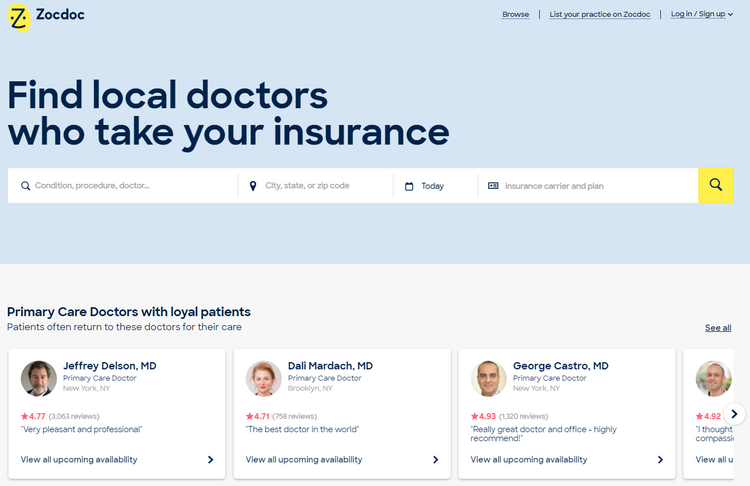
Zocdoc isn’t just a convenient platform, but it’s also a highly profitable business for its owners. It makes money by collecting a listing fee as well as a booking fee. Healthcare providers pay to be listed on the platform so that they can reach new patients, grow their practices, and operate more efficiently.
In the same way, most appointment booking websites are monetized via charging service providers for each booking made through the marketplace.
Online booking appointment marketplaces have gained popularity due to several reasons:
Nowadays, there’s no need to stand in line to visit a doctor or call a fitness trainer to make an appointment each time a person goes to the gym. Now everyone can make all the appointments online with just a few clicks, without wasting time on phone calls and queues. Moreover, customers can schedule their arrival close to their appointment time, considerably reducing their waiting time.
If a person has frequent appointments and meetings, scheduling them can take a lot of time. It’s especially true for remote workers, freelancers or people who work at multiple locations at once, like fitness instructors who work at several gyms or Elon Musk, who moves between Tesla and SpaceX factories every week.
However, appointment booking marketplaces do more than just providing customers with a list of available dates and times when they can come in for a meeting, treatment, or service. They also let clients cancel and reschedule appointments without having to contact the service provider.
By staying offline and accepting all new bookings via phone or email, many specialists are missing out on a giant piece of the cake – online bookings. Nowadays, most people prefer to do everything via the Internet, and if a service company doesn’t provide an option to book an appointment online, it’s losing potential customers.
If you are about to create an appointment booking website with WordPress, the main question is whether you are building a website for your own company or it’s going to be a marketplace that matches different specialists with customers?
If you want to create a marketplace, then there are a few additional questions you have to ask yourself to choose a niche properly:
If you want to create an appointment booking website but still have no idea about a niche for your platform, you can pick some of the listed below ideas that may work well for your city or country. For example, you may launch an appointment booking marketplace that lists services of:
There are dozens of possible niches for your appointment booking marketplace. The main point is to identify people’s pain points in your region and consider how these problems can be solved with your online platform.
Okay, now let’s move on and try to create an appointment booking website with WordPress.
Before diving into the tutorial part of this article, make sure that you already have all the necessary prerequisites.
Your domain name is as important for your brand as your business name or logo, so you should carefully think about the right one. Since it’s a crucial part of any website, we listed a few tips on how to come up with a great domain name:
Your next step is to find a reliable web host to handle your site. There are dozens of hosting providers here and there, so it may be a bit challenging to choose the right one. So you can check this article about WordPress hosting providers and choose one of the providers mentioned there.
Once you register a domain name and purchase a hosting plan, it’s time to install WordPress. Almost every hosting provider offers a one-click WP installation, so you’ll be able to handle everything in a few clicks.
Finally, you need to decide on a booking appointment WordPress theme for your website. When looking for a theme, make sure that it has all the essential features for your future project. For example, it should have marketplace functionality, a booking system, different search filters, a communication system, reviews, monetization options, etc.
In this walkthrough, we’ll use ExpertHive. It’s a lightweight and clean service marketplace WordPress theme. When combined with the HivePress plugin and the HivePress Bookings extension, it becomes a great solution for building an appointment booking website.
Also, for the sake of simplicity, we’ll show you how to create an appointment booking website for doctors. It’s just an example we chose for this tutorial, but you can follow the same steps and create a website for your own niche.
So, let’s move to the theme installation to get a better idea of the theme’s features and how to set it up correctly!
In order to install the ExpertHive theme, navigate to the Appearance > Themes > Add New > Upload Theme section and upload the theme ZIP file. Then click on the Install Now button and proceed by activating ExpertHive.
Upon the theme installation, you’ll get a recommendation to install the suggested plugins, including HivePress, the plugin that will enable the marketplace functionality on your website. You can easily install and activate all the plugins by following the suggested link.
However, if you have any issues installing the ExpertHive theme, you can follow the screencast below, which shows the whole process step-by-step.
Now in order to add the booking functionality to your doctor appointment platform, it’s necessary to install the Bookings extension. You can easily do it by going to the Plugins > Add New > Upload Plugin section. Then you need to select the add-on ZIP file to upload and proceed by installing and activating it.
Okay, now you have all the necessary prerequisites to launch a doctor directory, so let’s move to the next step and add some listing categories based on the medical specialties.
To make it easier for patients to navigate your website, it’s better to create different service categories based on the medical specialties. For example, let’s add “Psychiatry,” “Dermatology,” and “Cardiology” categories. To do that, go to the Listings > Categories section.
Firstly, you need to add the category title and fill in the description if necessary. Then you can select a category icon that will be displayed on the front-end. Finally, there’s an option to create a hierarchy of categories by turning your category into a subcategory (in this case, simply set a parent category for it).
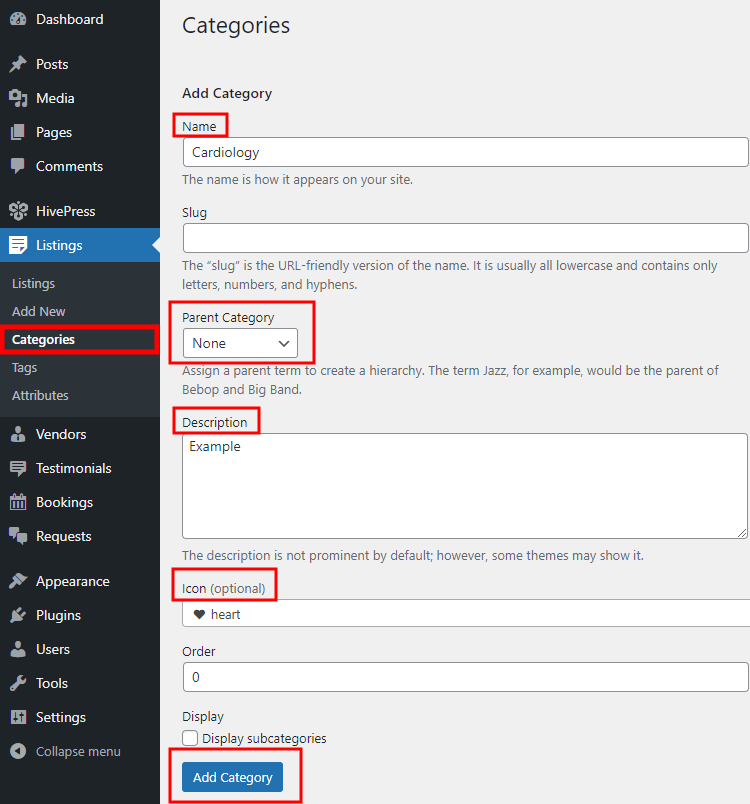
When finished, click on the Add Category button. Similarly, you can add as many categories as necessary for your doctor appointment booking website.
Once you split your doctor directory into categories, it’s time to add some fields specific to the services listed on the doctor appointment websites. You can add custom listing fields and search filters in the Listings > Attributes section. For example, let’s add the “Price” attribute to allow doctors to set the basic service price, while patients will be able to search and filter services by price range.
You can adjust your custom field in three different contexts, so let’s cover each of them:
$%value%.Once you are done, click on the Publish button.
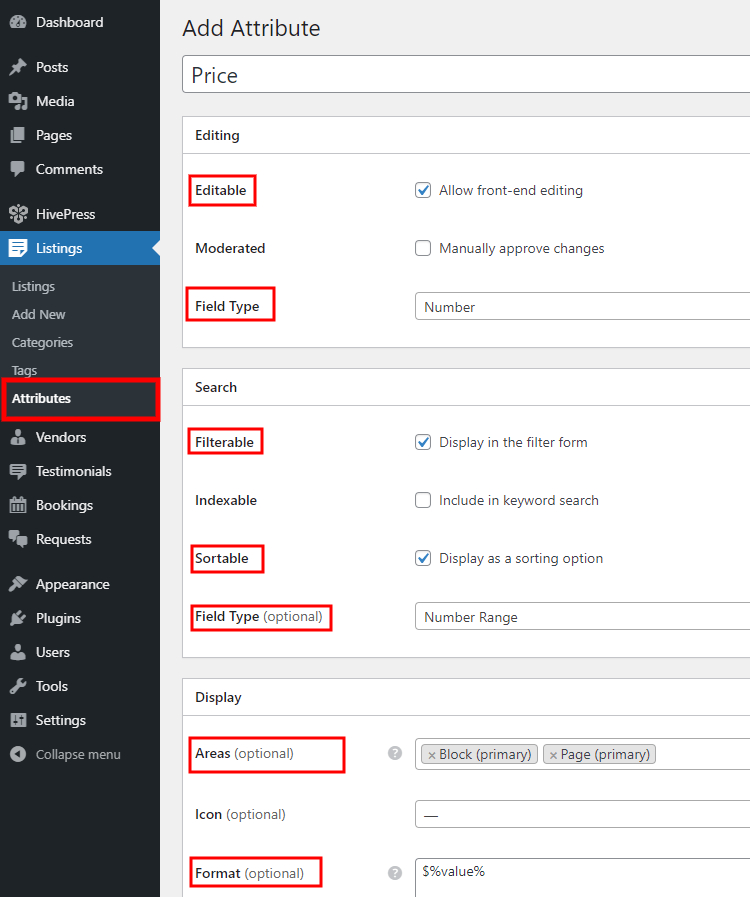
Keep in mind that there are no limitations, and you can add as many custom fields and search filters as required for your doctor appointment website.
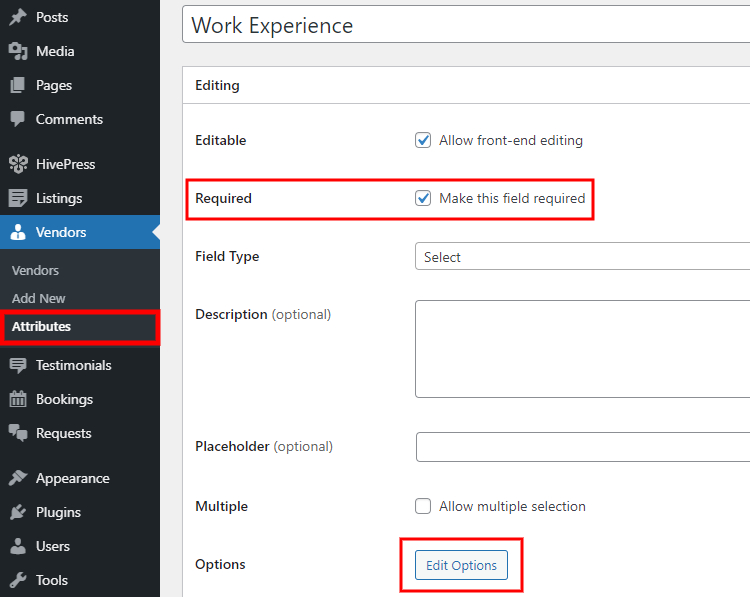
Alright, we’ve just added some custom listing fields, but let’s also add some custom doctor profile fields and search filters, so users will be able to search for doctors directly instead of the services they provide. You can do it in the Vendors > Attributes section. For example, let’s add the “Work Experience” field to allow doctors to indicate their experience when they register on your website, and patients will be able to filter specialists by their work experience.
First of all, enter the attribute name, allow its front-end editing and choose the field type. We’ll use the “Select” type for this custom field. Then it’s necessary to mark it as filterable, sortable and select the search field type (here, we use the “Select” field type as well). Finally, define the display format for this attribute and click on the Publish button.
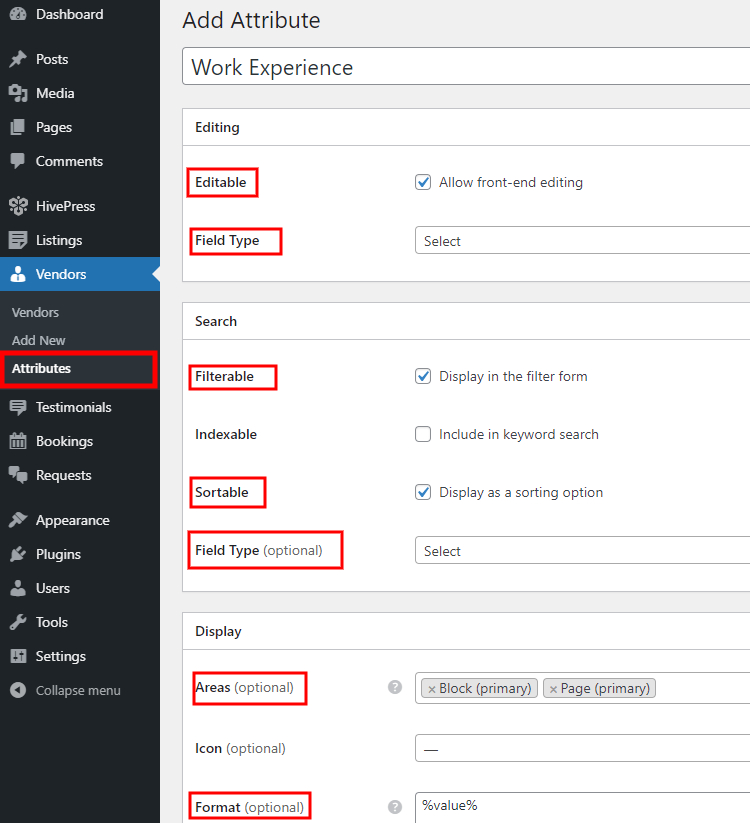
Now, if you want to make this field mandatory, you have to mark it as required and save changes.
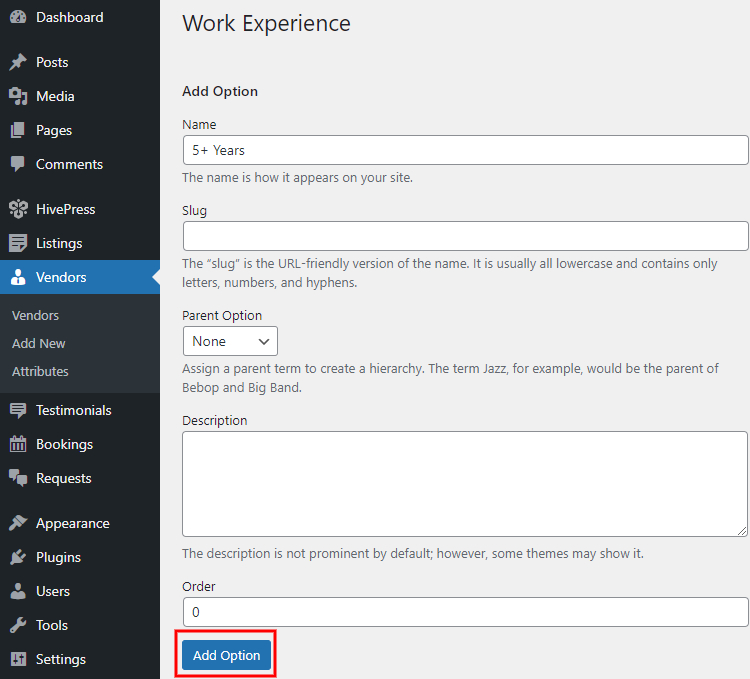
Then, you need to add some options by clicking on the Edit Options button. For example, let’s add “5+ Years,” “10+ Years,” and “15+ Years” options. Simply enter the title and click on the Add Option button.
Okay, once you are done with custom fields, let’s set up a front page for your doctor appointment booking website.
It’s crazy easy to add and customize new layouts since HivePress is integrated with the WordPress block editor. To add a new page, go to the Pages > Add New section.
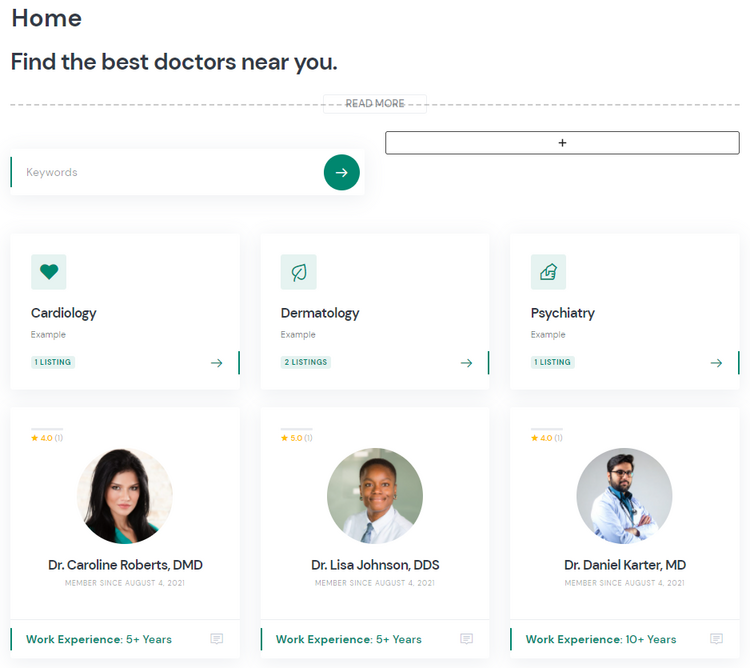
Firstly, set the page title (e.g., “Home”). Now, let’s add some layout blocks. For example, let’s start with a “More” block to separate the header section from the main page content. To add a new block, click on the ➕ icon and select the block you need. Similarly, you can add the listing search form, a block that displays listing categories and another one that shows doctor profiles.
Also, you can upload a few featured images that will be displayed in the page header section by clicking on the “Set featured image” icon and uploading your images. You can check this screencast to set up your header images in the way they are displayed on the ExpertHive demo site.
When you finish customizing the page content, click on the Publish button. To use this page as a front page, navigate to the WP Dashboard > Settings > Reading section, select it from the drop-down list, and save changes.
Alright, you’ve just created a fully functional doctor appointment booking platform, but now it’s time to test it to get a better understanding of its features. For example, let’s list a new medical service from the front-end to check how it works for doctors. To do that, go to your website, click on the List a Service button and choose one of the categories.
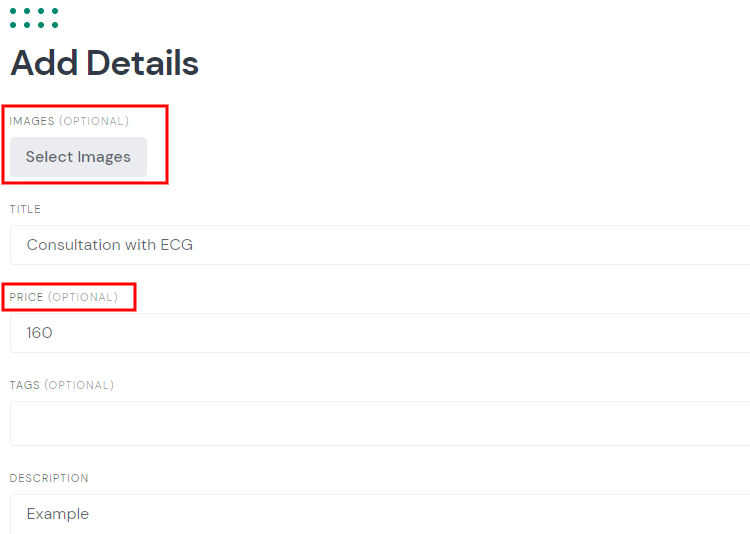
Then, you’ll be taken to the listing submission page, where you can upload preview images, set the service title and fill in other required fields. Also, there will be a custom “Price” field that we’ve added previously.
Once you are done with listing details, you can scroll down and adjust the booking settings. For example, you can set how many days are required before the appointment date, then specify the booking window that defines how many days an appointment can be made in advance. Also, you can set the earliest and the latest time available for an appointment, define the booking slot duration and frequency (in minutes) and so on.
Please note that you can enable the “booking requests” option to accept each booking request manually.

When you complete the listing form, click on the Submit Listing button to get this service listing published and available in the search results (if moderation is enabled in the HivePress > Settings > Listings section, the admin will have to approve it before the listing appears on the front-end).
Finally, let’s check how this doctor appointment booking website works for patients. Let’s log out, register a new account and try to book an appointment, just to test your website from both sides.
Once you register a new account, you need to locate the listing that you’ve added in the previous step and try to book it.
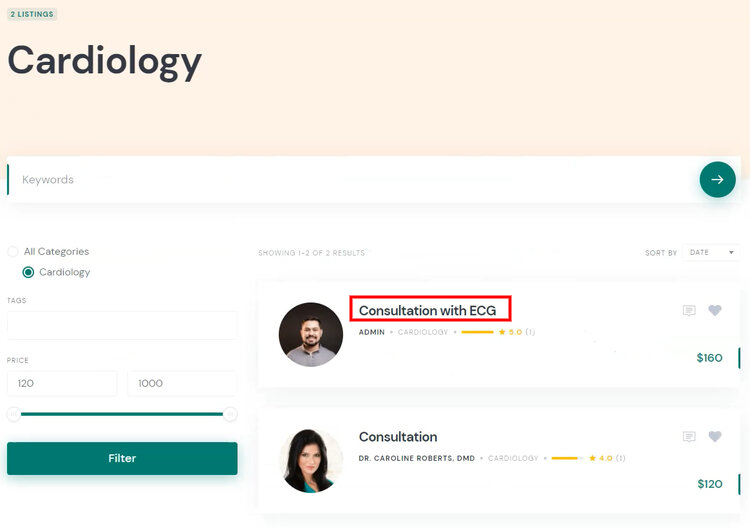
You’ll notice that the appointment dates and time slots follow the booking restrictions you previously set (in the listing settings form). So, when you pick a date and time, click on the Request to Book button.
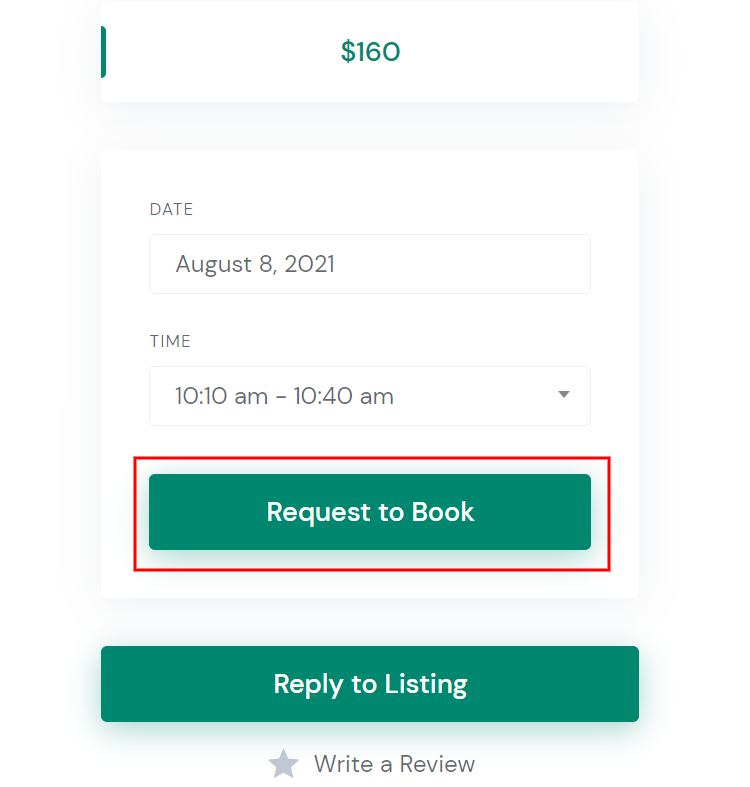
After that, you’ll be redirected to the confirmation page, where you can verify all the details and add some booking notes if necessary.
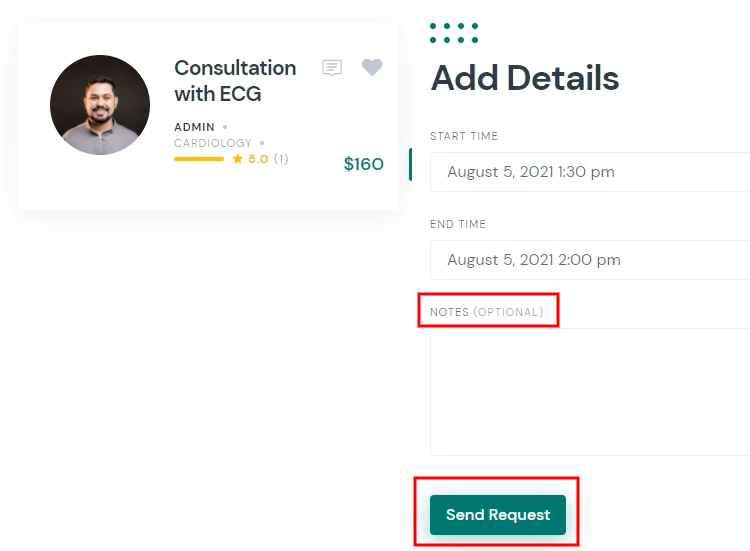
Bear in mind that as a website owner, you can require extra details from patients by adding custom fields to the booking form. Once you verify all the details, click on the Send Request button.
That’s it! Now a doctor will get a pending booking request and will be able to accept or decline it (as shown on the screenshot below).
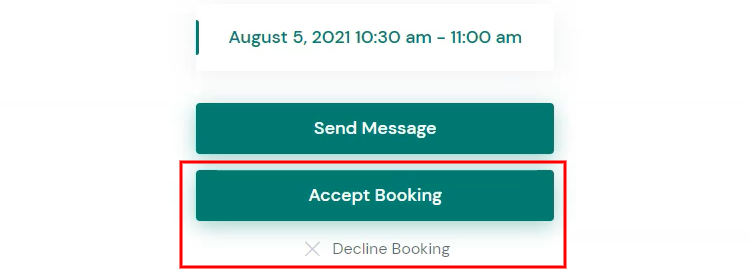
If the booking request is accepted, the patient will be notified via email. Also, if there are some changes or issues, doctors and patients can easily communicate with each other via private messages. Additionally, patients can leave reviews about the provided services or bookmark them.
By following these steps, you can build an appointment booking website with WordPress in next to no time. When you get it off the ground, you can start promoting your website to attract users to it. Once there are enough profiles on your platform and you get decent traffic, you can start monetizing your website.
Keep in mind that you can easily launch your appointment booking website with the ExpertHive theme and the HivePress plugin, along with its Bookings extension. Both ExpertHive and HivePress are lightweight, easy-to-use and packed with all the essential features for building an appointment booking platform right out of the box, such as doctor profiles, private messages, location-based search, and so on.
Additionally, you may want to check our overviews of the most popular:
Launch a product catalog website for your business in 6 steps.

Build your own job portal website without any coding skills, using WordPress.

Start your own coupon website and make money with affiliate commissions.