
How to Create a Searchable Database with WordPress
Create a searchable database with WordPress for free.
Create your own micro-jobs marketplace using WordPress.

The era of the gig economy is here, and there is no going back. The gig economy brings a lot of benefits for both freelancers and clients. As freelancers are paid per project completed, clients can save money by paying for results, not hours. Similarly, freelancers are free to finish the job anywhere and anytime they want. Moreover, the gig economy has enabled people from various backgrounds, such as stay-at-home mothers and digital nomads, to be productive.
There are various services offered by freelancers, ranging from photography and design to complex computer programming. Freelancers usually use micro-jobs marketplaces, such as Fiverr, to sell their services to potential clients, while the platform charges a commission fee for each transaction. That’s why building your own micro-jobs marketplace can be a sound business model.
In this guide, we’ll answer the following questions:
Building a micro-jobs marketplace is not a small task, but we’ll walk you through the whole process step-by-step and explain how to get your website up and running without any coding knowledge.
Let’s get started!
Any micro jobs marketplace is basically an online platform that connects freelancers with people who want their jobs (aka gigs) done. Such platforms cut out the middleman of hiring, firing and HR departments since anyone can register a profile, list their services, and customers can easily find, order and pay for those services.
For customers, a freelance platform is an easy way to outsource work without compromising on quality. For service providers, it’s a perfect place to promote their services to a vast audience. Additionally, thanks to such marketplaces, freelancers have the flexibility to work from anywhere and on their own schedule.
There are many different micro-jobs marketplaces here and there, but the best-known probably is Fiverr.

The platform started out as a small website, offering several services like logo design or translation (by the way, it got its name from the starting price of services which is $5). However, nowadays, it offers hundreds of freelance services at different prices. For example, according to the official report, Fiverr connected more than 3.4 million buyers with freelancers from various parts of the world in 2020.
Impressive, isn’t it? But let’s also take a look at Fiverr’s business model to get a better idea of how it makes money.
Fiverr uses several business models to generate revenue, so let’s briefly cover each of them:
While the commission-based model works best for service marketplaces, Fiverr uses three monetization models at once, and that’s not the limit. Fiverr is growing, and there’s a high likelihood that new revenue streams will be used.
It may look like Fiverr is absolutely dominating the industry, and there are no chances to compete with this giant and get a market share. However, the right mix of an idea, thoughtful strategy and focused work can be the key to success. Here are some tips on how to launch a competitive freelance platform:
It’s naive just to create a global website like Fiverr, try to cater to the same audience and expect the same success. Instead, it’s better to select a specific niche or a group of people and focus on it. Also, it may be a good idea to choose a particular location (city/region/country) and develop a freelance marketplace for it.
For example, 99designs is a freelance marketplace focused on graphic and web design.

In order to compete with market giants, it’s necessary to provide customers with better service than Fiverr does.
For example, Toptal is a micro-jobs marketplace that approves less than 3% of service providers that register on the platform. Its name “Toptal” comes from “top talent” and the platform emphasizes that it has a rigorous screening process and accepts only experienced professionals. As a result, it differs from Fiverr, which doesn’t have such a hand-picked talent pool.
To entice new customers, it’s necessary to provide some unique and exclusive services as was mentioned above. However, any freelance platform is a two-sided marketplace, so it’s crucial to create a marketplace that is attractive both to customers and freelancers.
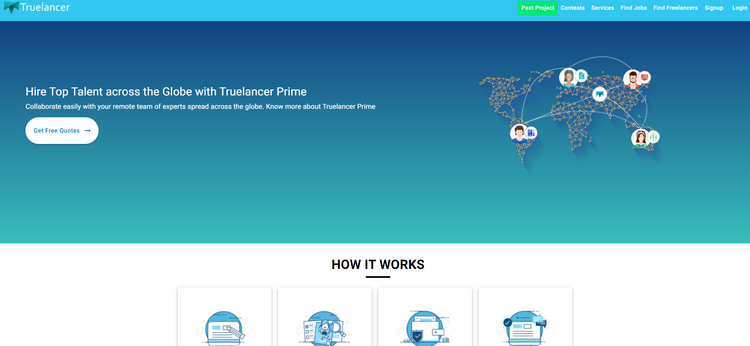
For example, Truelancer is a platform that connects customers with freelancers from low-cost-of-living countries and doesn’t have any minimum gig prices, unlike Fiverr.
We’ve just mentioned a few niche freelance marketplaces, but there are dozens of other platforms around the globe that successfully operate and get their piece of the pie, regardless of market giants like Fiverr.
So it all starts from the idea. Are you ready to create your own freelance platform?
Before we begin, make sure that you have everything required to create a micro-jobs website like Fiverr. You’ll need the following things:
While it’s not really difficult to install WordPress, get a domain name, and buy a hosting plan, choosing a suitable WordPress theme and plugin may not be an easy task since there are many options on the market. But there are a few things to keep in mind when choosing a micro job WordPress theme.
If you want to create a website like Fiverr with WordPress, you have to choose a theme that includes the following features:
A successful freelance platform is a two-way marketplace that, on one side, allows customers to submit tasks and receive offers from freelancers. On the other side, service providers have an opportunity to create profiles and list their services so potential customers can easily find them.
The theme should be packed with some monetization tools that will allow you to set up commissions on your platform so you can easily make money by taking a commission from each transaction made on your website. Also, there should be a payout feature, so freelancers can effortlessly request their earnings.
Both customers and freelancers need to communicate with each other. Whether they need to discuss some project details or send samples, there should be an option to send a message. Also, on any freelance marketplace, it’s crucial to allow customers to leave reviews of received services and rate freelancers since it helps to cut out unreliable specialists.
To build a niche freelance platform, look for a highly customizable theme, so you’ll be able to tailor it to your niche. You should be able to add custom service categories, custom listing fields, additional search filters etc. It’s crucial because if you choose a theme with hard-coded service categories (just for example), you won’t be able to set it up to your needs without code changes and additional spending.
So always check the above-mentioned features before purchasing a WordPress theme for your freelance platform. However, if you find it challenging to select a suitable theme for your project, you can check our overview of the best micro jobs WordPress themes to get a better idea of the available options.
Once you get all the prerequisites, you can start building your micro-jobs marketplace.
For the sake of this tutorial, we’ll use TaskHive, a lightweight yet functional micro-jobs WordPress theme that allows you to build a website like Fiverr in no time. We’ll also use HivePress, a free multipurpose WordPress plugin that powers most of the TaskHive marketplace features.
Let’s start with the theme installation!
You can easily install TaskHive directly from your WordPress dashboard. Simply navigate to the Appearance > Themes > Add New section, then click on the Upload Theme button, select the theme ZIP file to upload, and proceed by installing it.
Once it’s installed, you’ll receive a suggestion to install the recommended plugins, including HivePress and WooCommerce, the most popular e-commerce plugin that enables billing and payment features. Simply follow the link in order to install and activate the plugins.
You can also check this video on how to install TaskHive if something is unclear.
After you activate WooCommerce, it will automatically launch the setup wizard that will guide you through the marketplace configuration. Аdd your marketplace details, enable payment methods and install optional WooCommerce extensions to complete the installation.
This step is optional, but we highly recommend importing the TaskHive demo content to start with existing layouts and get a better understanding of how everything works.
To do this, navigate to the WP Dashboard > Plugins > Add New page to install the demo import plugin. Simply type “one click demo import” in the search field to find the plugin, then install and activate it. Once you activate the plugin, go to the WP Dashboard > Appearance > Import Demo Data page and click on the Import button. Once you click on the Import button, you’ll see a recommendation to install third-party plugins. Simply skip this suggestion and proceed with importing the TaskHive demo content.
That’s it! Now, you have the same layout as on the demo site. If you have any trouble with importing the demo content, you can follow the step-by-step screencast below.
Even if you don’t import the demo content, we’ll show the whole process of setting up a micro-jobs website below in case you are a more advanced user and want to build your freelance marketplace from scratch.
The next step is to split your micro-jobs marketplace into service categories to make it easier for users to navigate your website. In order to add a new category, go to the WP Dashboard > Listings > Categories section. Then, enter the category title, e.g., “Digital Marketing,” and fill in the description if necessary.
Keep in mind that there are several more options in this section. For example, you can easily create a hierarchy of categories by setting a parent category. Also, you can upload a category image and put categories in a particular order.
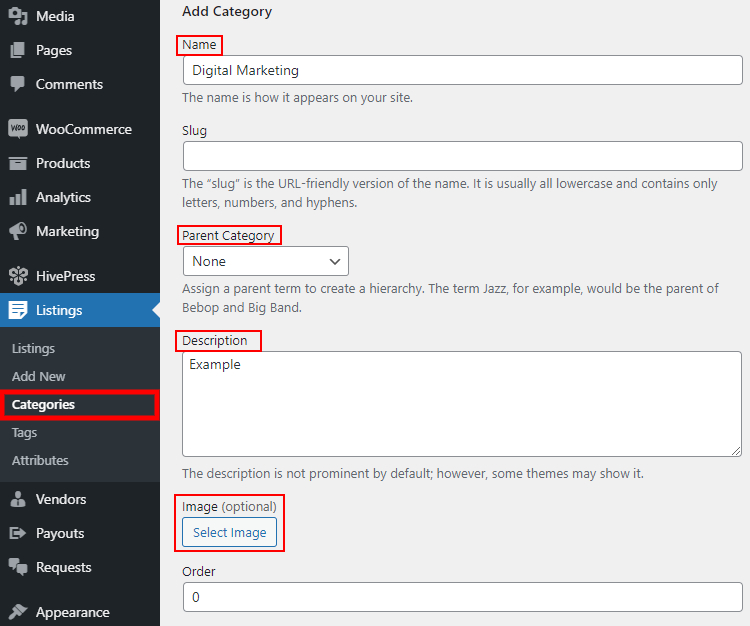
Once you finish, click on the Add Category button. Similarly, you can add as many categories as required for your freelance marketplace. Now, let’s move on and try adding a service listing attribute.
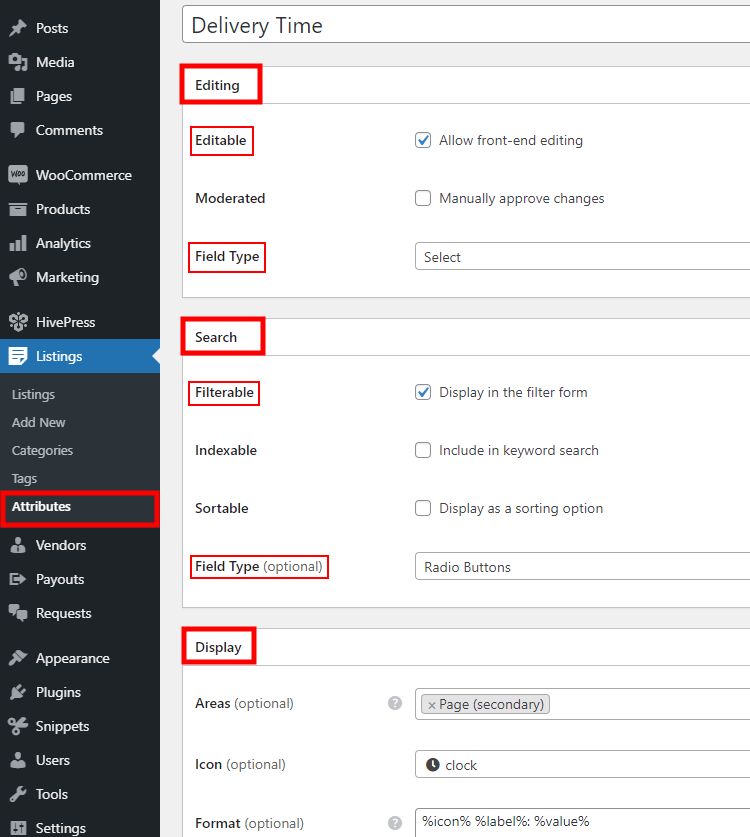
After you finish adding categories to your micro-jobs marketplace, it’s time to add some custom fields specific to service listings. For example, let’s add the “Delivery Time” field so freelancers will be able to set the date when the order is completed. To do this, navigate to the WP Dashboard > Listings > Attributes section and click on the Add New button. Once you name your custom field, you can edit it in 3 different sections. Let’s briefly examine each of them to get a better idea of how to set them up.
When you finish, click on the Publish button.
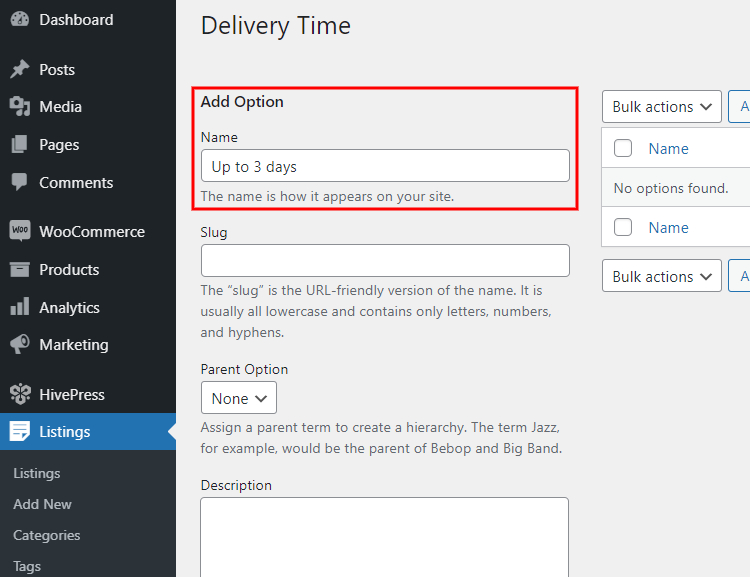
Then you need to add some options to your attribute, so freelancers will be able to choose the delivery time in the listing submission form. Click on the Edit Options button and add as many options as you need.
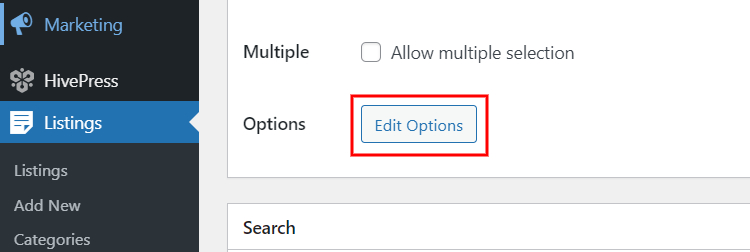
For example, let’s add “Up to 24 hours”, “Up to 3 days”, and “Up to 7 days” options, the same options as on Fiverr.
In this section, let’s go through the most important HivePress settings in the HivePress > Settings section to make sure that your Fiverr-clone website is set up and functions according to the requirements.
Let’s start with the Listings tab. In this tab, you can check out the available settings for your listings. For example, you can choose a page that displays all the website listings as well as set up the number of regular, featured and related listings displayed per page.
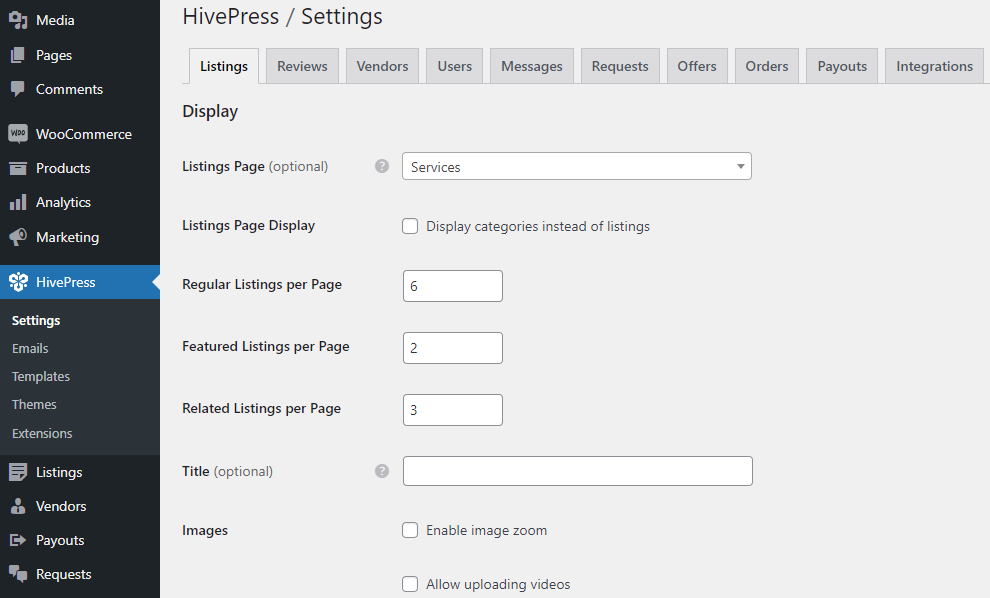
Also, note that if something is not clear, you can hover over the question icon for an extra description. Additionally, you can check our docs or ask a question on the HivePress community forum.
In the Search section, you can select which default fields you want to show in the listing search form (currently, you can choose keywords and categories).
Within the Submission section, you can adjust the listing submission settings.
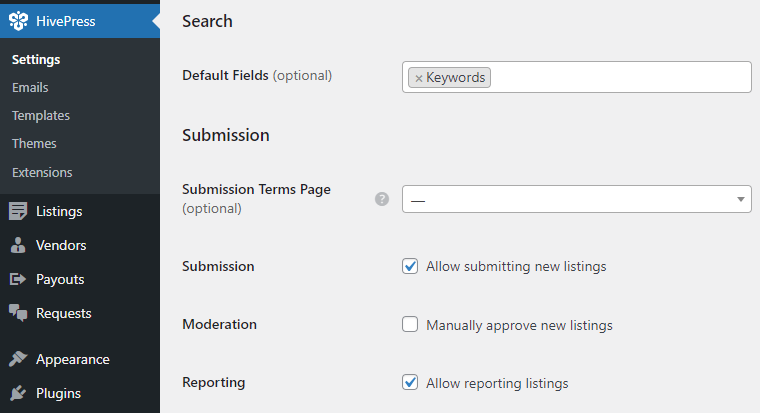
For example, you can link custom terms of use page to require users to accept them before adding a new listing. Also, you can enable or disable the “Front-end listing submission” feature. If you disable it, users won’t be able to add listings, and only the website admins will be able to do that.
Please note that the listing moderation is enabled by default, so the site admins will have to approve every listing manually before it appears on the front-end. Uncheck this option if you want to publish listings automatically without approving them first.
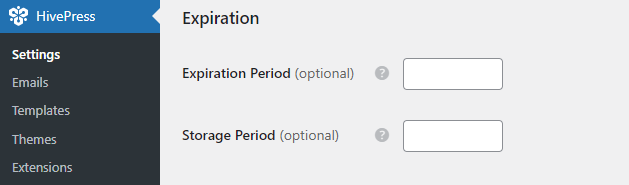
Keep in mind that if you want listings to be published for a limited time, in this section, you can set their expiration period by setting the number of days after which a listing expires. Also, you can set the number of days after which an expired listing is deleted permanently.
Finally, here’s the Selling section. Within this section, you can enable:

Additionally, you can allow file attachments. It may be a handy feature if a result of the provided service should include some files like a photo, receipt, plan, or whatever. In that case, freelancers will be able to attach files as a result of the order. Also, this feature is necessary if you are building a marketplace of digital assets.
Okay, now let’s move to the Vendors tab.
Here, we’ll briefly go through the settings related to vendors (i.e., freelancers).
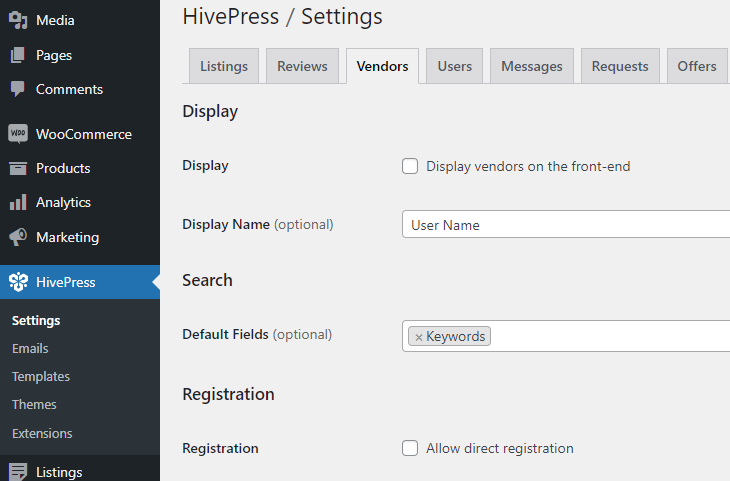
In the Display section, you can define whether you want to display profiles of freelancers on the front end at all. If so, then similarly to listings, you can select a page that displays all vendors and set the number of vendors per page.
In the Search and Registration sections, you can select which default fields you want to show in the vendor search form. Also, you can allow direct registration. By default, to become a vendor, a user has to add at least one listing. But if you enable this option, then users will be able to register as vendors without submitting listings at all.
Please note that, in the Selling section, you can set the commission rate. In other words, set a certain percentage that will be charged on every successful deal (e.g., you can set 10 %).
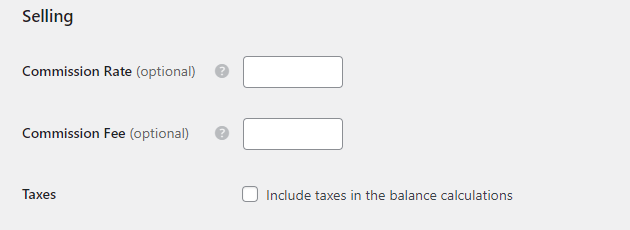
Additionally, you can set a fixed fee for every purchase. Please note that you can use either a commission or a fixed fee, or even both at the same time. For example, you can set $2, and freelancers will be charged 10% and $2 for every successful sale.
By the way, you can include or not include taxes in the freelancer’s balance but checking the “Taxes” field.
That’s all for Vendors. Now, let’s move to the Requests tab.
With HivePress, you can allow customers to post custom requests, indicating the desired budget, while freelancers can bid on requests and make offers.
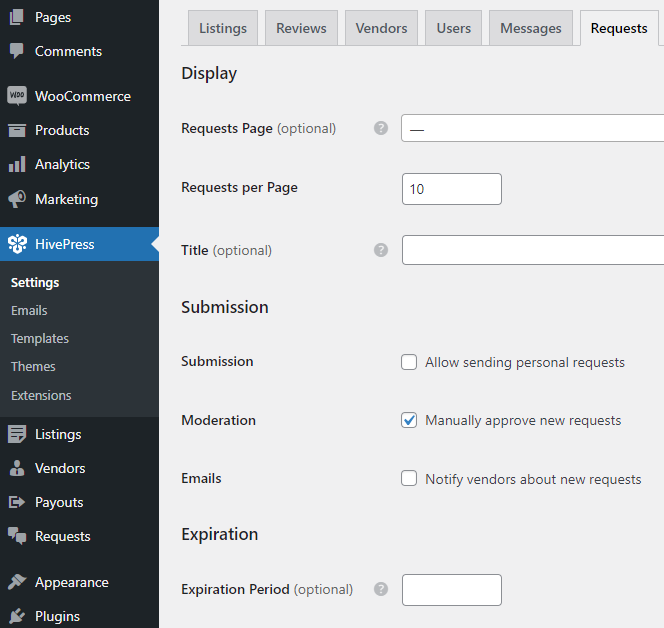
By default, customers can post public requests, and any freelancer can make an offer, but if you enable the “Personal requests” feature, clients will be able to make personal requests to freelancers of their choice, and only those freelancers will see such requests.
Similarly to listings, you can enable or disable moderation here. You can disable moderation if you don’t want to check and approve each new request manually. In that case, all the new requests will be published immediately.
Finally, set an expiration period that will define how many days a request can be displayed on your website and then will be deleted.
In this section, you can set up how offers on your micro-jobs marketplace will work.
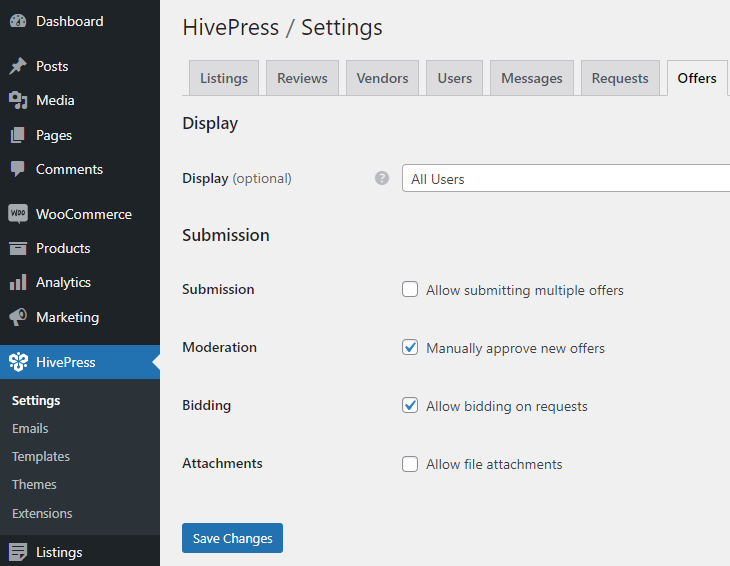
In the Display field, you can select who can view the submitted offers. You can allow it for all users, only registered users, or limit it only to the request author.
Next, check the Submission field. By default, a freelancer can make only one offer per request, but if you enable this feature, freelancers will be able to add multiple offers with different prices per request. For example, if there’s a request for a voice cover, in the first offer, a professional can suggest a voice-over for $50, then they can make another offer and suggest a voice-over, including proofreading for $70.
Finally, you can allow freelancers to add attachments to their offers (e.g., they can add their portfolios or presentations, etc.).
Now, let’s talk about Orders.
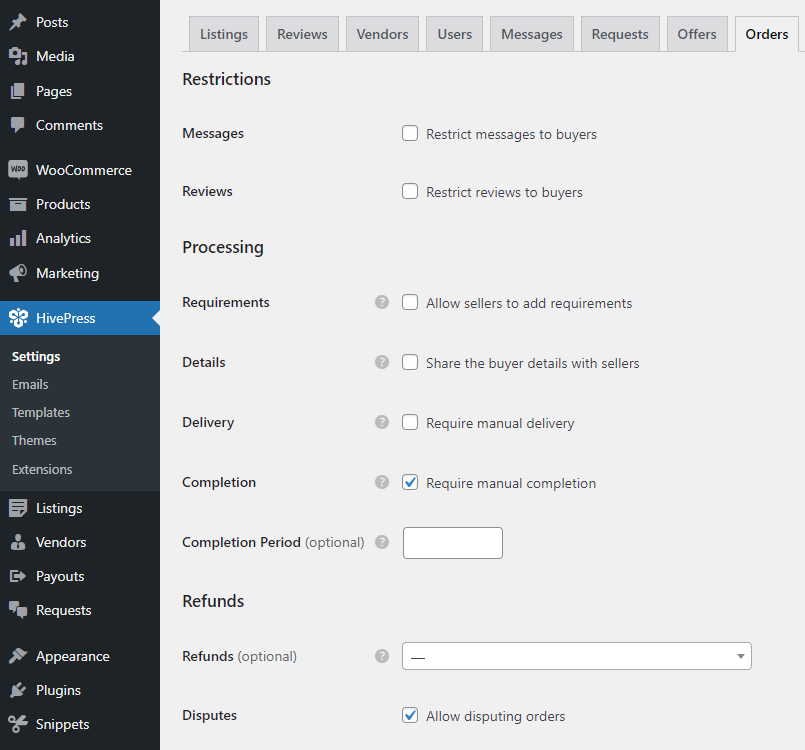
In HivePress, each time a customer purchases a service or accepts an offer, a new order is created, and once the order is paid, freelancers can provide the service.
If you enable the “Requirements” option, freelancers will be able to add some custom fields to require some order details and customers will have to fill them out. For example, if it’s a translation service, a freelancer may need to clarify what dialect should be used in translation.
By default, all the customers’ contact details are hidden from freelancers. But if you enable the “Details” feature, freelancers will have access to customers’ contact details.
We do not recommend enabling it if you want to prevent marketplace leakage. Meaning that you should prevent any possibility of customers getting in touch with freelancers bypassing your platform.
Pay attention to the following features:
Finally, you can enable refunds if you want to allow freelancers to make refunds to customers.
We recommend checking the disputes option. It allows users to notify the platform admins if there’s something wrong with the order.
In the Payouts tab, you can set up how the payouts will work on your micro-jobs marketplace.
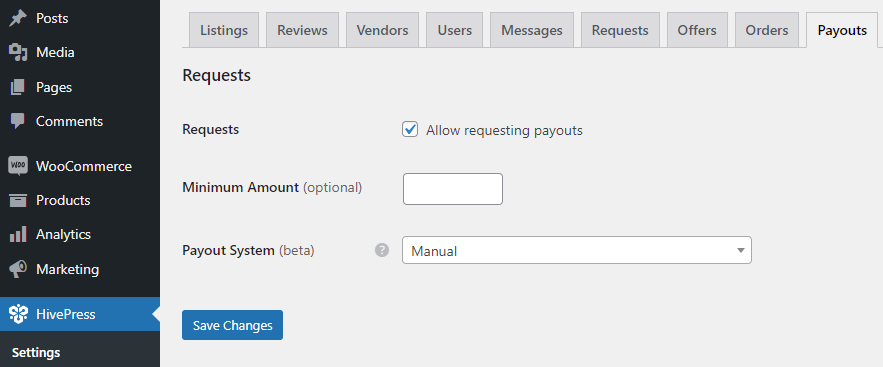
Currently, there are 3 modes: manual, direct and Stripe Connect.
If you are going to use the Manual mode, you can enable “Requests” to allow freelancers to request payouts of their earnings. Also, you can set a minimum payout amount. In that case, freelancers will have to reach this balance before they can request a payout.
That’s all for the Settings section! We covered the most important sections that we recommend checking. To get a better understanding of all the other settings, feel free to check this video.
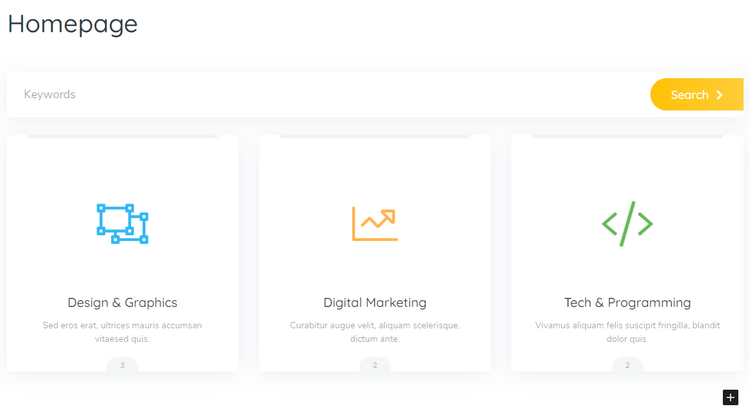
Now, let’s set up the front page. Since TaskHive is integrated with the Gutenberg block editor, you can add and customize new layouts without a hitch.
To add a new page, go to the WP Dashboard > Pages > Add New section. First of all, enter the page title and then proceed with adding new blocks. For example, let’s add a gig search form to allow users to search services directly via the home page. Simply click on the ➕ icon and select the necessary block. Similarly, you can add a block that displays service categories. When you finish setting up the front page, click on the Publish button.
In order to use this page as a homepage of your marketplace of services, go to the WP Dashboard > Settings > Reading section, select it from the drop-down menu and save changes. We also recommend going through all the HivePress settings in the HivePress > Settings section to ensure your site works in the way you want.
Finally, if you want to give your site a unique look and feel, navigate to the WP Dashboard > Appearance > Customize section and go through the appearance settings, such as primary and secondary colors, heading and body fonts, logo and background images, etc.
Please check this video to better understand how to customize the look and feel of your website.
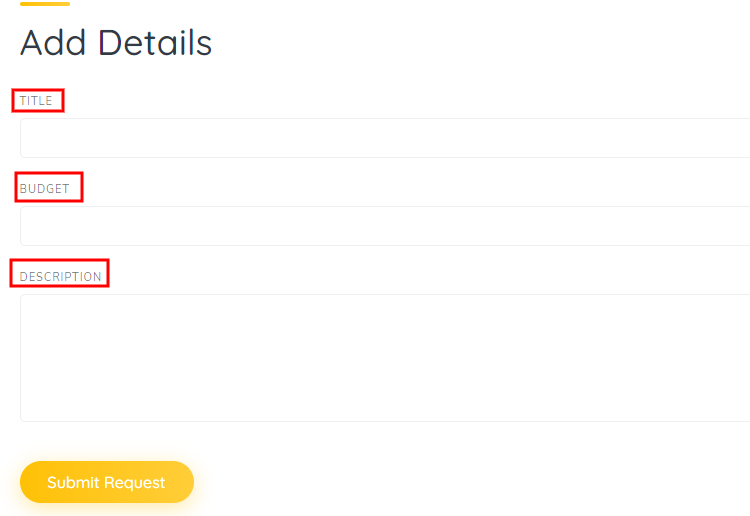
Now, let’s walk through the whole process of posting a request as a customer and making an offer as a freelancer. However, we’ll show you how to do this on the front end, just to get a better idea of how it works for users. Go to your homepage and click on the Post a Request button.
Then you’ll be taken to the request submission form where you can enter the title, set a budget and describe your request. As a site owner, you can also customize the request form and add any custom fields required for your marketplace. Once you set all the request details, click on the Submit Request button.
That’s it! You’ve just posted a request, and now freelancers can find it and make offers. Now let’s try to make an offer on the newly-created request. Since users cannot make offers on their own requests, we need to register a new account in order to make an offer on your own request. Just to show you how it works, we created a new account and navigated to the Requests page.
To make a new offer it’s necessary to click on the Make an Offer button, fill in the details along with the bid amount, and submit an offer.
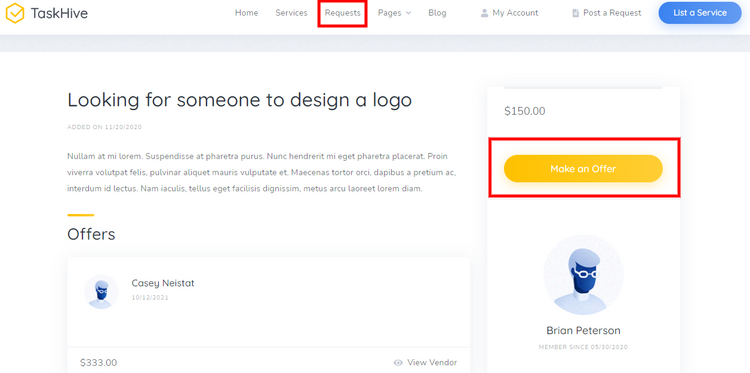
That’s how it works! As soon as a freelancer makes an offer, the customer will receive a notification and will be able to accept the offer. Once the offer is accepted, there will be a redirect to the checkout page where the customer can provide the billing details and make a payment.
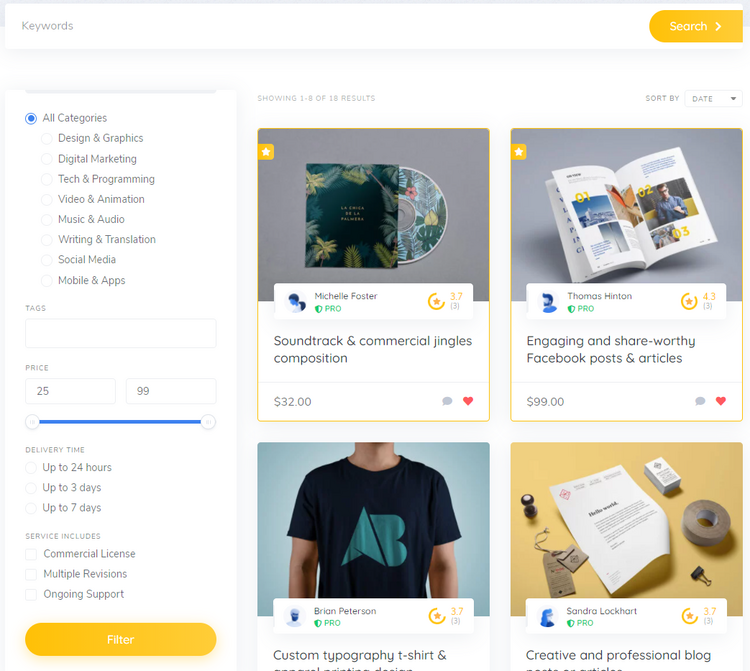
Let’s also check the whole workflow of listing a service as a freelancer. To do this, click on the List a Service button on your homepage and select a category. There will be a redirect to the listing submission page where you can upload an image for your listing and fill in all the necessary fields along with the “Delivery Time” one (a custom field we added previously). Once you fill in the submission form, click on the Submit Listing button.

Bear in mind that you can customize the listing submission form by adding or removing any fields in the WP Dashboard > Listings > Attributes section.
Also, you can check the screenshot below to get a better idea of how all the listed services will look on the front-end.
Okay, let’s move to the next step to extend the functionality of your micro-jobs marketplace.
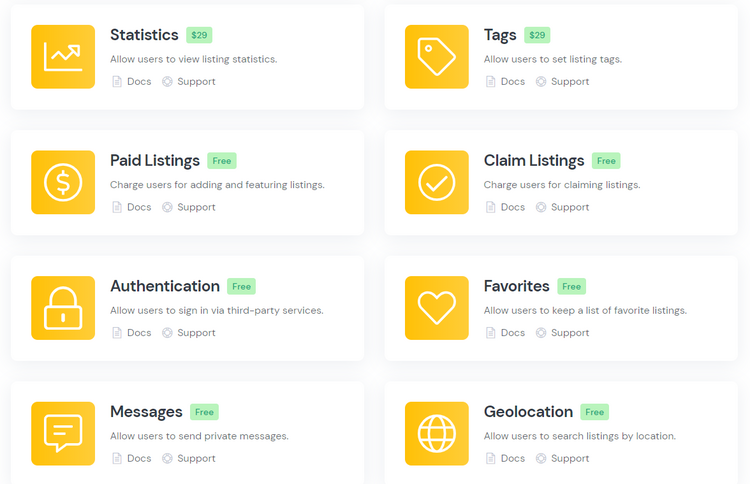
Your next step is to extend the functionality of your freelance platform. There is a bunch of TaskHive add-ons that you can install directly from your WordPress dashboard in the WP Dashboard > HivePress > Extensions section. Let’s take a look at some of them.
As you may notice, TaskHive is not limited to its core features, and there are many different options to extend your micro-jobs marketplace’s functionality. You can browse over the full list of extensions and install those that you find useful for your marketplace of services.
If you want to create a website like Fiverr with WordPress, you are probably interested in making money with it as well. With TaskHive, you can monetize your service marketplace in two completely different ways. The monetization model you choose heavily depends on your niche and the type of freelancers and clients you are dealing with.
Both ways of monetization are available as HivePress extensions and included with TaskHive, so you can quickly implement the monetization model of your choice or even both of them at once.
Additionally, once you start getting some traffic to your website, you can consider monetizing it by hosting ads. For example, you can allow banners, text and video ads to be placed at specific positions on your website. You may also integrate your marketplace with Google AdSense, which will be able to identify the most relevant high-quality ads for your website and automatically place them there.
That’s all! Building and running a micro-jobs marketplace like Fiverr is not an easy deal, but it’s worth its salt since you can turn it into a profitable business and monetize it in several different ways. Take advantage of this unique niche to create an additional income stream or launch your first online business.
So if you want to create a website like Fiverr with WordPress, you may want to consider the TaskHive theme along with the HivePress plugin. They are both lightweight, easy to use and packed with tons of useful features that are regularly updated and improved. You can check the detailed overview of the TaskHive theme to get a better idea of its features.
Additionally, you can check some of our other articles:
Create a searchable database with WordPress for free.

Build your own classified ads website without a single line of code.

Learn how to create a fully-featured freelance platform with WordPress.