
How to Create a Doctor Directory with WordPress
Launch your own appointment booking platform using WordPress.
Create your own directory website with WordPress in a few simple steps.

Nowadays, millions of people around the world are devoting their time to building and developing their own projects on the internet, and many of them create their own websites. Moreover, thanks to the rapid growth of the peer-to-peer economy – directory websites have gone viral due to their versatility.
In this walkthrough, we’ll explain how to create a WordPress directory website, set it up and successfully monetize it. However, before we move to the tutorial part of this article, we’d like to explain in detail what exactly a directory website is, how it works, what types of directory listing websites are there and so on.
To be more precise, we’ll cover the following topics:
Simply put, a directory website is a searchable catalog of different items like companies, events, real estate properties, classified ads, and so on. The main purpose of such websites is to help people find services, properties, places, etc., that they are looking for.
For example, Tripadvisor, Yelp, and Foursquare are some of the most popular directory websites you might have heard of. However, there are millions of other niche or local business directories around the internet. Such websites are extremely popular since they allow you easily find a restaurant in your area, check out upcoming concerts or simply contact a plumber if you have a leaky faucet.
When building a directory website, you are not limited to one or two types. Instead, there’s a variety of different niches, and you can choose any of them. For example, you can launch one of the following websites:
To get a better idea of the available directory types, feel free to check our post on WordPress directory niches.
Before moving to the tutorial part of this article, make sure that you have the following prerequisites:
Before moving to the tutorial part of this article, make sure that you have the following prerequisites:
We recommend using the HivePress directory plugin. It’s already packed with all the necessary features for building a directory website and is trusted by 10,000++ website owners worldwide. Also, combine it with ListingHive, the most popular free WordPress theme in the WordPress.org repository.
Okay, now we can move on and try to create a directory website with WordPress.
In the next 7 steps, we’ll show you how to create a directory website using WordPress and the ListingHive theme along with the HivePress plugin.
Since ListingHive is a free theme, it’s available in the WordPress repository, and you can install it directly from your WP Dashboard by going to the Appearance > Themes > Add New section. Then, use the search box to find it and proceed by installing and activating the theme.
Please check out the screencast below if you are having trouble installing ListingHive.
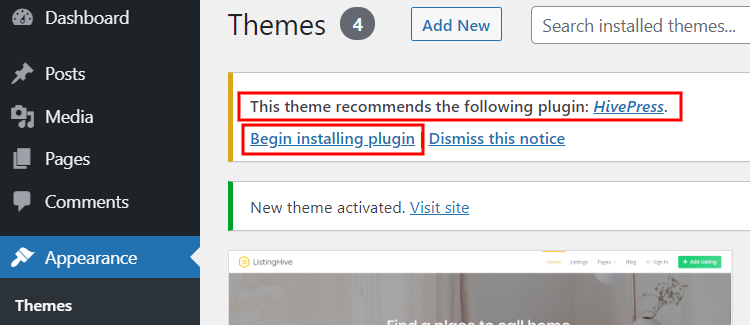
After the ListingHive installation, you’ll get a suggestion to install HivePress. It’s crucial to install and activate it since HivePress will power most of the directory features on your website. So simply click on the recommended link and install HivePress.
While HivePress offers the core functionality for building a directory website, you may want to install some extensions depending on the type of directory website you wish to build.
There are 15+ HivePress extensions that are fully optimized to work hand in hand with the ListingHive theme, so you can install any of them by going to the WP Dashboard > HivePress > Extensions section.
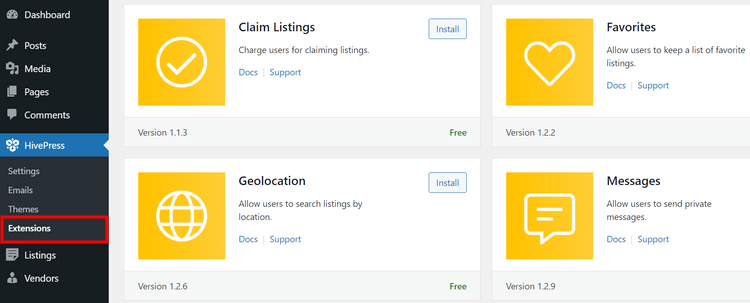
If you want to create a sought-after directory website, you should take care of the user experience and find ways to make it better by providing all the possible features. For example, you may consider installing the following add-ons:
There are many other different extensions that can help your directory website stand out from the crowd. Just keep in mind that there’s always room for improvement, and there are many opportunities to deliver a better experience to your website visitors.
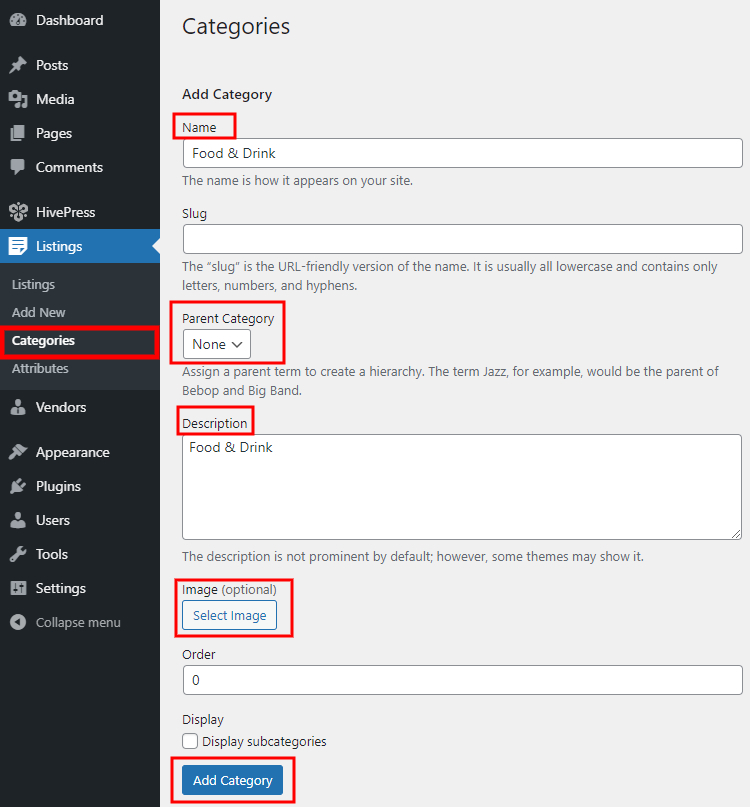
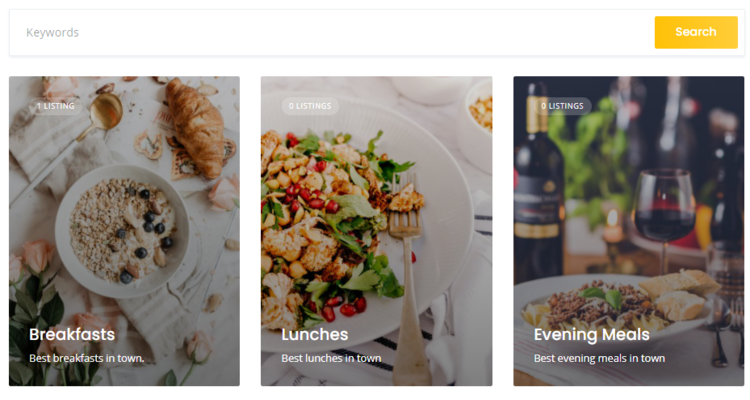
The next step is to split your WordPress directory website into different listing categories to make your site easier to navigate. Since ListingHive goes without any predetermined categories, you can create custom ones in the WP Dashboard > Listings > Categories section.
First of all, name your category and describe it if necessary. Then there’s an option to upload the category image. Also, you can build a hierarchy of categories by setting a parent category. It may be helpful if you want to have subcategories and make your directory more specific.
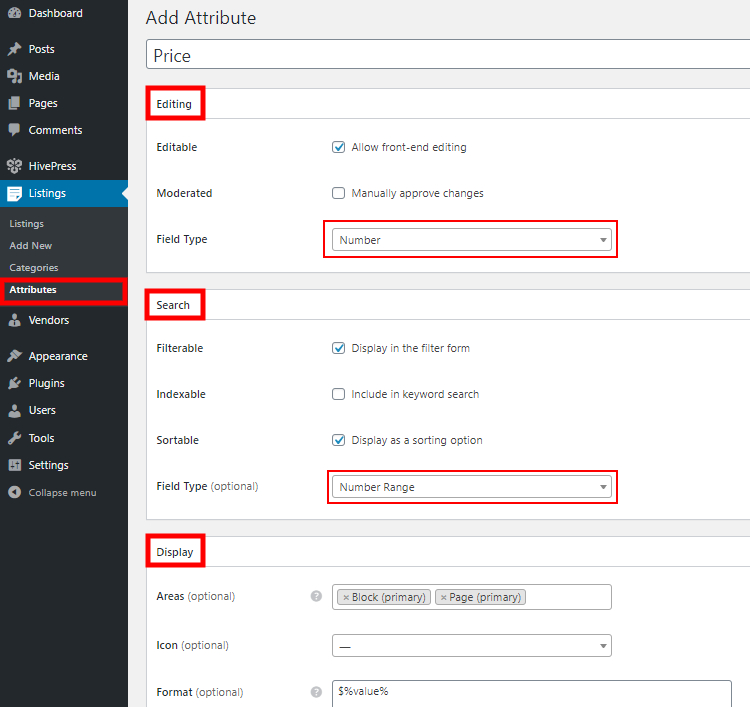
Once you are done with categories, you can go ahead and create custom listing fields. Thanks to the HivePress plugin, you can create custom listing fields and search filters for various uses. Simply navigate to the WP Dashboard > Listings > Attributes > Add New section to create your first custom field.
Keep in mind that each custom field can be customized in several different contexts, so let’s briefly cover each of them on the example of a “Price” custom field:
$%value%.Once you set up your custom field, simply click on the Publish button.
Now you can create a front page for your WordPress directory website. Since the ListingHive theme is compatible with the Gutenberg page builder, creating a stunning layout won’t be an issue because you can use blocks. To create a new page, go to the WP Dashboard > Pages > Add New section.
Firstly, enter the page title, e.g., “Homepage”. Then you can start adding layout blocks by clicking on the ➕ sign and selecting a block you want to add. For example, you can add the Listing Search form, Categories block, Recent Listings block and so on.
Once you are done with layout blocks, click on the Publish button.
If you want to use this page as a homepage of your directory website, navigate to the WP Dashboard > Settings > Reading section and select your newly created page from the drop-down list.
At this point, we recommend going through all the HivePress settings in the WP Dashboard > HivePress > Settings section to ensure your site works in the way you want.
Also, navigate to the WP Dashboard > Appearance > Customize section and go through the appearance settings, such as primary and secondary colors, heading and body fonts, logo, and background images, etc., to customize the look and feel of your site. If you want to create a directory website that drives traffic, then the nice appearance of your website is a must.
Congrats, you’ve reached the last step of our tutorial. Finally, we’d like to show you the whole workflow of adding new listings to your WordPress directory. With ListingHive, you can do this both via the front-end as a user and via the back-end as an admin, so we’ll briefly cover both ways:
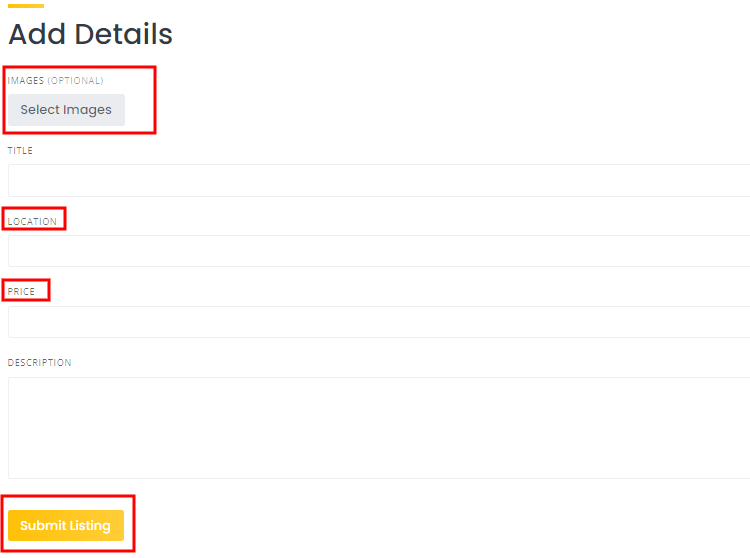
To add a new listing, users have to navigate to your website, click on the Add Listing button and select one of the categories. After that, they’ll be taken to the listing submission form, where they need to fill out all the details like title, description, add images, etc.
Keep in mind that as a website owner, you can customize the listing submission form by adding or removing any fields. For example, if you added the “Price” field in the 4th step of this guide, it will appear in the listing submission form, and users will have to fill it out.
Once a user clicks on the Submit Listing button, the site admin has to approve it in the WP Dashboard > Listings section and only after that, a new listing will appear on your directory website.
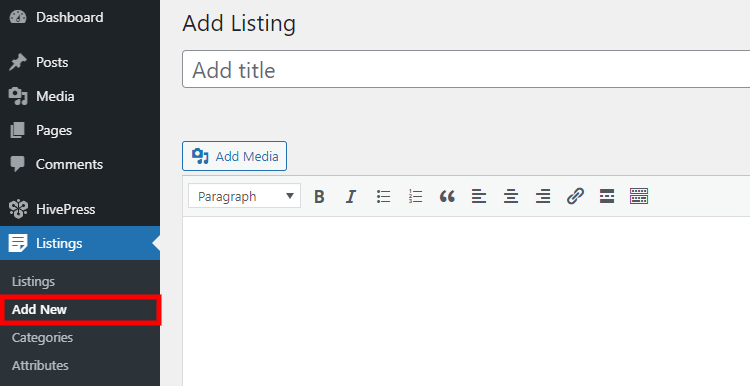
If you don’t want to allow users to submit listings, you can disable the Listing Submission feature in the WP Dashboard > HivePress > Settings > Listings section. Then, only website admins will be able to add new listings in the WP Dashboard > Listings > Add New section.
This section is optional since not everyone uses their site to make money. However, if you want to turn your directory website into a profitable business, this chapter may be useful for you.
In the beginning, we mentioned different monetization models for directory websites, but now we’d like to briefly explain how those models can be applied to HivePress-powered directories:
So, once your directory website starts getting some decent traffic, you can start monetizing it, using any of the mentioned models or several at once.
Now you might be thinking, how to get traffic to my new website? We prepared some advice on that matter, so let’s move on to the next section.
In order to bring traffic to your website and entice new visitors, you have to promote it in a proper way. Keep in mind that you have to attract two types of users: those looking for listings and those looking to list something. That’s why you should think about what works for both audiences when creating your marketing plan. Here are some common tips on promoting your WordPress directory website:
You can’t go wrong if you launch a blog on your directory website and start delivering great content to your website visitors. You can write tutorials, overviews, lists, interviews, and so on. It all depends on the niche and the audience that you want to attract.
If you lack ideas for your blog, check out what people are searching for, what questions they ask, what problems they face in your industry. For example, you can use the Google Keyword Planner to get a better understanding of the most popular searches in your niche.
Also, you can try using Soovle, which is an absolutely incredible tool. It unites the autocomplete suggestions from all the major providers like Google, YouTube and Yahoo in one place. Just type a word from your niche, and it will show you dozens of suggestions (some of them can be great topics for your future posts).
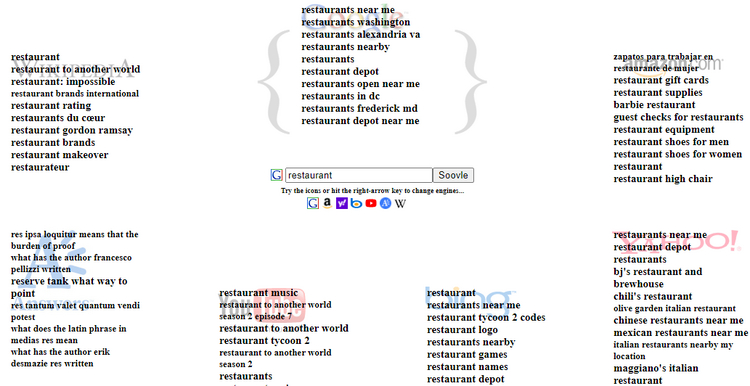
Additionally, there’s an excellent tool called AnswerThePublic that shows you the most popular questions with provided words or a phrase. For example, if you type “restaurant”, it’ll show 80+ questions that people ask about restaurants, and you can answer those questions in your blog posts.

One more way of attracting website visitors to your directory is by running an advertisement campaign. If you are not selling anything yet, you can run promotional campaigns to get lots of traffic. If you have a budget to run ads, it may be a highly effective way to promote your newly-created website.
It’s often an undervalued way of attracting new customers that may be effective for many niches. You can start making short videos about your products or some kind of overviews, etc. If your channel brings value to users, you can rest assured that sooner or later, it will drive some decent traffic to your directory website.
There are many other ways of promoting your website, like partnerships, affiliates, Facebook ads. However, you can start with the above-mentioned ones and complement them later with new ideas.
Finally, after you create a directory website, you should take care of the user experience. You can find dozens of ideas for improving UX on your website, but we’ll give you two recommendations to start with:
That’s it! It often seems impossible until it’s done, isn’t it? We hope it was a helpful article, and some of the tips outlined above will help get your site up and running.
Bear in mind that you can easily create a directory website with WordPress, using the ListingHive theme and the HivePress plugin. They are both free, easy-to-use, and allow you to build directory websites for any niche.
You can take a look at the ListingHive demo to decide whether it’s suitable for your next directory website. Also, feel free to check a detailed ListingHive overview to get a better idea of the available features.
Launch your own appointment booking platform using WordPress.

An easy guide on how to start a WordPress salon directory website.

A quick guide on adding Google & Facebook login buttons to HivePress-built websites.